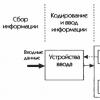
Hard drives: something you didn't even know existed. Disabling parking on HDD Seagate Do I need to disable head parking in wd
Some models of Seagate hard drives are distinguished by the fact that they have an inadequately low waiting time before switching to power saving mode, in which the read heads go into a parked state. This transition is accompanied by a characteristic crackling-whistle-creaking sound, and in the case where the hard drive is not a system drive, this can happen every few minutes. Needless to say that, in addition to the risk of failure from excessively frequent parking, it is also simply annoying with its chirping sound?
It is not particularly surprising that Seagate specialists do not want to provide users of their products with any way to permanently disable auto parking on many models of their hard drives. We have to reinvent the wheel again.
You can verify that there is a problem by the rapidly increasing value of the parameter Load/Unload Cycle Count in the S.M.A.R.T of such a drive. If the value of this parameter is hundreds or thousands of times different from the parameter Start/Stop Count, then obviously your hard drive is susceptible to this problem.
To forcibly disable parking in a system running Windows OS, we will use a ported version of the Linux utility hdparm and the standard Windows scheduler.
You can download the hdparm assembly for Windows in our archive.
First, you need to find out what the dissected disk is called in Linux terminology. Launch the command line ( cmd.exe) with administrator rights and call through it hdparm.exe -i /dev/sdX:
C:\>"c:\Program Files (x86)\Tools\hdparm\hdparm.exe" -i /dev/sda /dev/sda: Model= ST1000DM003-1CH162, FwRev=CC49, SerialNo= S1D85MBP Config=( HardSect NotMFM HdSw>15uSec Fixed DTR>10Mbs RotSpdTol>.5% ) RawCHS=16383/16/63, TrkSize=0, SectSize=0, ECCbytes=4 BuffType=unknown, BuffSize =0kB, MaxMultSect=16, MultSect=off CurCHS=16383/16/63, CurSects=16514064, LBA=yes, LBAsects=268435455
So, in our case, the Seagate drive is designated by /dev/sda. If he were second in the system, then his designation would be /dev/sdb, if third – /dev/sdc, etc.
Now open the Task Scheduler ( taskschd.msc) and create a new task. On the first page, indicate an arbitrary name for the task, select a user SYSTEM and indicate that the task must be executed with maximum access rights:
On the triggers tab, create a trigger to perform a task when the system boots: 
In addition, we will need to create another trigger to perform a task when the computer wakes up from sleep, because Disabling parking will also fail when the computer goes into sleep or hibernation: 
Then go to the actions tab and add a launch hdparm.exe with key -B 255 /dev/sda which will disable parking on the sda drive: 
This completes the setup - save the created task and manually launch it from the scheduler task library to check it. Then click on F5 to update the library - if everything went well, then in the column with the result of the last launch of our task the code “0x0” will be indicated.
Now we can open any disk health monitoring utility - for example, CrystalDisk Info - and make sure that APM is disabled on the selected hard drive. This task will run every time the computer is turned on or wakes up from sleep mode, and thereby keeps auto parking disabled.
PS: We take this opportunity to say hello to the Seagate firmware writers. May you all have hiccups there.
In particular, about the possibility of using 2.5-inch compact disks in desktop systems, where “adult” 3.5-inch disks are almost always used.
For many years, my previous system had 2 Western Digital hard drives, to be more precise, WD Caviar Blue (WD5000AAKS) and WD Caviar Green (WD5000AADS) - both 500 GB. For the system I used OCZ Agility 3 with 60 GB, while HDDs were used for storing files.
The main problem with large 3.5-inch drives is the noise level. Perhaps this is one of the few problems that is most difficult to deal with. The thing is that the disks create low-frequency vibration, which is transmitted to the case itself. And this despite the fact that AAM (Automatic Acoustic Management) was active on the older WD Blue model.
Just below you can see the performance level of Caviar Blue and Caviar Green respectively, measured using CrystalDiskMark 5.2.1.

As you can see, the maximum read and write speed does not exceed 100 MB/sec. By the standards of the years when both discs were released (7-8 years ago), the figure is quite good.
At first glance, it may even seem that Green is faster than Blue, but don’t let the test result fool you, let’s take a look at the results obtained in Victoria and HD Tune.


As you can see, Caviar Blue provides faster access and IOPS performance. Well, okay, not about that now.
When assembling the new system, it was decided to abandon two old 3.5-inch 500 GB drives in favor of one 1 TB 2.5-inch form factor.
After several days of searching for the best option, I settled on the Hitachi (HGST) Travelstar 7K1000 1TB 7200rpm 32MB drive. But that’s not a problem, the disk is offered in two versions: HTS721010A9E630_0J22423 and HTE721010A9E630_0J30573.
At the time of purchase, sellers were asking 1,599 UAH ($60.84) for HTS721010A9E630_0J22423, and 1,915 UAH ($72.87) for HTE721010A9E630_0J30573.
In fact, both disks are absolutely identical in terms of design; the differences lie in the settings of the disk itself, namely in the settings. The first model belongs to the “Standard Models”, the second – to the “Enhanced Availability Models”, i.e. with improved access.
Just take a look at the comparison table.


For the standard model, “Power on Hours (POH) Per Month” is not specified, while for the improved model 730 hours are indicated, which means the possibility of round-the-clock operation. For those who have questions: 365 days a year of 24 hours equals 8760 hours. When divided by 12 months, the average is 730 hours per month. Actually, just below for the improved model in the “Availability (hrs/day x days/wk)” parameter it is indicated – 24x7 (24 hours a day, 7 days a week).
The standard model can operate in Low Power mode, which consumes an average of only 0.8 W (Idle) when idle and 1 W (Active Idle) when active. For the older model, power consumption is constant at 1.8 W.
Only one parameter is responsible for all these differences - APM (Advanced Power Management). APM should not be confused with AAM (Automatic Acoustic Management), because the latter actually controls acoustic noise by changing the speed of movement of the head. The user can choose between silence and performance. Please note that AAM does not affect the disk rotation speed, therefore the linear read/write speed remains almost unchanged, only the random access time changes, although against the background of such optimizations as NCQ, the difference in speed is not as noticeable as the change in noise level.

In the case of APM (Advanced Power Management), the drive manages power consumption by stopping the engine and parking the heads (Standby mode). Firstly, stopping the engine means that there will be a delay when accessing the disk due to the need to spin up the disks. Secondly, the disk cannot park indefinitely, and the process itself leads to gradual wear of the disk. Some manufacturers claim 300 thousand parking spaces for their disks, some 600 thousand, some even more. Drives from most manufacturers are parked quite rarely (several times per hour), while others like the Travelstar 7K1000 can be parked more than 500 thousand times in a year and a half of operation (less than 1 thousand per day / approximately 500-800 depending on conditions and operating time ). As a result, according to S.M.A.R.T. such a disk will quickly change its status to “Bad”.
So, in the standard version of the disk, APM has a value of 128, in the improved version it is 254 (disabled). You should naturally have a question: how does parking heads save electricity and battery life? The fact is that the opposite end of the head is equipped with a coil. When the correct power is applied to the coil, it generates an electromagnetic field that allows it to move between two powerful permanent magnets (while moving the opposite end).
Interestingly, the APM value can be changed independently. When used on laptops, it is not recommended to completely disable parking, because a laptop is a portable computer, and one of the features of APM is head parking, which in turn protects the disk surface from damage when moving the laptop (shaking, strong vibrations, shocks, acceleration). In the case of a stationary PC, parking can be disabled during operation, or the value can be set to 250-253. You should not be afraid that the disk will stop parking at all; when disconnected, as before, the heads will be parked in a safe zone.
Disable head parking when idle
Personally, I, like thousands of other people, decided to extend the service life of the disk and not overpay $12. for the version with APM disabled.
From the factory, HTS721010A9E630_0J22423 comes with APM=128. The APM value ranges from 1 to 254. When set below 128, the drive will be allowed to stop the spindle (motor). For some drives, shutdown is performed at APM=0 (0x00), but in the case of the Travelstar 7K1000 there is no such option.
So what do we need?
- Hitachi Feature Tools
- HP USB Disk Storage Format Tool
- MSDOS
flash drive (USB);
Do not rush to download Hitachi Feature Tools from the official HGST website, it contains the old version of FT 2.15 without support for new disks.
Instead, you need to download Hitachi Feature Tools v2.17b2, which supports the new Travelstar 5K500.B, 7K500, 5K750, 7K750, 5K1000, Z5K320, Z7K320, Z5K500, Z7K500 and our 7K1000 drives.
(downloads: 1228)
First of all we install HP USB Disk Storage Format Tool from folder 1_HP_USB_Disk_Storage_Format_Tool. For Windows 7 and higher, you must run the HPUSBFW utility with administrator rights.

In the utility menu, select your flash drive (Device drop-down menu), you must specify FAT32 as the File system, the Volume label can be anything, it doesn’t matter.
Next, for quick formatting, check the option “ QuickFormat", just below we also activate " CreateaDOSstartupdisk"(create a boot disk with DOS) and switch the radio box to the item " usingDOSsystemfileslocatedat", for which we indicate the path to the 2_MSDOS folder from the archive. Click Start, after which you need to confirm formatting the disk (all data on the disk will be destroyed).


We wait for the procedure to complete, after which we copy all the files from the folder to the root of the drive 3_FT217b2. If you have hidden system files, the drive will appear as empty, but when you copy files you will be prompted to replace the files (replace files).

The process of creating a bootable USB flash drive is complete. Now you need to boot from it; this is done differently on each system. On some systems, to boot from disk you need to change parameters in the BIOS (often F2, Delete, F12), on others there is a special menu (often F12).
On startup Hitachi Feature Tools You will need to press any key several times. The system will warn you that this version of HFT is unofficial and is based on the official version of Hitachi Feature Tools 2.16 M2, released in 2011. You will also receive a warning that FT217b2 is intended solely for changing the APM parameter in new Travelstar drives (5K500.B, 7K500, 5K750, 7K750, 5K1000, Z5K320, Z7K320, Z5K500, Z7K500), and is not intended for changing other parameters or changing parameters in other models not listed.
As always, everything is provided “as is”, i.e. You use the program at your own risk, neither the developers nor I are responsible for possible consequences, including data loss and/or hard drive failure. Before changing parameters, be sure to copy the data (make a backup).

After selecting a disk from the list, you need to go to the top menu “Features” and select “Change Advanced Power Mode”, or press the combination Alt + P. In the menu that appears, configure the APM parameter according to your preferences.

Personally, I set the value to 254. Changes are made to the disk firmware, so reinstalling the OS or using it on a different hardware platform does not in any way affect the set parameter. This means that the parameter for the disk needs to be changed only once, for example, immediately after purchase. If the disk is not detected by the program, then your PC is based on incompatible Intel ICH9M system logic, or you need to switch SATA from AHCI to Native IDE mode. Discs installed in an external pocket will also not be detected.

And finally, the new small disk is absolutely not inferior in speed to the previous full-size disks. Good luck with your upgrades!
P.S. Additionally, in the Windows power plan settings, you can prohibit turning off the disk (“turn off the disk when idle” – 0/no).
Modern WD desktop drives have technology that parks the disk head block when idle. Everything would be fine, but the downtime on some drives is only a few seconds, and in the end it turns out that they park very often. The manufacturer claims that the discs can withstand from 300 to 600 thousand parking lots without problems (depending on the model), but this number adds up very quickly!
First, I’ll tell you a little why they came up with parking the head block when idle. This is done to reduce wear on heads, plates and reduce energy consumption. The heads hanging above the plates create additional aerodynamic drag, because The discs rotate at a fairly high speed, then the air in the can is drawn into rotation along with them, and the head block slows down these air flows. The resulting chaotic “gusts of wind” in turn create additional resistance for the rotation of the plates and energy consumption increases, which increases the temperature, which is harmful to the heads. As an example, I will say that for a 3.5-inch disk with a rotation speed of 7200 rpm, the linear speed of the edges of the plates is approximately 120 km/h, and at such speeds the air is already quite tangible, as you can personally verify by sticking your hand out of the machine. :) But this educational program should not bother you. Frequent parking will cause your drive to die much earlier than all the phenomena described.
Some people say that this problem is specific only to Linux. However, on Windows with the WD2001FASS disk, I accumulated about 20 thousand parking lots in a week, I’m afraid it would definitely die from this in a year. Although this usually affects green series models. For those who are afraid, I can say that the utility can show what is considered the current idle time before parking the heads. For example, I had 12.8 seconds! True, don’t forget one thing, but if, say, bad blocks appear sometime in the future and you have to bring the disk under warranty, run the utility again and return the original values, because If they notice a changed time, your warranty will be voided. :)
So we need:
Switch the disk operating mode to IDE in the BIOS if you have AHCI installed. Some laptops cannot be set to IDE, so the drive must be removed and connected to a desktop computer.
AIDA64 (Everest)- iron monitoring program, in this case we will be interested in S.M.A.R.T data, namely the parameter 193 Load/Unload Cycle count - number of head parkings, if this parameter is several times greater (or tens of times) than 12 Power Cycle Count - the number of disk power-off cycles (can be considered the number of times the computer is turned on if the disk was installed in it initially). This is our case!
Bootable USB flash drive with DOS- everything is written there how to do it. The utility works under DOS...
Actually, the utility itself is version 1.05, the utility was created for a very limited set of disks on which this problem first appeared, but it works with all WD disks.
So we made a bootable flash drive and unpacked it from the WDIdle3 archive and copied it onto a flash drive. During this operation, I disconnected all other drives and, of course, made a backup of the data! We boot from it and start entering into the command line:
wdidle3 /r - information about the current settings of the head parking timer, if the value is read from your disk, then a new one will be written, which is logical, just in case, write down the original value for returning the disk under warranty or inadequate response of the disk.
wdidle3 /d - stop the timer, this setting completely disables head parking during operation (which is what I did for myself)
wdidle3/s50 - sets the timer for 50 seconds. When setting the timer from 8 to 12.7 seconds, you can set it with an accuracy of 0.1 second. When set from 12.8 to 30 seconds, the timer is always set to 30 seconds. Values from 31 to 300 seconds are set with an accuracy of 30 seconds.
wdidle3 /? - help on using the utility
After changing the parameters, you need to dial again wdidle3 /r to make sure that the new value is registered. It is written that the work can take a long time, changing the parameter took about a second for me... Well, as they traditionally write in such articles, you do everything that is written at your own peril and risk.
Questions on the topic: “Will this work on my disk?” not accepted. Make sure that you have a Western Digital drive, look at the two smart parameters above and use the utility itself to see how long your head parking timer is set.
P.S. In some cases, there are incomprehensible disk glitches when the time is changed upward or the parking is completely disabled. I recommend that you first try to disable it completely and if the disk works normally, then leave it that way. If the disk behaves “incomprehensibly” - constant head parking or “blue screens” - increase the parking time. Considering the 32 thousand views and 8 pages of comments on this article (at the time of writing this sentence), one person started experiencing blue screens after changing the parking time. Some disks do not respond quite adequately to time changes. But the change in parking time did not lead to irreversible fatal consequences for anyone.
The problem was the following: In the game (in the game Smite), there were periodic lags (about once every 15 seconds), freezing for literally half a second, a second of lag. According to reviews, the same lags are observed in many games, such as Call of Duty, Call of Duty ww2, Battlefield 1, Battlefield 3, Battlefield 4 and many others.
Usually they advise checking the Internet, lowering the graphics settings, disabling the antivirus, this of course can all help, but if this does not help and you have an ultra good computer, which obviously, according to the system requirements, should easily run the game, then here is the solution.
The problem is this: hard drives have a technology called head parking, which retracts the read head of the drive into a safe area to avoid creating turbulence over the drive when idle and to reduce wear on the drive.
But sometimes the disk is “idle” for only a few seconds, for example, while you are running in a game through an area that has already loaded and does not require requesting information from the hard drive, but as soon as you enter a new area that is not loaded into RAM, the computer requires information and it accesses the hard drive. And right at this moment, if your head has already gone to the safe zone, it should return from there, which takes about half a second, which is why the lag occurs.
Solution to the problem:
1. If you have another hard drive, try moving the game to it.
But if not, or if you have everything on a Western Digital (WD) disk, as I did, then move on to the second point.
2. And so, you have Western Digital (WD) (be sure to make sure of this)
— First of all, what you need to do is go into the BIOS and change the disk operating mode from AHCI to IDE.
- Watch S.M.A.R.T. your hard drive, any program that can do this, for example, AIDA64, Everest, Victoria, etc. We are interested in parameter 193 Load/Unload Cycle count, it shows the number of head parking times. We compare the number opposite this parameter with the number opposite parameter 12 Power Cycle Count (number of power-off cycles). If the values differ by tens or hundreds of times, then this is our case!
— We will need a utility to make a bootable USB flash drive, such as HP USB Disk Storage Tool and MS-DOS
— Next, download the WDIdle3 program.
- Next: we make a bootable DOS flash drive, unpack the archive with our program there, reboot the computer, boot from the flash drive by pressing the F8 key, when the computer restarts, we will have a command line for working with hard drives.
- In this line we enter the following commands.
- First of all, the wdidle3 /r command will show the current timer value in seconds. Those. After how long of inactivity the head parks. That's where it usually costs 12.8 - 15 seconds. Those 15 seconds after which you observed lags!
— To completely disable head parking, enter the command wdidle3 /d.
— To set any value, we need the command wdidle3 / s50, where s50 is the number responsible for the number of seconds after which the head will park.
Remember here that values from 8 to 12.7 seconds can be set with an accuracy of 0.1 s. Values from 12.8 to 30 the timer is set only to 30. Values from 30 to 300 - with an accuracy of 30 s. The maximum value is 300. Press enter.
— Check if the value of wdidle3 /r is set
— We exit, reboot, check the game, there should be no lags! Hooray!
PS: It happens that after these manipulations, frequent blue screen crashes and similar unstable operation appear on the computer. I recommend that you first completely remove the head parking, check in the game, if the lags are gone, then leave it like that and forget, nothing will happen to the disk, but if you really want to set some value, set it to 300, check, if there are no crashes, leave it and enjoy the game!
If you still experience crashes, experiment with the values and select the one you need.
I also want to note that there are no criminal or fatal consequences in this, it has been proven from personal experience!
This thing is interesting: a hard drive, a real miracle of technology. In the article I show only one technical feature of this device, and there are too many of them to count. Yes, hard drives will go out of use with the development of SSDs, but this will happen only later.
The hard drive head parking mechanism is as follows. The hard drive has read heads that move along the surface of rotating plates (called magnetic plates). In this case, the heads do not touch the pancakes, despite the fact that there are no rigid clamps for them. They are positioned and held in position by the interaction of the magnetic fields of a moving coil.
Now let’s simulate the situation: you turn off the computer or the lights go out. The magnetic field disappears, the heads fall straight onto the pancakes; and the rotation speed of the pancakes is 5400-15000 rpm. And, despite the smoothness of the heads, they begin to scratch the tracks, damaging the hard drive.
Badly? Not that word. The manufacturer urgently needed to look for a way out, and he found it! When the power is turned off, the spindle motor rotates by inertia for some time. What if you put it in generator mode? No sooner said than done. This made it possible to provide power to the electronics board for the time necessary for the correct completion of the work. This power is also supplied to the head drive windings, pushing them towards the center of the disk. Having reached the parking area, the head drive is latched with a magnetic lock even before the heads have time to touch the surface of the disk.
But even this was not enough for the producers! They came to the conclusion that if a conventional parametric current stabilizer is installed between the generator/spindle and the head positioning coil, then it will be possible to regulate the electromagnetic force and, accordingly, the head parking time. All that remains is to write a service manual and place it on disk.
This is the essence of auto parking - any serviceable drive will always park the heads, no matter how suddenly the power is turned off. However, if a write was in progress at this moment, the consequences could be dire due to unwritten data or file system control structures. chkdsk comes to the rescue.
But when the power is turned on, the disks spin up to the required speed, after which the heads “fly” from the platform to the surface of the pancakes, which are spinning at a high enough speed to prevent the heads from touching themselves.
Now why all this demagoguery? In laptops, there is sometimes a problem when the hard drive beeps every 10-20 seconds. click. The click is nothing more than the parking of the hard drive heads.
Based on other Internet resources, an advanced user decides that frequent parking leads to wear on the mechanics of the hard drive heads. It's right. And then he does the action for which he then has to pay with money. He disables parking using the manufacturer’s service programs. As a result, the hard drive slowly crumbles in less than a year. The user thinks that the clicking sounds were due to a hard drive failure, and so he died a year later. Buys the next one. And in a cycle.
Looking for a solution to this problem in the OS itself, which you put; Getting into the internal contents of the hard drive controller is contraindicated.