Installing windows 7 on ocz ssd. Setting up an SSD drive in Windows to optimize performance. Let's move on to disabling hibernation
Many have already appreciated the performance of SSD solid-state drives - perhaps this is one of the most desirable and effective computer upgrades that can seriously improve performance. In all parameters related to speed, SSDs outperform conventional hard drives. However, when it comes to reliability, not everything is so simple: on the one hand, they are not afraid of shocks, on the other, they have a limited number of rewrite cycles and a different operating principle. The latter must be taken into account when setting up Windows to work with an SSD drive. Now let's move on to specifics.
First of all, solid state SSD drives do not need to be defragmented; defragmentation will not bring any benefit, but harm is possible. I already wrote about this in.
All recent versions of Windows "know" about this and automatic defragmentation, which is enabled by default in the OS for hard drives, is usually not enabled for solid-state drives. However, it is better to check this point.

Press the Windows logo key and the R key on your keyboard, and then in the Run window, type dfrgui and click OK.

A window with automatic disk optimization settings will open. Select your SSD (the “Media Type” field will indicate “Solid State Drive”) and pay attention to the “Schedule Optimization” item. For SSD, you should disable it.
Disable file indexing on SSD
The next point that can help optimize an SSD is to disable indexing of the contents of files on it (which is used to quickly find the files you need). Indexing continually produces write operations, which can potentially shorten the life of the SSD.
To disable, make the following settings:
- Go to “My Computer” or “File Explorer”
- Right-click on the SSD drive and select "Properties".
- Uncheck "Allow the contents of files on this drive to be indexed in addition to file properties."

Despite indexing being disabled, searching through files on the SSD will occur at almost the same speed as before. (It is also possible to continue indexing, but move the index itself to another disk, but I will write about this another time).
Enable write caching
Enabling disk write caching can improve the performance of both HDD and SSD drives. At the same time, when this function is enabled, NCQ technology is used for writing and reading, which allows you to more “intelligently” process requests received from programs. ().

To enable caching, go to Windows Device Manager (Win + R and enter devmgmt.msc), open “Disk devices”, right-click on SSD - “Properties”. You can enable caching on the “Policies” tab.
Pagefile and hibernation
The Windows paging file (virtual memory) is used when there is insufficient RAM. However, in fact it is always used when it is turned on. Hibernation file - saves all data from RAM to disk for subsequent quick return to a working state.
To maximize the life of an SSD, it is recommended to minimize the number of writes to it, and if you disable or reduce the page file, as well as disable the hibernation file, this will also reduce them. However, I will not directly recommend doing this; I can advise you to read two articles about these files (they also indicate how to disable them) and make your own decision (disabling these files is not always good):
- (what is how to reduce, increase, delete)
Perhaps you have something to add on the topic of tuning SSDs for optimal performance?
When the entire Internet is full of holiwars on the topic “SSDs are unreliable” and “SSDs are so fast that I will never work with HDDs again,” I think it’s time to bring a little clarity to the sea of contradictory information about SSDs themselves and about setting up Windows to work with them .
If anyone is interested, please see cat.
So I became the proud owner of this miracle of modern technology: OCZ Vertex 3 120 Gb. First, I booted into the old system and updated the SSD firmware, because... The OCZ firmware program does not allow updating the firmware when the disk is a system one. I think updating the firmware is the first thing you need to do after purchasing an SSD, because... As practice shows, there are plenty of errors in firmware, especially in new SSD models (compared to which Vertex 3 is not the newest :)).
Next, I decided to install a clean system on the SSD. Installing Windows 7 from a flash drive (USB 2.0) took about 10 minutes. Wow, I thought, before, installing some heavy programs took much longer, not to mention the operating system!
From that moment on, I could just start using a super fast drive and enjoy life, but I couldn’t shake the paranoid feeling that my SSD would quickly break due to frequent overwrites. Indeed, the limited number of SSD rewrite cycles is not yet a myth. But everyone already knows that even a resource of 10,000 rewrites is very, very much with a disk capacity of 120 Gb. Depending on the controller, the SSD can also use various internal technologies for wear leveling, relocation of data from one place to another, compression of recorded data (relevant for SandForce controllers) - the disk tries its best to work quickly and for a long time :) How to influence this internal logic is almost impossible (except by updating the firmware), so when choosing an SSD for some special tasks, you need to look for information on the logic of its controller.
For those who take special care of the disk and protect it, there is a lot of advice on the Internet on how to reduce the write load on the disk from the operating system. These tips can be divided into useful, harmful and controversial.
1) Transferring the directory for temporary files to a regular (HDD) disk
The paths to the TEMP directories are here:Computer – Properties – Advanced system settings – Advanced tab – Environment variables – TMP and TEMP (for the current user and general).
Some people advise transferring Temp to RAMDisk, but this is rather bad advice. This is due to the fact that some programs (including updates) write data to a temporary directory, then reboot the computer, and then expect that the data has not disappeared during this time. And the RAMDisk is cleared by default upon reboot. But even if your RAMDisk supports saving data to an image and restoring it after a reboot, this is also not a panacea, because... It is possible that the RAMDisk service simply does not have time to start and initialize by the time programs start accessing the temporary directory.
2) Disable hibernation
This is quite strange advice. On the one hand, disabling hibernation allows us to get rid of the hiberfil.sys file, the size of which is equal to the amount of RAM, and space on the SSD is especially valuable to us. Also, with each hibernation, a relatively large amount of data is written to the SSD, which “leads to wear and tear and blah blah blah blah”... Apologists for this advice write that “why do you need hibernation, because with an SSD the system already starts in a few seconds.” But personally, I need hibernation not for the sake of a quick start, but so as not to close (and then re-open) a damn bunch of applications that I constantly use, so the advisability of disabling hibernation is a big question.I would love to move the hiberfil.sys file to another drive (HDD), but due to system limitations this is not possible.
3) Disabling system protection.
Computer – Properties – System Protection – System Protection tab – Configure – Disable system protection.This can be done if you use at least some other means of system backup. Otherwise, there is a high risk of getting a non-working system in case of some failures.
4) Disable the paging file.
This advice causes the most heated debate, and even Microsoft could not get clear explanations.I consider this advice to be harmful and recommend transferring the paging file to a regular (HDD) disk (but in no case to a RAMDisk:), I won’t even explain why - this information is easy to find on the Internet).
Completely disabling the paging file is harmful from the following point of view. Some “very smart” programs (for example, MS SQL Server) reserve virtual address space for themselves in very large quantities (in reserve). Reserved memory is not shown in the task manager; it can be seen, for example, in Process Explorer by turning on the display of the “Process Memory – Virtual Size” column. If there is a page file, the system reserves memory in it (that is, a certain range is declared unavailable for use by other applications). If there is no paging file, backup occurs directly in RAM. If someone can clarify in the comments (with links to reliable sources) how exactly this affects the operation of other programs and performance, I will be very grateful.
5) Disable Prefetch, ReadyBoot, and Superfetch.
5.1. Prefetch is a technology for accelerating system and application loading by proactively reading data from disk. It is only relevant for slow carriers. Since the SSD has everything in order with Random reads, Prefetch can be safely disabled.Prefetcher stores service data in C:\Windows\Prefetch.
To disable Prefetch, you need to change the value of the Enable Prefetcher parameter in the registry key HKEY_LOCAL_MACHINE\SYSTEM\CurrentControlSet\Control\Session Manager\Memory Management\PrefetchParameters to 0.
5.2 ReadyBoot (not to be confused with ReadyBoost) is an addition to Prefetch that logs the loading process to determine the order and composition of the data required during loading and, based on these logs, prepares the required data to speed up the loading process.
The logs themselves are located in C:\Windows\Prefetch\ReadyBoot. Disabling Prefetcher" does not stop recording these logs. To stop logging, you need to set the Start parameter of the HKEY_LOCAL_MACHINE\SYSTEM\CurrentControlSet\Control\WMI\Autologger\ReadyBoot key to 0
Disabling ReadyBoot is generally a relatively useless tip because... This will not give any increase in speed, except to slightly reduce writes to the disk, because download logs (which are quite small, on the order of several megabytes) will not be kept.
5.3 Superfetch is a technology for preloading frequently executed programs into RAM. There is no point in disabling it, because... Superfetch does not write to disk.
6) Disable indexing
In the disk properties, you can uncheck the “Allow the contents of files on this disk to be indexed in addition to file properties.” This can reduce the size of the indexes that the Windows indexer builds, i.e. reduce the write load on the SSD.The indexes themselves are located in C:\ProgramData\Microsoft\Search
You can also completely disable the indexer by disabling the Windows Search service.
7) Transferring application caches to RAMDisk.
By applications here we mainly mean browsers, because... They are the ones who actively use the cache of visited pages. Transferring this cache to the HDD would be quite stupid, because... We need acceleration! And therefore, a very good solution is to move these caches onto a small (for example, 1 GB) RAMDisk (personally, I use AMD Radeon RAMDisk, although despite the loud name it is a Dataram product).Each browser has its own way of indicating the location of the cache, this information is easy to find on the Internet.
8) Disable usn log of the NTFS file system.
One of the controversial and contradictory pieces of advice. On the one hand, I was unable to disable usn log for the system partition. The usn log is also used by some programs (eg Everything) to track changed files. If anyone can comment on the situation regarding the usefulness of disabling usn, I would be very grateful.UPD 9) Disabling disk defragmentation
Windows 7 should automatically disable defragmentation for SSD drives, so there is no need to configure anything manually.Conclusions:
1. Even if you don't follow any tips for configuring your system to work with an SSD, Windows 7 will run a little less than great on an SSD.
2. Some tips will allow you to reduce the number of writes to the SSD disk, which can extend its already relatively long life.
3. Many tips will allow you to change some parameters without killing system performance, but also without giving any practical benefit :)
Other ideas and advice are highly welcome! I hope that together we can differentiate them into useful and harmful :)
Now solid-state drives, or SSDs, are actively taking over the market and are replacing the good old HDD drives. They gradually fall in price, and their volume is constantly increasing. But it's not that simple. These drives have their drawbacks. The fact is that the service life of memory cells is limited, and it is greatly influenced by the number of rewrites. That is why the correct configuration of an SSD drive under Windows 7 directly affects the service life of this device. Let's look at all this in more detail.
SSD Lifespan
This disk is a regular flash memory, i.e. microcircuits. There are no mechanical, moving parts. This flash memory consists of cells, and they tend to wear out. The more information you write to the disk, the more they wear out. Therefore, setting up an SSD drive is very important. If the disk is being read, then this does not affect its wear.
There are various utilities that can be used to obtain information about the operation and status of the drive. One of them is CrystalDiskInfo. With its help, you can find out many characteristics and performance indicators of the disk. For example, firmware, serial number, total number of operating hours, number of starts, rotation speed (if we are talking about HDD), etc. We will be interested in the field showing the number of host records. The disk controller counts the total amount of data written to memory during its entire operation. This is due to the way flash memory works. Therefore, the figure shown here in gigabytes will exceed the capacity of your disk.
Setting up an SSD under Windows 7
Modern flash memory (MLC) is designed for a fairly large number of rewrite cycles, for example 1000, 2000, etc. This means that you can completely rewrite the disk, for example, a thousand times. If you have 128 GB, then you multiply this value by a thousand and get the final result - the total amount of data that you can write to the drive over its entire service life. This indicator appears in the “Total host records” column. It indicates the amount of data written to the disk since it began operating. For comparison, it must be said that 128 GB SSD drives are designed to record 40-70 TB of information. With very active use of the disk, on average, about 10 TB of information is accumulated per year. Thus, its service life will be about 4-7 years.
With moderate use of an SSD drive, the amount of data written to the disk will be two or even three times less, and its service life will be correspondingly longer. That is why they are recommended for But first you need to achieve the correct SSD settings. Installing and configuring an SSD under Windows 7 will not take much time. But that is not all. In order to achieve the best results, another process is performed. This is a Windows 7 setup for optimal performance with an SSD drive.
How the system is configured
Above we learned how flash memory works and what its resource is. Now let's look at how to configure and optimize Windows 7 for proper operation of the SSD drive. It does not require deep knowledge of computer science or deep knowledge of the system. Even a novice user can do this. You will need to complete eight steps to optimize Windows to use an SSD drive. Myths and reality are closely related to each other, and some may get a little confused. We will tell you step by step where to click and what commands to set.
Disabling System Restore
We need to disable Next - "System and Security", then - "System". Then you need to open "Advanced system settings". In the "System Protection" tab, click on "Configure". There are several options here: “Enable protection” and “Disable protection”. We can also configure the number of gigabytes that we allocate for system protection.
This refers to the automatic creation of a copy of the system, the so-called recovery point, and how much disk space is allocated for this. The default is from 2.5 GB to 10 GB. Accordingly, if we disable system recovery, the specified number of gigabytes will be freed on the disk. This setting makes sense to increase the free space of the SSD drive and at the same time reduce the amount of data written to the SSD. However, system protection is a very useful feature, and whether to disable it or not is up to you. If your SSD storage capacity is large enough, then you can leave everything as is. If not, or you do not use protection, you can disable it.
Turning off data indexing
This point has a more practical meaning, which directly affects the speed of your SSD drive and its durability. In the “My Computer” tab, find “System Disk” and go to “Properties”.
Below, by default, the option to allow indexing of files on disk is enabled. This function was developed to optimize the performance of HDD media. This was due to the specific operation of their magnetic plates and heads. There is no such need for SSD drives, so we uncheck this function. This will eliminate unnecessary writes to the SSD disk. If an error suddenly occurs, it will be related to the swap file. You will need to disable it, reboot the system and repeat disabling the above option again.
Disabling the page file
By default, Windows creates a special file on the system disk - this is the paging file. It is used to write some information from RAM to an area on the system disk. This is used in resource-intensive applications such as Photoshop. Some information is unloaded from RAM onto the hard drive, and when necessary, it is loaded back. If you have enough RAM (8 GB or more), then this page file can be safely disabled. This will reduce the number of writes to the system disk. If your RAM is small and the applications you use are quite powerful, then disabling this file may cause system instability. Here you need to look individually.
To disable the file, follow the following path: “Control Panel”, then “System and Security”, then “System”, then “Advanced Settings”, then “Advanced”, then “System Performance”, “Settings”, then “Advanced” , "Change". By default it is enabled, you need to uncheck the box and then click “No paging file”.
Turning off hibernation
Hibernation is a special sleep mode with a new feature. It was developed for Windows Vista. In this mode, data from RAM is rewritten to the system partition, and we can turn off the computer from the network. After switching on, all information is restored, automatically read from the system media into RAM. This way, all open programs are back on the desktop. Data will not be restored in normal sleep mode. If you do not use hibernation, you can disable it. This will reduce the number of writes to the SSD and free up additional space.

Go to the command line: Start menu, enter “cmd” in the search, run it as administrator. Enter the following phrase there: “powercfg-hoff”, and then press Enter. After this, restart the computer. If in the future you want to return everything back, you will need to enter “powercfg-hon” in the command line and then restart the computer.
Disabling Prefetch (Files in RAM)
This feature loads some data into RAM if you access it frequently. The operating system itself monitors these files and anticipates this possibility. For example, you often use the Word text editor. Some files are already loaded into RAM, and this program launches faster.

For an SSD drive you will not get any noticeable increase in speed, since it works faster than an ordinary HDD, so you can turn off this function. Most often, the operating system itself disables this function when installing Windows on an SSD drive.
How can you check if this option is enabled and how can you disable it? This is done using the system registry. You need to open the system registry editor. Go to the “Start” menu, enter “Run” in the search bar and open the “Run” window in the results. Enter the word regedit there and click OK. The system registry editor window opens. Here we go to the HKEY_LOCAL_MACHINE directory, then to the SYSTEM tab, then CurrentControlSet, then Control, then SessionManager, MemoryManagement and PrefetchParameters. Click EnablePrefetcher, select “Change” and replace the number 3 with 0. Click OK, reboot, and the function will be disabled.
Disable SuperFetch (disabled by default) and Windows Search
This function can be disabled more easily, without the system registry. Go to: “Control Panel”, then “System and Security”, then “Administration”, then “Services” and look for Superfetch in them. Click the mouse and select "Properties". Then click "Startup Type" and then "Disabled". Next, click “Apply”, OK. After a reboot, the changes will take effect.
If you wish, you can turn off the Windows Search service. It helps you search for files on your computer. Accordingly, turning it off will be at your discretion. If you still decide to do this, then in the “Services” described above you need to find Windows Search, then “Properties”, then “Startup Type”, then “Disabled”, OK. In principle, this is not necessary.
Turn off clearing Windows cache
This step will not have a positive impact on performance for all drives. For example, on Intel SSD drives, the company itself does not recommend disabling this option.
Select: “My Computer”, “System Disk”, “Properties”, “Hardware”, the desired SSD, “Properties”, “General”, “Change Settings”, “Policy”. Check the box "Disable cache buffer clearing...". If after these steps the performance of your disk has dropped, it is recommended to uncheck this box.
Disabling ClearPageFileAtShutdown and LargeSystemCache (disabled by default)
The ClearPageFileAtShutdown option allows you to clear the page file when the computer boots, and the LargeSystemCache option is the size of the file system cache memory. By default, when installing an operating system on an SSD, these options should be disabled. Windows 7 disables them itself. In order to check this, you need to go into the system registry.
We also go to the system registry editor (see how to do this above). In the branch, go to the following folder: "HKEY_LOCAL_MACHINE/SYSTEM/CurrentControlSet/Control/SessionManager/MemoryManagement". In the right field we find the file LargeSystemCache. Click on "Change". If the field is 0, then it is disabled. We immediately find and also check the file ClearPageFileAtShutdown. If the field is 3, then you need to change it to 0, then click OK and restart the computer. You will learn further how to set up an SSD drive for Windows.
conclusions
That's basically it. The basic settings have been touched upon here. It is definitely necessary to disable the ClearPageFileAtShutdown and LargeSystemCache, SuperFetch and Prefetch, data indexing options. If desired, if RAM allows, you can turn off the paging file. System Restore and Windows Search are also disabled at will. To clear the cache, you need to look at the performance of your drive.
Setting up an SSD drive for Windows 7
Now let's talk about how to configure an SSD drive so that it optimally uses the resource stored in it. What steps and points must be followed in order for the disk to work as quickly as possible and its memory cells to remain operational for a sufficient amount of time? Setting up an SSD under Windows 7 does not require much time and is quite simple.

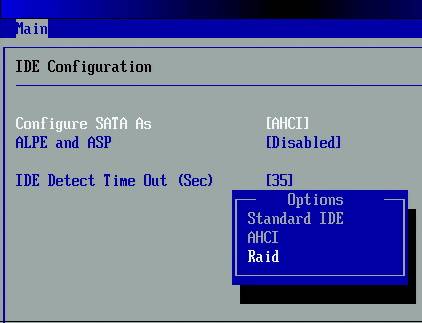
There are two modes of operation of the SATA controller. The first is the IDE, and it is usually enabled by default in the BIOS. The second mode is AHCI. It is this that will allow us to use NCQ and TRIM technologies, which will increase the speed of random writing and reading from an SSD drive. The TRIM command is sent by the system and allows disk cells to be freed from physically deleted data, thus increasing its performance.
Enabling AHCI Controller Mode
If you have not yet installed Windows, then you can change the mode from IDE to AHCI without any problems in the BIOS. After this, Windows 7 is installed and configured on the SSD drive, and everything works. If you have already installed the system, the procedure will be described below.

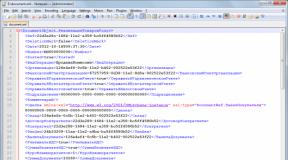
We need to go to the registry editor, finding the file regedit.exe. How to do this was discussed above. In the system registry editor you need to open a branch according to the following scheme. SSD configuration under Windows 7 occurs in the HKEY_LOCAL_MACHINE\SYSTEM\CurrentControlSet\services\msahci directory. Here we need to find the ErrorControl parameter. Click and select "Change". The default value will be 3. You need to replace it with 0, then OK. Just below we find the Start parameter. We also change the value from 3 to 0 and click OK. Next, reboot the computer and go into the BIOS. Now we change the controller mode from SATA to AHCI, save the BIOS and load the operating system.

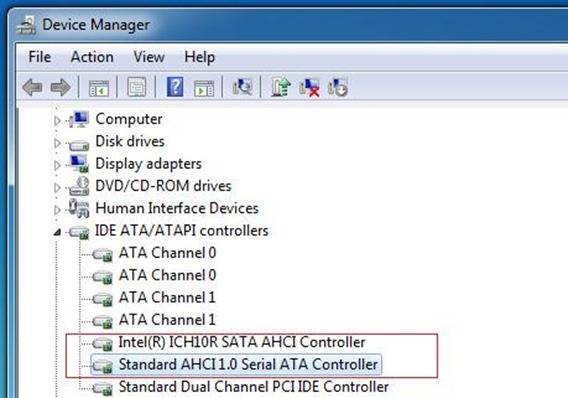
Now we need to check whether changes have occurred in the system. To do this, go to “My Computer”, then “Properties”, then “Device Manager” and find the IDEATA item here. It needs to be opened, and if you have the line “Standard PCIIDE controller,” then nothing has changed. If you have AHCI in this place, then everything is in order, setting up the SSD under Windows 7 was successful. These steps can be carried out before making changes to the registry and BIOS. You may already have AHCI mode enabled.

Now we have the TRIM command, which will allow the disk to function faster when littered with data, and NCQ technology is available, which allows you to increase the speed of random reading and writing of information.
Thus, the optimization of the SSD operation under Windows 7 was successful. The tips given above should help you in setting up the system for the SSD. All this will make your computer work as efficiently as possible.
The developers of SSD technology guarantee high loading speeds and operation of the system software. As noted by programmers who are already using the new drives, they have not identified any features of installing Windows 7 on an SSD that could prevent an ordinary user from doing so.
Initially, the process is divided into two stages:
- the first stage is setting up the media itself for Windows 7, which is easy to do using the SSD Mini Tweaker 2.1 utility;
- The second stage is the direct transfer of the operating system itself to a new device. It should be noted that you should not try to use versions of Windows lower than 7; even using XP will not show any significant differences between its operation on an HDD or an SSD.
Things to consider before installing Windows 7
Before proceeding directly to downloading and configuring the operating system, you must firstly disconnect all other storage drives, for example, HDD drives, check the firmware version of the SSD drive on the website of the manufacturer of the SSD drive and, if necessary, update it, then make changes using the BIOS into disk operation mode by moving from IDE mode to AHCI (Advanced Host Controller Interface) mode.
Physical installation of a new drive can only cause difficulties in cases where it will be used on laptops, since most models have only one connector for connecting the drive to the motherboard. A way out of the situation may be to use an HDD drive as an external device, and place an SSD drive in its regular place.
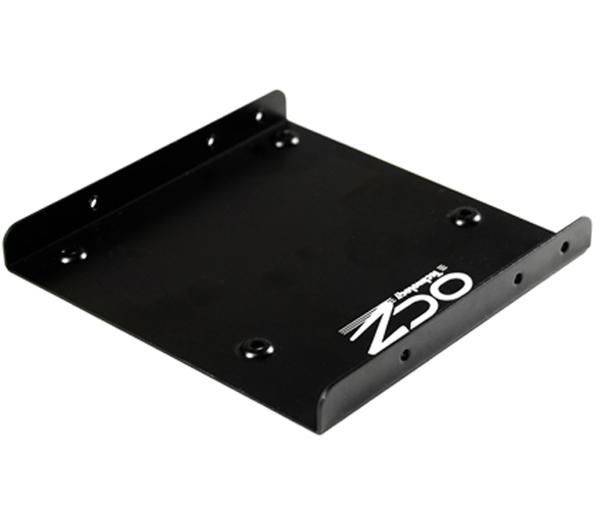
A situation may also arise when there is no space in the computer case to connect 2.5-inch devices, in which case you should use a “2.5-inch to 3.5-inch” adapter, which is often included in the basic SSD drive kit .
After physically installing the new disk, open the BIOS, and sequentially go first to the “Advanced” menu tab, then to the “SATA Configuration” item and in it go to the “Sata mode selection” sub-item in which we mark the AHCI mode module.
After this, press F10, which saves all changes made.
The procedures described above are all you need to know and do before directly installing the OS.
OS installation
It is best to install Windows 7 not by transferring the system image from the HDD, but directly from the installation disk, and disconnect the hard drive itself from the motherboard at the time of installing the OS.
Initially, you need to make sure that the physical installation and connection of the SSD drive to the SATA interface is done correctly and that the BIOS sees it and correctly identifies it. The necessary information is displayed in the “Information” menu item, where all connected devices are displayed.
After making sure that a new disk is present in the list of connected devices, go to the “Boot” section, which indicates the device (CD or DVD) from which the system will be loaded and installed.
The further installation process is completely similar to that carried out when working with a hard HDD drive and, apart from the increased speed of downloading and copying information, there are no differences. You must act in accordance with the prompts of the installation program.

After the installation is completed, you again need to enter the BIOS and switch the boot point from the CD (DVD) to the SSD device, from which Windows 7 will now be loaded on the computer.
Correct installation of the software will instantly affect the performance of your computer.
Important! Before starting the installation, it is necessary to confirm that the SSD disk is formatted for the NTFS file system (New Technology File System - developed by Microsoft Corporation for the NT line of OS).
It is best to do this manually by entering the appropriate commands in the CMD line in the following sequence:
- “Diskpart” - launches the Windows command interpreter;
- “List disk” - displays a list of all connected storage media with detailed characteristics and data;
- “Select disk X” - select the device to format, the “X” parameter is replaced by the letter designation of the SSD drive in the list above;
- “Create partition primary align=1024” - creating an offset parameter;
- “Active” - activation of the section;
- “Exit” - exit from CMD mode.
Video: WINDOWS installation
Setting up the system on SSD
Initially, “Seven” was developed to interact with HDD drives, since although the SSD production technology was already known and proven, it was not intended to be widely used due to its too high cost.
In this regard, for the correct operation of all OS services, it is necessary to optimize Windows 7 so that its operations increase their performance and do not lead to the creation of internal conflicts when interacting with the SSD disk.

Adjustment of OS utilities is also necessary to increase the service life of a new disk, since the technology of solid-state drives itself is critical to frequent rewrites, which wears out the disk, which is structurally similar to a huge “flash drive”.
The optimization process is preceded by the procedure of having drivers loaded and enabled in the system to support AHCI mode and the TRIM command of the ATA interface is activated.
Important! The TRIM command optimizes the performance of solid-state drives by providing them with information about unused blocks by the system that can be used for recording. Full support for TRIM mode is provided only in Windows 7/8/Vista; it was not provided in earlier versions.
The presence of enabled AHCI controllers is displayed in the “Device Manager” on the “Control Panel” in the “IDE ATA/ATAPI controllers” tab.
Checking the status and activating the TRIM mode is carried out from the line of active commands (the sequence of pressing “START” - “Run” and entering the CMD command) but only if you have administrative access rights to the system.
The CDM command for checking the status is “fsutil behavior query DisableDeleteNotify”.
After entering it, there are two possible answers:

TO TRIM enable command – “fsutil behavior set DisableDeleteNotify 0”.
Now you can proceed directly to the procedure for optimizing the OS for the SSD, namely:
- the paging file is either moved to another disk or disabled;
- SSD caching and indexing processes are turned off;
- defragmentation of the SSD disk is prohibited;
- the TEMP folder is transferred to the HDD and hidden;
- The system recovery and hibernation functions are disabled.
Disable indexing
The information exchange speed of SSD devices is much higher than that of HDDs, for which Windows 7 was developed, so there is no need for indexing and caching. Disabling these two functions will only increase the reliability and safety of information in cases of computer power problems.
Indexing is disabled in the SSD disk properties tab by unchecking the option "Allow indexing for quick search"(Allow files to have contents indexed in addition to file properties).

After clicking “Ok”, the computer may show resistance, but to do this, just click "Ignore All" in the drop-down window.
Defragmentation service
Windows 8 independently detects the media type and automatically disables the defragmentation function for the SSD drive, thereby increasing its service life by eliminating the need to repeatedly move file blocks, to which it is very sensitive.

In Windows 7, disabling is carried out by excluding the SSD drive from the list of drives for which this mode is configured.

Creating restore points
By deactivating the “System Protection” function (System Restore), the user minimizes the number of accesses to the SSD device for writing and saves its space by prohibiting the creation of copy files.
Disabling occurs in the “Computer Properties” folder in the “System Configuration” tab, checking the “Disable protection system” option.

Optimization with SSD Mini Tweaker utility
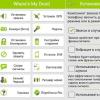
"SSD Mini Tweaker"- a useful utility with free distribution and a small amount of memory space. When you launch it, only one window appears in which all the settings described above are displayed, enabling or disabling them is necessary to optimize the OS for working together with the SSD drive.

Just check the boxes next to the required functions and click on “Apply changes” and all actions within the Windows 7 OS will be automatically performed.
The transition to a new type of media is completely justified in terms of increasing the performance of the Windows 7 operating system and even with minimal user skills does not cause complications.
Currently, an ever-growing number of Windows and other OS users choose SSDs as the main storage devices in personal computers and laptops. This is due to the large number of advantages of this technology:
- high speed of functioning of the Windows operating system and applications in comparison with conventional HDDs;
- low power consumption and noise even at maximum load;
- high fault tolerance under overloads and adverse external conditions;
- optimization of the latest versions of Windows and non-Windows-like systems for working with SSDs.
But besides the obvious advantages, there are also some disadvantages of this type of media:
- high cost compared to the price of classic HDDs;
- limited number of rewrite cycles, which reduces the “lifetime” of the device;
It is obvious that this type of media will become increasingly widespread. Therefore, we provide a detailed sequence of steps for installing the Windows operating system on an SSD.
Preparing your computer and media for installing Windows
 Before using the SSD, make sure that its antistatic packaging is not damaged. Otherwise, the static voltage generated during operation can not only damage the stored information, but also damage the media. Avoid touching connectors or exposed parts of the drive.
Update your motherboard's BIOS to the latest version available and make sure the SATA mode is set to AHCI. At this point, the preparatory stage of setting up the system moves to the next stage.
Installing media into your computer
 When installing it in a personal desktop computer case, you must take into account the fact that the SSD drive has a 2.5-inch form factor. This means that it is necessary to have a suitable compartment in the design of the system unit rack or to use special mounting brackets and screws. It’s worth adding right away that unstable fixation of the SSD is highly discouraged, because Strong vibration can reduce the life of the device.
If you own a laptop, the mounting process will become much easier, since compact devices use storage media of exactly this form factor. So installing a new SSD will be limited to switching contacts from an already used disk.
In any case, after fixing the disk, you need to connect it. Two cables are used for this. The first is the power cable and comes from the power supply. For user comfort, this cable is equipped with a notch mount that will reduce the likelihood of incorrect connection. If your system does not have a suitable wire, you can purchase an inexpensive “adapter”.
The second cable is a signal cable and is used for data transmission. Most modern SSDs use a SATA connector, which is also equipped with a notch for proper connection. One end of the cable is plugged into the data carrier connector, the other into the motherboard. Before purchasing an SSD, make sure your motherboard has SATA connectors as there are no data cable adapters available. 
Connect the power cables and turn on the computer. At startup, the BIOS recognizes the media and you can proceed to the next step of the instructions. Otherwise, check that all steps of this algorithm have been completed. If, after reconnecting, the media is not recognized by the system, then there is a high probability that the device is incompatible with your motherboard or that one of the devices is faulty.
Installing Related Software
You can proceed directly to the installation of the Windows operating system. There are practically no special features of this process from installing software products on the HDD. The steps are almost the same, starting from formatting the disk, etc. The only important thing is to correctly configure the BIOS settings. After the computer starts and the system recognizes all components, you must select the device from which information will be read before installation. This can be a CD or DVD, or a bootable USB flash drive. To select, you can use the BootMenu (keys F10-F12 depending on the brand of the computer) or select the required SSD media as the first device in the BIOS settings. 
Next, we carry out the standard steps when installing Windows or another operating system - step by step we follow the instructions of the installer program (formatting the media, selecting regional settings, etc.). An important point: if you install the system on a completely new disk, it will not be divided into logical partitions. In this case, you need to think in advance about how best to do the partitioning and perform this operation in the installer at the stage before formatting.
More interesting for the user may be the option of cloning an existing operating system onto a new medium. This method is very convenient, since SSD media are highly integrated with the system and will allow the operating system to start without problems. The latest versions of the tools allow you to clone a wide range of versions of Windows and other systems. To carry out this operation, it is convenient to use a tool such as Acronis® True Image HD.
To run it, you need to use a boot device, but the operating algorithm itself is very simple. Select on the “Tools and utilities” tab > Click the “Clone disk” button (Quick cloning in some translation options) > Select “Automatic (recommended)” to activate the quick system cloning mode. During operation, the program will automatically format the media. For more accurate copying, it is recommended to specify the operating system type, up to the Windows version. Select the source disk (HDD) > Click the “Next” button, then select the target disk (SSD) > Click the “Next” button. After rebooting the system, you can start Windows from the solid-state drive.
Notes for various operating systems
Modern users pay great attention not only to Windows, but also to other operating systems. Let's look at the features of installing them on a solid-state SSD drive.
- MacOS. While holding down the Optoins button in the menu item, open the system boot window. To run installation on an SSD, you may need to additionally specify the target media type. In some driver versions, this media type may be recognized as FDD or HDD. Therefore, it may not be selected as the first device. The disk will be formatted before installing the OS.
- Unix systems. When installing the operating system, the hard drive will be formatted. Therefore, in case of switching from Windows, it is recommended to copy important information to a third-party independent medium.