After reinstallation, disk d is not visible. The computer does not see the hard drive: how to fix the problem? Incorrect BIOS settings
Hello My Dear Friend.
Just recently I reinstalled the operating system on one of the computers.
After reinstallation, one of the partitions on the disk disappeared. That is, there is only one system partition left and that’s it. In fact, there are many reasons why this happened. However, in my case this problem was not critical. Everything was restored very simply using standard Windows tools without installing additional programs.
To do this, I used system administration tools.
When I went into this tool, I discovered that the system simply did not give the section any letter! Therefore, it was not displayed in the system.
You can find them in the Start menu or in the Control Panel. However, by default they are not displayed in the Start menu.
Settings forWindows XP:

To do this, you need to right-click on the start menu button and go to properties. Then go to the “Start Menu” tab, on the right there will be a configure button, click on it. Then go to the Advanced tab and find Administration and select “Show in All Programs and Start Menu.” Then ok. Administration now appears in the Start menu.
Settings forWindows 7:

To do this, you need to right-click on the start menu button and go to properties. Then go to the “Start Menu” tab, on the right there will be a configure button, click on it. Then find Administrative Tools and select “Show in All Programs and Start Menu.” Then ok. Administration now appears in the Start menu.
The settings are almost the same. In the seven there is simply no additional button and getting to the desired option is much faster.
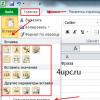
Then go to Start Menu – Administrative Tools – Computer Management. Or go to the properties of “My Computer” and this item will also be there.

Then go to Storage Devices - Disk Management.

Then I found the section that was lost. And just assigned it a drive letter. Right-clicked on it. Selected item Change the drive letter or drive path. Then clicked add.

In this step, I selected the drive letter I liked and clicked ok.
I recently received a comment in which a user had a problem installing Windows on a PC; it turns out that the installer does not see the hard drive, so it is not clear where to install the system. Below in the installer the cause of the error is described, which tells us that the disk drive driver is missing and needs to be loaded.
The problem is common and I want to write a short instruction to help people solve it. Let's figure it out.
Find drivers for your hard drive
Modern computers, or rather laptops, with an Intel processor, you can find the necessary drivers on their website. To make it easier, you can enter the following in any search engine: “Intel® Rapid Storage Technology (Intel® RST) Driver”. In the results you can search for the necessary drivers for any operating system.
If you have an AMD processor in your laptop, you can search for drivers using the following query: “SATA/RAID driver (or laptop).”
You can find drivers on the Internet if you simply enter the model of your laptop or computer motherboard.
Installing a driver if Windows does not see the hard drive during installation
Next comes the most interesting part. After you have downloaded the driver, you need to transfer it to, in our case, the flash drive from which you are going to install Windows. Even if you use a bootable DVD, still place the driver on a flash drive and then insert it into your computer. Placing the driver on disk will prevent you from installing it properly.
Start downloading from the flash drive or disk until the installer appears. Then click on the button.

A window will appear where you need to specify the path to the driver, this is our flash drive, click OK. The driver installation will begin, and then you should see your disks and partitions, if, of course, everything was successful.

As a note, I would like to say that if you are installing Windows on your computer for the first time, and after installing the drivers, 3 or more partitions appear in the installer, then you do not need to delete them, format them, or do other actions with them. Manipulations can be carried out only with the largest section. The fact is that the remaining sections are important, since they store data on which will help.
If you yourself cannot do everything that I have written here, then contact specialists and they will be able to fix everything for you for a fee.
There is another option why the Windows installer does not see hard drives, perhaps you need to disable the mode, I have already spoken about this mode several times, for example. It turns off in . But this option is more suitable for Windows XP.

I think we can finish here, I hope that this guide will help you in solving the problem with installing Windows.
First of all, you need to decide what a hard drive is. A hard drive (called a “hard drive” in slang) is a device for storing data. In fact, all information on a computer is stored there (with a few exceptions).
The operating system and all the data to which it has access are recorded on the hard drive.
Accordingly, when the system does not detect one of these devices, all files written to it become inaccessible. Below we will describe the causes of problems and ways to overcome them.
An external hard drive may also be susceptible to the “diseases” listed below.
Diagnostic measures
If the computer does not see the disk, you need to determine the “culprits”. That is, find out whether the problem lies in the device itself or in the system. To do this, you will have to connect the hard drive to another computer.
If it recognizes the device, then the problem is in the system, but if not, then the hard drive itself is faulty. It is better to entrust further work on it to the masters. Or use warranty replacement or repair.
If the problem is in the “native” hard drive system, then there are several ways to fix it on your own. The little that you can do yourself will help you avoid spending on specialist services.
Some useful tips
- You can enter the BIOS settings by pressing the F2 or Del keys until the system starts loading;
- It is better to remember well the correct connection of cables to SATA outputs;
- It is better to wrap the hard drive removed from the system unit in antistatic agent;
- It is also better to always place the lower part of the device, which contains the boards, on an antistatic agent.
Main problems and solutions
There are a number of problems with the hard drive that you can overcome yourself. A software conflict or outgoing contacts can be corrected without contacting specialists.
Outgoing contacts
The problem may lie in a simple lack of contact. To fix it, you will need to remove the cover of the system unit and try to reconnect the cables. If there is no result, then you can use other parallel cables.
Incorrect BIOS settings
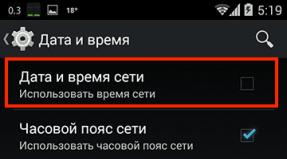
In the case where even the BIOS does not detect the hard drive, you need to look at the system date. If it is incorrect, it indicates a settings failure. Resetting the settings will help correct the situation. To do this, you will need to remove the battery on the motherboard, wait 10-30 minutes and install it back.
After these simple steps, the hard drive should be recognized as a physical device.
The problem may also be in the order of boot devices. In this case, you will not need to completely reset the BIOS settings. Just find the menu item whose name contains the word “Boot”.
It will contain a priority list of devices to boot. In this list you need to move the HDD to the first line.
Insufficient nutrition
If the device periodically disappears and appears, then you need to listen to it.
The characteristic buzzing sounds of changing operating cycles indicate a lack of power. Then you will have to purchase a more powerful power supply or turn off some less important device.
Device conflict
Two hard drives of the same brand in the system can cause conflicts. To avoid them, you need to check and configure each one in turn with a separate connection to the system.
Bus version
Versions of Windows prior to Vista may not support the SATA(SATA II) interface.
The easiest way in this case is to change the operating system to a newer one. If this is not possible, then you will still have to reinstall the OS, but with integrated drivers for SATA interfaces.
OS problem
If the BIOS detects the device, but Windows does not see the hard drive, then manual configuration using Windows will be required. To do this, proceed as follows:
1. Open “Control Panel” in the “Start” drop-down panel;
2. Double-click on the “Administration” item;
3. In the window that opens, select “Computer Management”;
4. In the list on the left, select “Disk Management”.
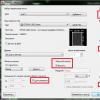
All connected disk devices will be displayed in the lower central part of the computer management window. One of them will be without a volume label (letters, C:, D:, etc.). Right-clicking on the tile for this drive will open a drop-down menu containing the line “Change drive letter.”
Clicking on this item will bring up a window in which you can assign a volume label in the A-Z range. After this, you should restart your computer.
Note! The cause of the malfunction may also lie in an inappropriate file system. For normal operation it must be NTFS. Information about the volume's file system can be found in the corresponding tile in the Disk Management window. If a system other than NTFS is listed there, you will have to reformat the disk.
Not a single method helped revive the “patient”? Then you cannot do without the help of specialists. The problems are much more serious and only specialists can save the hard drive.
The computer does not see the hard drive. What to do?
Why does the computer not see the hard drive and how to solve this problem? This video is dedicated to answering these questions.
Hello dear friends!!! In this article I want to talk about why after - does not see a broken hard drive. It was not for nothing that I decided to write this article, I just had a lot of questions about this, of course there is a lot of material on this topic on the Internet, but still people ask questions and I think that it would not be superfluous on my website.
Why the hard drive is split during installation of the operating system, the answer is simple, for the convenience of storing files, so that your data and files are not piled up on the same partition with Windows, so that you can install programs and games on a separate partition of the hard drive. thereby touching the partition with the operating system. In general terms, I think everyone understands why all this is needed. So let's get started.
Let's say during the installation of Windows 7 you split your hard drive into two partitions. The first section is " C"on which you install the system, and the second partition " D"on which you will subsequently install games, programs, upload photos and files. After installing the system, you go to “My Computer” and see only the “ C", and the section " D"The system does not see the hard drive. What needs to be done for the system to see the second partition of the hard drive? Right-click on “My Computer” and select the “Management” tab. A window will appear where you need to select the “Disk Management” tab.
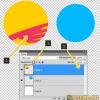
You will see a window like this, where your hard drive partitions will be displayed.

In order for the section " D" was visible in "My Computer", right-click on the second partition and select the "Format" tab. Attention: After formatting, all data on the hard drive will be deleted.

After formatting is completed, you will need to specify a letter for this section; if you do not specify a letter, then the system will not see a broken hard drive. How to do this, see the screenshots below.