Transferring programs from xp to windows 7. How to move data from one computer to another. Select files and create an image
Hello friends! All topics that relate to personal data, files and settings are always very relevant. Just as relevant are the methods of preserving, transferring and restoring them. Therefore, today I want to write about how to transfer settings, accounts, program settings and files from one computer to another running the Windows operating system, in this article we will look at an example on Windows 7.
To transfer data, we will use the standard utility. In Windows Vista and Windows 7 operating systems this utility is already built-in, and for Windows XP it can be downloaded from the Microsoft website http://www.microsoft.com/ru-ru/download/details.aspx?id=7349.
How to transfer data to another computer?
Well, let's get started.
We launch the utility, for this we go to “Start”, "All programs", “Standard”, “Service” and launch .
Now we need to choose how we will transfer and receive data to the new computer. There are three ways:
- Using a data cable. To be honest, I still don’t understand what cable we are talking about. It seems that it’s not about the network, because the next point is data transfer using the network. As far as I know, two computers cannot be connected via USB. Well, okay, let's skip this method and move on.
- Second way. This is data transfer using the network. If you have both computers connected to the network, you can try this method.
- Well, for example, we will use the third method. It seems to me the simplest and accessible to everyone. It consists of saving files and settings in one archive, with the ability to restore data from this archive on a new computer.
Therefore we choose “External drive or USB flash drive”.
Then we need to select on which computer you ran the Data Transfer Wizard. In order to create a file of all settings and files, you need to select “This is my original computer”. We will choose the first option when we restore data on a new computer.
Now you need to wait while the program checks the possibility of transferring.
After verification, we will most likely have the opportunity to transfer general and specific account data. You can cancel some items (by clicking on “Settings”) that you do not want to transfer, such as videos or music, they take up a lot of space. Just uncheck unnecessary items and click “Next”. Make sure that the transfer file is not very large.
If you want to protect the data recovery file, then specify a password, if not, just click “Save”.
Now we just need to specify the location where we will save our file with a copy of the data. If it will be restored on another computer, then save it to a flash drive or external hard drive. And if you just want to restore it later on the same computer, you can save it to your hard drive.
Just do not save to the partition where the operating system is installed, most likely it is the local drive C. Because when you reinstall Windows, this partition will be formatted. Save it to local drive D, or E. In any case, this file can then be copied and moved wherever needed.
You need to wait until the file is saved. After saving the file, you can begin restoring data on a new computer. Or after reinstalling the operating system.
Recovering data from a file
After the file has been saved and transferred if necessary, we need to recover the data from it. There is nothing complicated here, let's run it again. Click “Next”.
We choose the third option.
Choose “This is my new computer”.
That's all, now our files and settings have been transferred to the new computer.
When and where to use data transfer?
Perhaps this should have been written at the beginning of the article. I also wanted to say a few words about when data transfer may come in handy. In the article I wrote that we are transferring data to a new computer. And this is probably the most common option; when buying a new computer, you can transfer all the data in a few clicks, and this is very convenient.
But not only buying a new computer can cause data transfer. This feature can be used, for example, when replacing a hard drive, or when reinstalling the operating system. Good luck friends!
For many people, a new computer or even a simple hard drive upgrade means the inevitable process of installing a new operating system. Despite the deceptive simplicity of the Windows Setup Wizard, the procedure for preparing a new PC for full operation is always tedious and takes a lot of time. It’s not enough to just install Windows; you also need to transfer all the data from the user profile, as well as install a considerable number of applications that you have become accustomed to after a long time of working on your old PC.
Fortunately, there is a way to save your time and speed up the boring procedure of installing and configuring work programs. Using special utilities, you can transfer old data to a new hard drive, and in some cases, even migrate from one version of the operating system to another, while preserving user files and the entire arsenal of previously installed software. Read below to find out what tools you will need for migration.
"Windows Easy Transfer"
The most obvious way to transfer all your data to a computer with Windows 8 is to use the built-in utility, which is called Windows Easy Transfer. It is part of the Microsoft operating system, starting with Windows XP, and is also present in the latest Windows 8. With its help, you can transfer files, system and user settings. Windows Easy Transfer is designed as a wizard. First you need to run it on your old computer and select one of the methods for saving data. If you have two computers that are on a local network or connected by a special cable, you can transfer files without accessing an external drive. But if you want to install Windows 8 on an old computer, then you cannot do without connecting an external drive.
After determining where to save the files, you need to choose what exactly you want to save. By default, Windows Easy Transfer offers to save all files stored in the user's profile (documents, music, videos, pictures, application and system settings), as well as items that the user has shared. It is worth keeping in mind that using a standard data transfer application, you can copy any files and folders to the new system, and not just those that can be seen in the wizard window. To do this, you need to go to the advanced settings and manually select all the elements in the file manager. The wizard window will display the total size of the data that will be copied.
All data is stored in a single MIG file, which can be password protected for security. As you might guess, the size of such a file can be quite large, so before using the drive you should check what file system it uses. If FAT32, you need to format the flash drive or external drive in NTFS, because the size of the MIG file will most likely exceed the 4 GB maximum allowed on FAT32.
After the data has been copied to the drive, you can run Windows Easy Transfer on the new system. Provide the path to the MIG file, enter a password if necessary, and you can choose which files you want to transfer to your new computer. It is worth keeping in mind that in order to copy user content, you may also need to enter the password for the account that is used on the old computer. All this, of course, was done for security reasons. After the process is completed, Windows will show detailed statistics indicating the number of transferred accounts, programs and documents, and will also generate a list of applications that were installed on the old computer, but which are not on the new one. You will have to install them manually, but the program will tell you what is missing.

Its operation for the user is as simple as possible: just run the program and it will generate a list of all applications installed on the system. Select the ones you want to transfer to your new computer and tell PickMeApp to save all the files related to them. For each application, PickMeApp will create a file in its own TAP format containing all the data. Now the user needs to manually copy these files to an external drive and then copy them to the PickMeApp installation folder on the new computer. Well, if a flash drive is not at hand, you can use any service convenient for you for cloud data storage - Dropbox, Google Drive, Yandex.Disk, etc. Place the TAP files in a folder whose contents are synchronized with the cloud, and they will be copied to the remote server. Install the cloud service client on a new computer, and the previously copied files will immediately appear on your hard drive.
After PickMeApp detects the TAP files, the program window will display a list of applications available for installation. The installation takes place directly from the PickMeApp window, and applications that have already been installed are marked with a green marker for clarity.
PCMover is another alternative solution that you can trust to transfer applications to a new computer. This program is also capable of transferring system and user settings. Overall, it can be thought of as "Windows Easy Transfer" with advanced features.
PCMover can help in transferring data from one computer to another, and in copying important information when updating the system on an old PC. For each case, a separate operating mode is provided. If we are talking about transferring data between computers, the program must be installed on both. Communication between devices can be carried out via a local network, via a USB cable, or using a Windows EasyTransfer cable. It is also possible to copy data to an external drive.

All the main work is done on the old computer: the program allows you to choose which accounts, files and applications you want to transfer. By default, PCMover offers to copy all installed applications, files on the C drive, email messages, and user settings. If you wish, you can view the list of installed software and weed out what is unnecessary, add individual folders, files of certain types, and the contents of other disks for transfer to a new system. Separately, you can set exceptions for certain file types and directory names.
After running PCMover on a new computer, the user can determine exactly what should be copied: all saved data, files only, files and settings (no applications). Before restoring applications, you can view their list and select only those you need. It is worth keeping in mind that when migrating commercial applications, not all licenses will work on the new computer. Some programs may need to be reactivated. You also need to take into account that programs such as anti-virus scanners, firewalls, tools for searching for spyware, and local search utilities will most likely not work correctly after the transfer due to their specific nature. It is better not to transfer such applications, but to install them directly on the new system.
Since transferring a large amount of data can take a lot of time, the PCMover developers have provided notifications when the process is complete. The program can notify you that the files have been transferred by email or SMS.
The tool from Chinese developers is very similar to the popular Acronis TrueImage program, but, unlike the latter, it is distributed free of charge. Using EaseUS Todo Backup, you can transfer your operating system to another hard drive, as well as create a copy of data on partitions, disks, or the system. In addition, the program has the usual tools for backing up data, but they are beyond the scope of our topic.
A disk cloning tool can be useful if your old hard drive is already too small to accommodate all your applications and user files. Connect the new drive and start the data transfer process. EaseUS Todo Backup can create a copy of the disk, taking into account all sectors (and the size of the target disk must be larger than the old one or at least the same). There is also a mode designed for transferring data to SSD drives.

When performing various manipulations to transfer data, the system backup mode can also be useful. You should use it immediately after installing a new OS (or after purchasing a laptop with Windows pre-installed). While the system is not yet overloaded with applications and is operating as stable as possible, create a backup copy of it and save it as an image. If problems subsequently arise in Windows, you can always download this image and restore the system to its original state.
Sergey and Marina Bondarenko
Written for CHIP Magazine
Having to transfer files, settings, and programs from an old computer to a new one is daunting, especially if you don't have the practice of regularly making backups. Simple utilities and some useful tips will help make the task easier.
With regular backups, everything becomes much easier. But when the necessary files are randomly scattered throughout the hard drive, you risk losing them if the drive or the computer itself fails. Without backups, nowhere!
File transfer utilities
There are many special utilities that allow you to automatically transfer files and settings from your old computer to your new one. The programs, however, will have to be reinstalled, but important data and parameters will be saved. In any case, the most important thing is to save your personal files. We list several popular utilities for performing this task.
Data Transfer Tool is a Microsoft utility built right into Windows. Unfortunately, in Windows 8.1 it has lost some of its functions and no longer supports transferring files and settings over the network. However, you can still connect an external drive to your old computer, transfer files to it using this utility, then connect the same drive to your new computer and copy the data to it in exactly the same way. The utility is built into Windows 7, 8 and 8.1. To launch it, open the Start menu or Start screen (Windows logo key), search for the keywords “data transfer” without quotes, and click once you see the link you want. For Windows Vista and XP, you can download Data Transfer Tool from the official Microsoft website.

Mac Migration Assistant is an Apple utility built right into Mac OS X. It helps you transfer data from an old Mac to a new one or from a Windows computer to a Mac. In the latter case, you need to download from the Apple website. Well, to launch the utility on Mac OS X, press the +[spacebar], type “Migration” (without quotes) and click.

There are other similar programs, including a paid one, which Microsoft offered to use when upgrading from Windows XP to Windows 7. Unfortunately, it is no longer free, and it is unlikely that anyone will want to pay for a one-time transfer of files to a new computer.
Archiving and recovery
Should be created regularly. If this is already done, to transfer data to a new computer, it will be enough to create the most recent backup copy and then restore the files from it on the new PC.
However, there is one caveat: backups created using the Backup tool in Windows 7 cannot be imported into. Back in Windows 8 there was a function to recover files from Windows 7, but in Windows 8.1 it is no longer available.
However, you can create a backup copy of your data on external media using any utility, from the built-in Backup to third-party programs and Apple Time Machine on Macs, and then simply copy the files from the archive to a new computer. On Macs, the already mentioned Migration Assistant allows you to import files from Time Machine backups.

Easy file copying
The easiest way to transfer data is to simply copy files. This is suitable for creating simple backups and for moving files to a new computer. Connect a sufficiently capacious external drive to the old PC, copy or drag all the necessary files onto it, and then connect it to the new computer and copy the files there. Yes, it’s that simple - and if the files are also logically organized into folders, you can very quickly copy all the most important things.
Of course, in this way you can only transfer your personal files, not system settings. If you want to save bookmarks in your browser, you should export them and then import them on a new computer. Modern browsers - Chrome, Firefox (and Internet Explorer, but only in Windows 8) - even have a built-in synchronization function that allows you to transfer bookmarks from your old computer to a new one through a specially created account.

Cloud storage
Cloud storage also makes it easier to transfer data to a new computer. Many people probably use Gmail, Outlook.com, Yahoo! Mail or similar with IMAP support instead of POP3. This means that emails are stored on a remote server, so you don't have to worry about transferring mail to a new computer (unless, of course, you are still using POP3 to receive emails).
The same can be said about services that allow you to store files, settings and other data online. Good options are Dropbox, Google Drive and Microsoft OneDrive. All you need to do is install the cloud service client application on your old computer and copy all your files there. Then you can log in with the same account on the new computer - and all files saved in the cloud will be downloaded there. Windows 8.1 even has integration with OneDrive - Microsoft offers to store all files in the cloud so that they can be accessed from any computer without the need to transfer something somewhere else. You can use other cloud services with the same success.
One of the biggest challenges when preparing to migrate from Windows XP to Windows 7 is transferring applications, files, and settings. Microsoft doesn't offer automatic upgrade options for this transition, as it did when migrating from Windows Vista to Windows 7.
Therefore, when upgrading from Windows XP, you usually have to install Windows 7 from scratch, then reinstall all applications, and then copy user documents, settings, and other non-standard settings. Microsoft might not provide direct update capabilities, but the company does offer a tool to help with the latter operation.
Windows Easy Transfer for Windows 7 lets you transfer files and settings from a user's old Windows XP computer to a new Windows 7 machine. It copies user accounts, documents, browser favorites, among other file types. email and application settings.
Windows Easy Transfer is available for 32-bit and 64-bit versions of Windows XP (and 32-bit and 64-bit versions of Windows Vista). It's included with Windows 7, so there's no need to install it on a new machine. Windows Easy Transfer is not a new tool, but the latest version has several new features that make migration much easier.
You can download the tool for Windows XP from the Windows Easy Transfer download web page and select the version for your OS. Run the resulting file to install Windows Easy Transfer and download it by selecting the appropriate link from the Start menu.
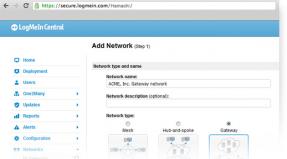
The first page explains what information can be transferred. Next, you need to decide which files and parameters need to be migrated and choose one of three options (Fig. 1).
You can use a cable that directly connects two computers, a network but both computers must be accessible from that network (over a regular or wireless connection), or an external disk or USB drive to transfer data. Windows Easy Transfer creates a file , which can be transferred to a new computer. After selecting one of the options, confirm that the files and settings you want to transfer are on your current computer.
Rice. 1. Windows Easy Transfer offers three migration methods.
The next steps depend on the migration option you choose. If you choose to create a file on an external drive, the tool immediately begins searching your computer for files to copy.
If you are migrating by cable, you need to connect the computers with a cable, open Windows Easy Transfer on the new computer running Windows 7, and then select the cable migration option in the transfer tool. (The Windows Easy Transfer Tool is located in the All Programs/Accessories/Services folder.) If Windows Easy Transfer is not already open, when you connect the cable, it will open or a window will appear asking you to open it. The connection should quickly be established and the search for files to copy should begin.
If you choose to transfer over a network, the transfer tool will provide a key when you run it on a Windows XP computer. After this, you need to launch Windows Easy Transfer on the new machine with Windows 7 and select the network migration option. After entering the transfer key, the tool will find the old computer and report that two computers have been found and begin scanning.
If you perform any of the three migration options, once you've finished browsing your old Windows XP computer, the migration tool will show the user accounts that contain the files and settings included in the migration process. When transferring using an external drive, you need to continue working with the tool on your old computer; If you are using a cable or network, Windows Easy Transfer must be launched on the new computer.
You can view and even change the list of files by clicking the “Customize” link. Windows Easy Transfer will display the File Manager window (Figure 2), where you can see all the folders and files selected for transfer. You have the right to select or deselect any files and folders. The program selects the material for transfer as carefully as possible, but you still need to review the selection in the file manager to clearly control what will be transferred.

Rice. 2. File Manager allows you to view a list of files selected for transfer.
Here the transfer process again changes depending on the transfer method. If you are using an external storage device, after selecting and verifying all the files to be transferred, click Next, and then set a password to protect the file containing the data being transferred. The migration tool will prompt you to specify a name and location for the migration file. Although this option is useful when using external drives, if you do not want to connect the external drive to your computer, you can save the transfer file online.
Next, apply the Windows Easy Transfer file to your new computer running Windows 7. To do this, on the new computer, open Windows Easy Transfer and select the option to transfer from an external drive, then select Transfer to Local Computer. Answer yes to the question if you have any files already saved, then specify the transfer file on the external drive and on the shared network folder.
For cable and network transfer options, after selecting files and options, you must click the Transfer button to begin the transfer process. Once the process is complete, the migration tool will provide a summary of what was transferred to the new computer: a list of files and applications that were transferred, Windows XP-only applications that were not transferred to Windows 7, and a list of third-party programs installed on the old computer but not yet on the new one. These Windows Easy Transfer reports can be viewed by clicking the Windows Easy Transfer Reports link in the All Programs/Accessories/System Tools folder.
Windows Easy Transfer should be the last step in migrating a computer from Windows XP to Windows 7. The tool is most effective when applications on a Windows 7 computer duplicate the same applications on a computer running Windows XP. I hope that Windows Easy Transfer will save you a lot of time and effort as you migrate your users to the new world of Windows 7.
The other day I came across a problem where it was necessary to transfer a user profile from one hard drive partition to another.
At first glance, there seems to be nothing complicated, just mark the folders and copy to another section. However, it should be noted that this method of transferring a profile to another disk partition will not work. In such cases, use various third-party programs designed to backup the entire disk. I suggest considering the already built-in program " ", with which you can transfer user folders: these are documents, images, music, including hidden files, etc. It should also be noted that you will be able to transfer your data that is stored on a computer with the Windows XP operating system to the Windows 7 operating system.
Windows 7 Easy Transfer
So, click on “Start” and select: All Programs > Accessories > System Tools > Windows Easy Transfer.

As a result, the “Data Transfer Tool” window will open, which provides a list of what can be transferred, it can be documents, messages, music, etc.

We are offered 3 options. I propose to briefly consider each of them; in general, it should be noted that the “Data Transfer Tool” contains a step-by-step description of the data transfer algorithm.
1. Data transfer cable - using a special USB cable, you can connect two computers and transfer data. Just don’t think that this is not the USB cable that connects from the computer to the printer.

If you decide to transfer information using a data transfer cable, then it should be noted that you will also need to run the “Data Transfer Tool” on another computer. It will take some time for the computers to be connected. If there are no connection problems, Data Transfer Tool will transfer the data to another computer.

2. Net – If the computers are connected to a local network, then it will be possible to copy information from one computer to another. We continue to consider -
This method involves transferring data to other computers connected to each other via a local network. When you click on the “Network” link, a window will open in which you will need to click “Next”.
As you can see, the data transfer algorithm is described point by point, I think that you will understand it.

Then the “Data Transfer Wizard” will generate a key that will need to be entered on the new computer, thereby connecting both computers to each other.

After a successful connection, the compatibility of the data transfer will be checked, and then the transfer of information from one computer to another will begin.
3. External drive or USB flash memory device. This method involves using a USB flash drive or external hard drive.

We will need to indicate what action we want to take with the data. That is, either the data needs to be copied to a computer or the data will need to be transferred from this computer to another medium. In our example, select “This is my computer” and click on the link - This is my source computer.

As a result, a window will open in which you will need to indicate what data we want to transfer. Using checkboxes, we mark the documents we need that need to be sent to a flash drive.

Then in the next window you will be asked to set a password. For example, I set the password to 12345 and click “Save” and select the external drive ( flash drive) to save. In general, in these simple ways you will know what Windows 7 Data Transfer is all about.

Thus, a folder in .MIG format will be created on your flash drive. In order to transfer the saved .MIG folder, for example, to another computer, you launch the “Data Transfer Tool” and when the Data Transfer Tool wizard asks you to specify a computer (according to the figure below), you must click on the first link “This is my computer, you want to transfer files and settings to this computer."

Well, I hope the information in this lesson is on the topic Windows 7 Easy Transfer was useful for you. This concludes, see you in the next lesson!
And finally, here's a video for you
The Data Migration Tool is a simple tool, but knowing a few of the intricacies of how it works will save you from bitter disappointment. My tips will help you save and restore your data, avoiding all the pitfalls.
To avoid problems, you need to ask yourself four simple questions:
- what needs to be transferred
- will all this be saved?
- how to transfer something that is not saved automatically
- Will it be possible to restore everything on a new system?
And then you will not have questions that Herzen and Chernyshevsky asked in their time. However, I will also try to answer them.
Today on the program
A note about Windows 8.1 and Windows 10
Unfortunately, in Windows 8.1 The data transfer tool does not have the ability to save files and settings. It can only restore them. This is likely due to OneDrive's integration into the operating system, as well as the wide range of syncing options. Unfortunately, cloud synchronization does not allow you to transfer a number of user settings and program settings.
IN Windows 10 There is no means of data transfer at all. Alternative - console utility USMT, part of ADK. It is quite simple, and the issue can be solved by studying a couple of its parameters.
What data is saved automatically
Microsoft has provided automatic saving of all your settings and data, as well as files stored in the profile.
Standard libraries. If these libraries include folders located outside the system partition, they are also saved.
All user environment settings, including Explorer options, folder view, desktop, taskbar, and Start menu, including all icons pinned to them.
For many people, a new computer or even a simple hard drive upgrade means the inevitable process of installing a new operating system. Despite the deceptive simplicity of the Windows Setup Wizard, the procedure...
Do you need to quickly and safely transfer data and system settings from one computer to another? Read about the easiest and most effective ways to transfer information, suitable for beginners and experienced users.
Transferring data from one computer to another may seem like a long and complicated process, during which all data will be transferred through third-party media. This method is indeed possible, but it has many disadvantages and risks to which the data is exposed during transportation. In addition, simple copying does not allow you to transfer browser settings, system settings and other important settings.
Transferring information and settings using built-in Windows tools
Backing up information is a useful Windows 10 feature that allows you to create image of the current system. With its help, you can return the OS to its previous state or transfer data and settings from one computer to another.
To use backup you must:
Step 1. Click right click by button "Start", select the item "Control Panel". You can also open the control panel using search strings. In the window that opens, select the item "Archiving and recovery".

Step 2. Select an item "Creating a system image".

Step 3. In the window that opens, you need to select the location where the image will be saved. Important! The system image can take up quite a lot of disk space (depending on the amount of data being copied from the current OS), so the best choice would be to save the image on external hard drive or voluminous flash drive.

After transferring the system image to another computer, you just need to open it. As a result, the user will be able to get full Windows 10 with your own settings, installed programs and them personal parameters.
Transfer information and settings using Windows Easy Transfer
Currently, to transfer computer settings and files, you can use a large set of tools that are recommended by Microsoft or produced by third-party manufacturers of hard drives and specialized software.
Among them are:
- Laplink PCmover Professional
- Seagate DiscWizard (for hard drives from Seagate)
- Samsung Data Migration (Samsung media)
- Acronis True Image (the principle of operation is similar to backup)
Many of the transfer programs can be paid and come with high speed connection cables, allowing you to complete the transfer in the shortest possible time. As a rule, such programs are used for corporate use, when one version of the OS with a view configured for operation and a software package installed is distributed to all corporate machines.
However, they all have a common operating principle that allows data to be transferred over the network Internet, special high speed cable and also create system image on a third-party hard drive or computer.
It is worth noting that many programs fit individually to HDD or SSD, therefore, before use, it is recommended to carefully familiarize yourself with the capabilities and utility compatibility with different types of media.
We strongly do not recommend using pirated or hacked utilities to transfer data. Such software may have viruses are “sewn in”, which will give third parties access to all information, data and passwords on the user’s computer!
Transferring information by copying
If the above methods cannot be performed for various reasons, you can use a simple transfer of information by copying. To do this, you need a computer that sends files, a PC that receives data, as well as any external storage. The transfer can be done practically any flash drive or a portable hard drive - it all depends on the speed and capacity of the drive, since transferring a large amount of data may take too long.
If you have a fast Internet connection, you can use cloud services like Google Drive and transfer through them. Unfortunately, many services provide only limited space for free, but this method also has a right to life.
If the user decides to go the transfer route by copying, there are currently many special high speed cables like Belkin Easy Transfer. Such products have an affordable price and fairly high efficiency, which allows you to quickly transfer data between different computers without worrying about the safety and security of information.
The article describes ways in which you can transfer data from one computer to another with a guarantee of data safety and without much effort. Transferring files, settings and programs to a new computer can be difficult and intimidating for the user, especially if he does not know how to do it correctly and where to start.
Often it all comes down to the user copying the most necessary and important data from the old PC to an external storage medium, and then copying it to the hard drive of the new computer. This method also exists, but it is associated with the risk of data loss during the process and/or as a result of information transfer. But what about applications and operating system settings?
In fact, there are several ways that will help you transfer data from one computer to another with better quality and with less effort, and, very importantly, with a guarantee of safety.
Content:Data Migration Tools
There are many utilities for transferring data, settings and programs to a new computer. To use them, you just need to install such a program on both computers and use them to transfer your files, applications and settings.
A tool with this functionality is also provided free of charge by Microsoft - Windows Easy Transfer. And although, starting with Windows 10, it is no longer available as a built-in utility in the operating system, Microsoft offers to use another third-party application - PCmover Express.
The principle of operation of the program is as follows: connect an external storage device to your computer and launch the application; transfer your data from your computer to an external drive and then connect it to another PC to which you need to transfer the data; run this application on a new computer and transfer data from external media to this computer.
Backup and restore files
The system's built-in File Backup and Restore tool also allows you to transfer files and system settings to another computer.
![]()
Using this tool you can create a system image. This will be a complete image of the operating system, including system files, installed programs and personal files. It is enough to simply deploy the system image that was created from the old computer on a new computer.
Just copy the files
Also, do not forget about the possibility of copying files manually, this way you can transfer personal files from computer to computer. To do this, connect an external storage medium of sufficient capacity to your computer (for example, an external hard drive) and copy all the files that need to be transferred to it. After this, connect this drive to the new computer and transfer the necessary files.
If all your files on your computer are well organized and you know their location on your hard drive, then you will not have any difficulties implementing this method.

This way, you will be able to transfer files, but not settings. If you also need to transfer browser bookmarks, you will need to export/import them using the functions of the browser itself. All modern browsers also have synchronization functions, with which you can import all settings.
Cloud storage
Cloud storage services can store user data, settings, and other data, and do a good job of it. To do this, just install the service client on your computer and configure data saving with its help. On another computer, it will be enough to install the same client and log into the account you created earlier, and you will have access to all the data saved in it.
There are many such services at the moment, the most popular of which are Dropbox and Google Drive, as well as Microsoft OneDrive integrated into Windows. You can use any one convenient for you.

If your computer crashes
If the transition to a new computer is due to the inoperability of the old one, then the user’s personal data can also be transferred from it.
To do this, connect the hard drive of the old computer to the new one and check how it is detected by the operating system (it all depends on the reasons for the failure of the old PC). If it is recognized by the computer as another hard drive and all files are available for use on it, then it is enough to carry out the actions described in paragraph "Just copy the files". You can only copy them directly to the hard drive of your new computer.
If hard drive files from your old computer are not displayed, you can recover them using a hard drive data recovery program - Hetman Partition Recovery. To do this, launch it and scan your hard drive. Save all files detected by the program to a new computer hard drive.

Switching to a new computer should not be difficult for the user. Some tools even provide the ability to transfer installed programs and applications. But the most important factor in data transfer is the user's personal files, which should not be damaged or lost during the process or as a result of the data transfer. The methods described above should help the user avoid such unpleasant consequences.
If you bought a new hard drive or solid-state SSD drive for your computer, it is very likely that you have no great desire to reinstall Windows, drivers and all programs. In this case, you can clone or, otherwise, transfer Windows to another disk, not only the operating system itself, but also all installed components, programs, etc. Separate instructions for 10 installed on a GPT disk in a UEFI system: .
In fact, Seagate DiscWizard is a complete copy of the previous program, only to work it requires at least one Seagate hard drive on the computer.

All actions that allow you to transfer Windows to another disk and completely clone it are similar to Acronis True Image WD Edition (in fact, it is the same program), the interface is the same.
You can download the Seagate DiscWizard program from the official website https://www.seagate.com/ru/ru/support/downloads/discwizard/
Samsung Data Migration
The Samsung Data Migration program is designed specifically for transferring Windows and data to a Samsung SSD from any other drive. So, if you are the owner of such a solid-state drive, this is what you need.

The transfer process is carried out in the form of a wizard with several steps. At the same time, in the latest versions of the program it is possible not only to completely clone a disk with operating systems and files, but also to selectively transfer data, which may be relevant, given that the size of SSDs is still smaller than modern hard drives.
The Samsung Data Migration program in Russian is available on the official website https://www.samsung.com/semiconductor/minisite/ssd/download/tools/
Important: Other SSD and HDD manufacturers also have the same utilities for transferring Windows to another drive. Typically, you can find it by asking a query consisting of the brand and the phrase “Data Migration”, this is how you will find, for example, Intel Data Migration Tool and similar programs for other brands of drives.How to transfer Windows from HDD to SSD (or other HDD) in Aomei Partition Assistant Standard Edition
Another free program, also in Russian, that allows you to conveniently transfer the operating system from a hard drive to a solid-state drive or to a new HDD - Aomei Partition Assistant Standard Edition.
Note: this method only works for Windows 10, 8 and 7 installed on an MBR disk on computers with BIOS (or UEFI and Legacy boot), when you try to transfer the OS from a GPT disk, the program reports that it cannot do this (possibly , here simple copying of disks in Aomei will work, but it was not possible to experiment - failures when rebooting to complete the operation, despite Secure Boot being disabled and checking the digital signature of drivers).
The steps for copying the system to another disk are simple and, I think, will be clear even to a novice user:

If everything goes well, upon completion you will receive a copy of the system that can be booted from your new SSD or hard drive.
You can download Aomei Partition Assistant Standard Edition for free from the official website https://www.disk-partition.com/free-partition-manager.html
Transfer Windows 10, 8 and Windows 7 to another disk in Minitool Partition Wizard Bootable
Minitool Partition Wizard Free, along with Aomei Partition Assistant Standard, I would classify as one of the best free programs for working with disks and partitions. One of the advantages of Minitool's product is the availability of a fully functional bootable ISO image of Partition Wizard on the official website (the free Aomei allows you to create a demo image with important functions disabled).
By writing this image to a disk or flash drive (the developers recommend using Rufus for this) and booting your computer from it, you can transfer your Windows or other system to another hard drive or SSD, and in this case we will not be hampered by possible OS limitations, since it is not running.
Note: I tested cloning the system to another disk in Minitool Partition Wizard Free only without EFI boot and only on MBR disks (Windows 10 was transferred), I can’t vouch for its performance in EFI/GPT systems (I couldn’t get the program to work in this mode, despite Secure Boot being disabled, it looks like this is a bug specifically on my equipment).
The process of transferring a system to another disk consists of the following steps:

Once complete, you can close the Minitool Partition Wizard, reboot your computer and set it to boot from the new disk to which the system was transferred: in my test (as I already mentioned, BIOS+MBR, Windows 10) everything went well and the system booted as usual which did not happen with the source disk disconnected.
You can download the Minitool Partition Wizard Free bootable image for free from the official website https://www.partitionwizard.com/partition-wizard-bootable-cd.html
Macrium Reflect
The free Macrium Reflect program allows you to clone entire drives (both hard drives and SSDs) or individual sections, no matter what brand your drive is. In addition, you can create an image of a separate disk partition (including Windows) and later use it to restore the system. Creating bootable recovery disks based on Windows PE is also supported.

After launching the program, in the main window you will see a list of connected hard drives and SSDs. Mark the disk where the operating system is located and click “Clone this disk”.
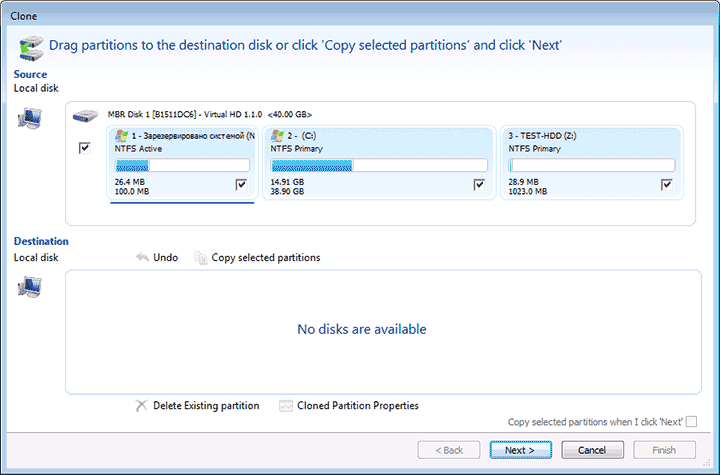
At the next stage, in the “Source” item the source hard drive will already be selected, and in the “Destination” item you will need to indicate the one to which you want to transfer the data. You can also select only individual partitions on the disk to copy. Everything else happens automatically and is not difficult even for a novice user.
Official download site: https://www.macrium.com/reflectfree
Additional Information
Once you have transferred Windows and files, be sure to either set the new drive to boot in the BIOS or disconnect the old drive from the computer.