USB port does not work after reinstalling Windows. USB port does not work after reinstalling Windows Why does usb 3.0 work on a computer?
If we connect a 3.0 flash drive to a computer that supports USB 3.0 ports, we see the message “ This device can perform faster when connected to Super-Speed USB 3.0“, this, friends, means that we either do not insert the flash drive into the USB 3.0 ports (with the blue tongue), or there are problems with their functioning, and they work in USB 2.0 mode. What are the causes of problems with the operation of USB 3.0 ports on computers, and how such problems are solved, we will try to understand this in today’s article.
Let me remind you that the bandwidth of the USB 2.0 interface is 60 Mb/s, and USB 3.0 is 10 times greater, 625 Mb/s. Naturally, few of the removable drives connected to a computer’s USB 3.0 ports operate at the limit of this interface’s capabilities, but it is of fundamental importance for individual storage devices. For example, many modern models of external HDDs using a USB 3.0 interface can provide a linear speed of 100-170 MB/s. Actually, the same as when connecting internal hard drives to the SATA interface. Whereas on the USB 2.0 interface, the linear speed of external hard drives on average usually remains at around 30 MB/s. Flash drives 3.0 on a USB 3.0 interface write data 2-3 times faster, and read data 3-5 times faster. By the way, we talked in detail about the speeds of flash drives on USB 2.0 and 3.0 interfaces. In general, friends, if you have a 3.0 removable drive, I think that it’s worthwhile to understand the functionality of the USB 3.0 port if there are problems with it.
BIOS settings
USB 3.0 ports can operate within USB 2.0 capabilities if configured to do so in the BIOS. This point needs to be checked first. We go into the BIOS and look for where USB ports are configured, usually this is the “Advanced” section of the advanced settings and the “USB Configuration” subsection. Or something with similar names. Here you need to check if USB 3.0 support is active. The USB 3.0 Support setting must be set to Enable. The “XHCI hand-off” parameter should also have the “Enable” value; it can be called “XHCI Pre-Boot Mode”, simply “XHCI” or something else, but with the presence of the key term “XHCI”.

XHCI is a USB 3.0 controller, and if the BIOS does not implement a separate item to support this interface like “USB 3.0 Support”, its enable/disable is implemented by the controller. On some motherboards, the XHCI controller parameter may have other values such as “Auto” or “Smart Auto”, which ensure that USB 3.0 ports operate in 2.0 mode before the operating system boots with its USB 3.0 drivers. And such values are usually set by manufacturers of computer devices by default in order to make it possible to work with a modern USB interface inside operating systems, while avoiding the failure of the installation of some of them, the distribution of which does not include USB 3.0 drivers. The most striking example is the official builds of Windows 7, the problem with the lack of drivers for which we discussed and solved. If, friends, your PC or laptop has working USB 2.0 ports (with a black tab) for cases of installing Windows 7 without integrated USB 3.0 drivers, you can safely set the XHCI controller setting to the “Enable” position. Just when installing the “Seven”, do not forget that the flash drive must be inserted into the USB 2.0 port.
Driver update
Inside Windows, the USB 3.0 interface can operate at the USB 2.0 level for the simple reason of incorrect installation of the controller driver. This problem can be solved by any of the methods of dealing with incorrectly installed drivers - either updating them or reinstalling them. To begin with, we use the standard capabilities of Windows. Let's go to the device manager. Expand the “USB Controllers” branch. Click on extensible host controller. More often it is listed as “Intel(R) USB 3.0 Extensible Host Controller,” but in our case, for example, its manufacturer is the Japanese company Renesas. Call the context menu on it and select driver update.
Depending on the version of Windows you have installed, some of the illustrations and information in this document may vary.
Before use
Some USB devices, such as printers, scanners, copiers, require installation of software and USB drivers. before connecting a USB device to a computer. Always follow the installation documentation provided by the USB device manufacturer.
When troubleshooting a USB device, you may need to disconnect the USB device from your computer.
Attention!Always follow the manufacturer's instructions for disconnecting USB devices from your computer. Some USB devices must be disabled and ejected before they are disconnected from the computer. Some USB devices support the Windows function Safely Removing Your Device.
Troubleshooting steps
If applicable, follow these steps to troubleshoot USB devices that are not working properly.
Disconnect all USB devices from the computer except the USB mouse and USB keyboard (if used). These include hubs, flash drives, printers, and cameras.
After first disconnecting all USB devices, follow these steps:
When using a desktop computer Connect the malfunctioning device to one of the USB ports on the back of the computer case (ports connected directly to the system board).
When using a laptop Connect the malfunctioning device to the USB port on your laptop. Do not use a USB port splitter (such as a docking station or USB hub).
Device is not working: Leave the device connected and proceed to the next step.
If the USB device came with software that was not previously installed, install the software according to the manufacturer's instructions.
After installing the manufacturer's software, reconnect the USB device.
Unknown device: The driver is not installed or was installed incorrectly (for example, the USB device was removed while Windows was detecting it and setting it up as new hardware). To resolve this issue, uninstall and reinstall the device driver as shown below.
Disconnect the device.
Right click Unknown device and select Delete.
A window will open.
(if shown).
Click the button OK.
Restart your computer.
Reinstall the device according to the manufacturer's instructions.
Disconnect the USB device and wait 20 seconds.
Install the drivers according to the manufacturer's instructions.
Restart your computer and reconnect the USB device.
Disconnect the USB device and uninstall and reinstall any software previously installed on it (if any).
Uninstall and reinstall the device as shown below.
Without disconnecting the device, right-click the device name in the Device Manager window and select Uninstall.
A window will open Confirm device removal.
Click the box next to Uninstall driver software for this device(if shown).
Click the button OK.
After the line with the device name disappears from the list, disconnect the device and restart the computer.
Try installing the device again according to the manufacturer's instructions.
Power supply. If the USB device is powered by a battery, make sure the battery is installed properly and is functioning properly. If the USB device is powered by an external power source, make sure all power connections are securely secured and the power cord is connected to the power source.
Check USB connection. Sometimes, simply disconnecting and reconnecting the device to the computer is enough to solve the problem.
What happens when the device is disconnected?
The device is working properly: The problem is most likely related to the power supply or poor overall system performance.
Note.To avoid future USB device failure, follow these guidelines. Don't connect too many devices to your computer. Wait 5 seconds after connecting the device. Use hubs with autonomous power supply for connecting other devices. Do not connect USB devices when the system is busy (slower than normal).
Installing software from the USB device manufacturer Note: Some USB devices require manufacturer's software to operate.
The device should now work properly. If the problem persists, continue to the next step.
Microsoft Easy Fix Solutions: Microsoft provides a web-based application for automatic diagnosis and repair. Go to the How to Use Microsoft Easy Fix Solutions webpage (in English) and select the troubleshooter that best matches your problem. Then follow the onscreen instructions. If the device still does not work, continue to the next step.
Windows Update: Running Windows Update will check for operating system updates required for your computer. Go to Windows Update (in English) and follow the on-screen instructions to check for updates and agree to all recommended and optional driver updates. If the device still does not work, continue to the next step.
Microsoft System Restore: If the USB device previously worked and then became unstable, use the function Microsoft System Restore to return to a time when the device was still working. For more information, see Use Microsoft System Restore (Windows 10, 8). If the device still does not work, continue to the next step.
device Manager: You may be able to fix the problem by using Device Manager.
On Windows, find and open device Manager.
Follow the steps below, depending on how the device is listed in Device Manager:
Other device: USB ports work, but device drivers need to be installed. To resolve this issue, follow these steps:
Device name is displayed: USB ports and basic plug-and-play functions work well. The problem may be caused by the device itself or its drivers. One of the following may resolve the issue:
If the device you are using is a communications device, double-click the device name and select a different COM port number, such as COM4 instead of COM3.
Device not listed: If the device is not listed, go to the next step.
Removing USB Root Hubs: Removing USB root hubs forces the system to reinstall the root hubs the next time you restart the computer. Use the steps below to remove USB root hubs:
Windows does not detect USB 2.0 device (device name is missing in Device Manager)
If the USB device appears in the Device Manager window, the problem may be the power requirements.
Disconnect the device and do the following until the device is detected:
USB drives not showing up in the Safely Remove Hardware window
If you connect a USB storage device such as a flash drive, the device may not appear in the Safely Remove Hardware window after clicking Safe removal of equipment in the Windows desktop notification area.

USB storage: The USB device may not be displayed if it was previously stopped and not disconnected from the USB port.
After installing the Windows 10 operating system on your computer or switching to it from previous versions, it may happen that peripheral devices connected via USB ports often turn off or even stop working correctly, displaying warning icons in the device manager in the form of a yellow triangle, as well as error code 43 in the description. What to do in this case? First you need to determine the culprit.
Of course, if several devices fall off at once, then it is clear that they are most likely not to blame and the reason lies in the computer itself. If only one device is faulty, then for diagnosis you need to carry out the following manipulations:
Try switching to a nearby USB port. This advice is especially relevant if the system unit is located somewhere under a table in a dusty corner and is wiped only once a year. And then, before doing this, you need to see if it is clogged with dust or debris.
Replace the connecting cable. This is generally a sore spot - cords are lying around anywhere, their connectors are bent, they are crushed by a chair or shoes, they are chewed by pets, etc. As an example, we can take iPhone smartphones, whose proprietary cables break near the plug after just a couple of months of active use.
If an external hard drive fails, the error most likely appears because the second connector on the cable is not connected and it simply does not have enough power.
If there is another computer or laptop, then connect the device to it and observe the work. As an option, you can go to friends or relatives. If the gadget functions there without problems, everything will immediately become clear.
So, we have come to the conclusion that the causes of the problem with USB ports are hidden in the computer. Let's look for them!
Outdated drivers and BIOS
Very often, outdated or incorrect drivers are to blame for bus failure. This is especially noticeable when updating the system, when everything worked fine on the old OS, but after updating to Windows 10 glitches began with error 43 and “Device not recognized” messages. To fix it, you need to go to the motherboard manufacturer’s website, look for a new version of the software and install it.
An alternative option is to download the Drivers Solution Pack client online and use it to update drivers.

Usually after this the malfunctions are eliminated completely and irrevocably.
I also want to talk about a couple of cases where problems with USB ports on Windows 10 appeared due to an outdated BIOS version. Moreover, both times it was not on old decrepit hardware, but on new ASUS laptops after upgrading the pre-installed “Eight” to “Ten”. Everything was solved by downloading the latest version of the BIOS from the official website and flashing the motherboard using a special utility that came with the kit.
Reinstalling a port concentrator
Sometimes this trick helps fix errors with USB: Right-click on the “This PC” icon and select “Manage”. The “Computer Management” system snap-in will open. In it you need to select the “Device Manager” section:

Here we find the “USB Controllers” section and open it. We need the “USB Root Hub” item. Right-click on it and select “Disable”. Close the window and restart the computer. We return to the dispatcher again and turn on the hub. After this, all USB ports should work without problems.
Power plan settings
This case is especially relevant for owners of laptops, netbooks and ultrabooks. The fact is that in order to save battery energy, they have activated the function of selectively turning off devices, and if at a certain point in time a lot of consuming gadgets are connected to the computer (phone charger, card reader, portable speaker, etc.), then Windows 10 can Selectively disable one or more devices at once.

To disable this option, go to Device Manager again and open the properties of the USB root hub. On the “Power Management” tab, uncheck “Allow the computer to turn off this device to save energy.” After that, close the dispatcher and reboot.
nastroisam.ru
USB ports on a computer or laptop do not work, the front ports do not work or stopped working after installation
If, when connecting a device via USB, it does not initialize, is not detected by the operating system, and does not display any messages at all, then the reason may be that the controller responsible for this port is disabled.
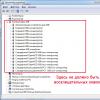
The first thing you should do is look at the status of the ports in Device Manager. To launch it, enter the command “devmgmt.msc” in the Run window (Win + R).
Open the USB Controllers section and look at the status of the USB hub or USB Root Hub. 
In the picture one of them is shown disabled. Enable it using the right button – Enable.
You can also go to the properties section - Power Management tab, uncheck the box for permission to turn off devices to save power. 
In the same properties, you can check the relevance of installed drivers and update them if necessary. 
If the controller is marked with a yellow exclamation mark, then try reinstalling its driver, or removing all controllers and rebooting the system, after which they should automatically install and work properly. 
All ports do not work
If all ports do not work at once, reboot the computer and go into the BIOS (F2 or del key at startup). Depending on the type and version of BIOS, the settings may vary. You should find the “USB Function” and “USB 2.0 Controller” parameters, they should be in the “Enabled” position. Most often they are located in the “Onboard Devices Configuration” section
Only the front connectors do not work
If we are talking about a PC, then we should distinguish between the front and rear connectors. The rear ones are located directly on the motherboard, the front ones are connected to it using a special cable. Therefore, when the front USB stops working, first check the operation of the device when connected to the rear one. 
How to find a driver for an unknown device (error 28)
If it is working, you will have to remove the cover of the system unit (with the computer's power off), and then check that the front connector cable is connected correctly to the system board.

The correct connection pinout can be found in the description of your motherboard, but usually how to connect is clear from the labels on the motherboard.
Other reasons and solutions
 If you use an extension cord or hub, check the operation of these devices when connected to other ports or on another computer.
If we are talking about a non-functional USB 3.0 connector, check whether its special cable is connected to the corresponding connector on the motherboard.
Check the drivers of the devices themselves that are connected via the ports; the reason may be in these devices, and not in the connectors.
If none of the methods produces results, then this particular port or controller probably has mechanical damage, which can be repaired at a service center.
composs.ru
USB ports stopped working

The situation is not so rare - we’ll try to figure out the problem and quickly solve it ourselves.
So, first you need to clarify whether USB on your computer has stopped working or USB on your laptop has stopped working. The strategy in each case will be slightly different, and the sequence of actions for self-diagnosis and restoration of the correct operation of the universal serial bus controller (USB, Universal Serial Bus) will also be slightly different.
Diagnostics of USB in a computer and methods for repairing it
If your computer's USB stops working, you need to take a number of measures:
- if the USB on the front panel of the desktop computer case does not work, then a mechanical failure has most likely occurred;
- or when connecting the USB case of the system unit (4 wires; 2 of which are signal, and 2 provide power) to the connectors on the motherboard (the so-called front panel), an error occurred - the USB is not connected correctly (the polarity or the sequence of the transmission wires is broken data);
- To check the correct connection and avoid more serious damage to the computer's motherboard, you need to connect a known working device, such as a flash drive, to the connectors located on the rear of the system unit - the USB of the motherboard. At the same time, never rush to connect devices to the front panel - there is a risk of burning the flash drive if the polarity is not observed.
- Thus, if the flash drive is detected at the back of the system unit, but does not want to work at the front, we conclude that the contact in the USB panel is broken (soldering at the points of connection with the wire and the connector itself often breaks off), the USB connector is damaged (this fact is easily revealed by visual inspection), not If the USB hub connector on the motherboard is connected correctly or not connected at all, to do this you will have to remove the protective casing of the system unit and assess the condition, armed with a manual with the correct indication of the connection sequence.
For each motherboard, it is better to look at the sequence separately, since there is a direct sequence (reverse), a horizontal position of the block and a vertical one. It is worth paying attention to the colors of the contacts and the block (if it is painted in some way), or the colors of the contacts and their location relative to the metal contact pins of the block (especially the missing pin).

If connecting to the USB connectors on the motherboard did not give anything, you should pay attention to the color of the USB itself - black or blue. If the USB to which the flash drive is connected is blue (the plastic inside the connector itself is painted blue as in the picture), then this indicates that we are trying to work with a USB 3.0 port. This is a more powerful connector in all respects, but also more problematic. The fact is that such USB connectors may not work after reinstalling Windows without separate drivers, or may not work correctly with some devices even if they are present. This situation can lead to both inability to work and various types of failures - blue screens and computer freezes. Therefore, for a complete diagnosis, we look for the black USB connector and connect to it. If the device is detected, we conclude that the problem is with the drivers for USB 3.0. To fix this problem, install the drivers from the motherboard kit or, best of all, download them from the manufacturer’s website.
If devices are not detected in any of the USB ports, then the reason may be in the controller, then purchasing a separate device called a USB2.0-PCI or USB3.0-Mini PCIe expansion card will be a salvation, since repairing a USB controller for the motherboard computer is not cost-effective. The boards cost differently and differ in speed characteristics and power supply.
The USB2.0 board is traditionally cheaper, has lower speed, and will fit into an old computer; but it may not fit into a new one with a MicroATX motherboard (a small board with one PCI slot).

USB3.0 boards are usually more expensive, more powerful and faster, but are not suitable for an old computer; can be used if PCI slots are occupied or obscured by a video card.

Here is a set of work to diagnose and restore functionality for a USB computer - for a laptop it may be somewhat more complicated (or easier).
Self-diagnosis and repair of a USB laptop
The algorithm for diagnosing and repairing a USB laptop is similar to that of a computer, but there are some features. Firstly, the diagnosis is very simple, and secondly, the repair is quite complicated. I would like to warn you right away that accurate diagnostics are best carried out after a complete reinstallation of Windows, since there is a possibility that the previous installation of drivers will be incorrect and incorrect parameters will be recorded, which will lead to the inability to restore the correct operation of the laptop. Diagnostics consists of testing the operation of the black and blue connectors on the laptop (USB2.0 and USB3.0). If USB3.0 does not work, we try to connect the USB flash drive to the 2.0 (black) connector; if USB2.0 works, we conclude that we need drivers for USB3.0. It is best to use official sources with drivers for these purposes, i.e. laptop manufacturers' websites. Various disks with auto-installation of drivers may or may not help. Therefore, you need a high-quality laptop repair - be prepared to work hard (this applies to everyone). If it turns out that even after reinstalling Windows, none of the existing USB ports work - things are bad. One hope is that someone simply turned them off through bios - go into bios and turn them on. Otherwise, most likely the controller has failed or problems have arisen with the south bridge of the laptop motherboard. In any case, a complex laptop repair will be required - replacement of the bridge, which can only be carried out at a service center.
Naturally, before this it is necessary to exclude mechanical damage to the laptop’s USB ports, which can also lead to short circuits. This situation will be characterized by the following phenomena: the laptop turns off when USB is connected, or the laptop turns on and immediately turns off. Mechanical damage can be assessed visually by looking into the slot of the connector: if all the hardware is in place, everything is in order. Moreover, you will have to inspect all the connectors, and not just where you want to attach the flash drive. If a problematic connector is detected, the laptop will need to be repaired - replacing the USB port.
hpc.by
USB ports on laptop not working
A number of laptop users may encounter a situation where the USB ports on the laptop do not work, and devices connected through them are not recognized by the Windows system. This problem occurs quite often and can have many causes, making it difficult for the user to work with the USB devices he needs on his computer. In this article I will tell you why USB ports on a laptop do not work, what are the reasons for this phenomenon and how to fix it.

Fixing a problem with USB ports on a laptop
Causes of the problem when USB ports on a laptop do not work
So, why did the USB ports on the laptop stop working? The reasons for this dysfunction may be the following:

How to fix non-working USB ports
In order to fix non-working USB ports on a laptop, you need to do the following:

Video solution to a situation where the USB port does not see the device
In this material, I examined a situation in which the USB ports on a laptop do not work, listed a list of reasons for this dysfunction and provided a number of tips for solving it. If you do not know what exactly caused these problems with USB ports, then consistently follow the entire set of tips I have listed, this will help to effectively solve the problem with malfunctioning USB ports on your PC.
Best usb ports not working
SdelaiComp.ru
Why don't USB ports work?
More than once I have received questions related to the fact that it was not possible to connect a single USB device. The system simply did not find the device. And here it is obvious that the problem is not in the device itself, if the user has already tried to connect a bunch of devices, but there is still no result.
Both home computer owners and laptop users may encounter this problem. I can’t immediately answer why exactly you can’t work with USB devices, so I’ll try to figure out the causes of this problem and find a way to get rid of this problem.
What is the reason for USB ports not working?
Please note that we will be looking at a problem where it is impossible to connect any USB device at all. We will talk about what to do when only one port does not work in another article. Here we will talk about a common problem when usb basically does not work.
The first thing we will need to check is the controller responsible for the ports. It might just be disabled. How to enable it in this case? You will need to go into the BIOS. When you turn on the computer (before the system boots), press the F2 key (on some operating systems you need to press Delete or F8). It also depends on what kind of motherboard you have installed.
So, we found ourselves in the BIOS, what next?
- Here, pay attention to the “Integrated Peripherals” category. But you will have this item if Award BIOS is installed. There is also Ami BIOS. In the second case, pay attention to the inscription “USB Controller/2.0). How can you tell if the controller is turned on or not? If the controller is enabled, we will see the inscription “Enabled”. When the controllers do not work, the word “Disabled” is written. Are you sure the controllers are turned off? We turn it on, then don’t forget to save the changes and restart the computer.
- It is quite possible that we connected a non-working device, and because of it the system cannot connect the others. This needs to be checked. So, be sure to turn off your computer and then disconnect each device. Next, turn on the PC, then try to insert a USB drive that definitely works (only this one!), if we can work with a flash drive, then the USB ports do not work here due to peripheral devices.
- Now we will try to fix the problem using Device Manager. In the manager window there should be an item “USB Serial Bus Controllers”. By studying it carefully, we can understand whether we have problems with the devices. If they are, an exclamation mark will appear next to the device. It tells us that there really is a malfunction.
- If this does not help, then it may be worth getting rid of the USB controllers (we delete them through the same device manager). Then we restart the computer, connect the devices, and the system will automatically install new controllers.
- There is such a wonderful feature in every OS as “System Restore”. You can try to return the system state to the day when USB devices were still working.
- Rebooting the USB hub may help. In this case, it will not work, but we will fix this by simply restarting the PC.
- If you do not have the most “ancient” PC or laptop, then USB hubs can turn off all or some devices to save power. And the user does not receive any notifications about this. Accordingly, we need to disable the saving function. Go to Device Manager, find the “Universal Serial Bus Controllers” section, and then go to the “USB Root Hub” tab. All that remains is to double-click on the left mouse button and then go to the “Power Management” tab. Next to this box, uncheck “Allow the computer to turn off this device to save energy.” Don't forget to save your settings. Thus, you will need to disable the saving function for each connected device.

Immediately after installing the Windows 7 operating system, some users notice that the USB ports on their computer do not work. Let's figure out what actions need to be taken to be able to connect devices to a PC using the above protocol.
Let us immediately note that this article will talk about a specific problem after installing, reinstalling or updating Windows 7, that is, about a situation where before installing the operating system everything worked fine, but after performing the specified procedures, it stopped functioning. We will not dwell on other possible malfunctions related to the fact that the computer does not see USB devices. A separate lesson is devoted to this problem on the site.
The problem we are studying has two main causes:
- Lack of necessary drivers;
- Incorrect entries in the system registry (after upgrading Vista to Windows 7).
Method 1: USB Oblivion
This solution is suitable just in case you upgraded to Windows 7 from an earlier operating system. In this case, entries in the system registry about previous connections of USB devices may be saved, which will be incorrect in the updated OS, which will lead to problems with further connection attempts. In this case, all records of previous connections must be deleted. The easiest way to do this is using the USB Oblivion utility, which is precisely intended for this purpose.

Method 2: Microsoft USB Troubleshooter
Microsoft has its own USB troubleshooter. Unlike the previous utility, it can help not only after installing the operating system, but also in many other cases.


Method 3: DriverPack Solution
After installing Windows 7, it is possible that your computer will not be able to receive and transmit data via the USB protocol due to the lack of necessary drivers. This situation is especially common if USB 3.0 connectors are installed on a desktop PC or laptop. The fact is that Windows 7 was developed even before this standard began to be widely implemented. For this reason, the basic version of the said OS does not contain the necessary drivers immediately after installation. In this case, they need to be installed.
The easiest way to solve this problem is if you have a disk with the necessary drivers. In this case, you just need to insert it into the drive and extract the contents to your computer using the prompts that appear. The functionality of the USB ports will be restored. But what to do if you don’t have the required disk at hand? We will consider the actions that need to be taken in this situation below.
The easiest way to solve this problem is to use special programs designed to search and install missing drivers on your computer. One of the best applications in this class is DriverPack Solution.
- Launch the program. When activated, it will simultaneously scan the system for connected devices and detect missing drivers.
- Click on the button "Set up your computer automatically".
- After this, the program itself will create a restore point in case an error is made during the setup process or you simply want to roll back to the old settings in the future.
- After this, the procedure for installing drivers and configuring some PC parameters will be performed.
- After the procedure is completed, a message will appear that all the necessary settings have been completed and the missing drivers have been installed.
- Now you need to restart your PC. Click "Start". Next, click on the triangular icon located on the right side of the button "To finish work". Click.
- After restarting, you can check whether the USB ports are working or not.


Method 4: Manually installing drivers
The necessary drivers can also be installed without installing additional software to search for them. But this will require a little more tinkering.
- Click "Start". Sign in "Control Panel".
- Go to "System and safety".
- In the list of tools "System" click on the item "Device Manager".
- The interface will be displayed "Device Manager". The shell that opens will present a list of different types of devices that are currently connected to your desktop computer or laptop. Click on the group name "USB Controllers".
- A list of elements will open. You need to find one of the following names in the list:
- Generic USB Hub;
- USB root hub;
- USB Root Controller.
These are the types of ports. The list will most likely have one of these names, but it may appear multiple times depending on the number of USB outputs on your computer. Despite this, it is enough to perform the procedure described below with one of the identical elements, since drivers will be installed on the computer for all ports of the same type. If there are several different names of elements from the above list, then for each of them you will have to perform manipulations separately.
So, right click ( RMB) by element name and select from the list "Properties".
- A window will open in which you need to click on the name of the tab "Intelligence".
- After that in the field "Properties" select an option from the drop-down list "Equipment ID". In area "Meaning" The device ID will be displayed, that is, in our case, the USB port.
- This data must be saved. They can be written down or copied. To do the second option, just click RMB by area content "Meaning" and select from the menu "Copy".

Attention! The main thing is that after this, do not copy any more data until the operation to find the necessary drivers is completely completed. Otherwise you will simply replace the information in "Clipboard" about driver IDs with new data. If you still need to copy something else during the procedure, then first paste the data from the equipment properties window into "Notebook" or any other text editor. This way, if necessary, you can quickly copy them again.
- Now you can start directly searching for the necessary drivers. Open your browser and go to one of the popular online driver search services - DevID or DevID DriverPack. You need to enter the data that you copied in advance into the search field of the site and click on the button that starts the search.
- After this, the search results will open. Select the option that matches your operating system (in our case, Windows 7) and its bitness (32 or 64 bit), and then click on it.

If you use the DevID DriverPack service, you will need to specify the OS name and bit depth there before you start the search.
- After you have gone to the driver page, download it, unpack it from the archive if necessary, and run it on your computer, following the prompts that will be displayed on the monitor. After restarting the PC, the problematic USB ports should work. If this does not happen, then look for the origins of the problem in incorrect registry entries, as described above.


There is another option for downloading the necessary drivers - do it from the official website of the manufacturer of USB controllers that are installed on your PC. But in this case, you must definitely find out the address of this Internet resource, as well as the exact name of the controller model.
There are two main reasons why USB ports may not work after installing Windows 7, although before that they functioned normally. Firstly, these are incorrect entries in the system registry left over from the old OS, and secondly, the lack of necessary drivers. Each of these problems can be solved in several ways, which we described in detail in this article. So, after reading the material, users can independently choose the most convenient and acceptable course of action for them.