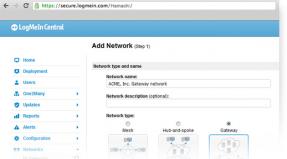
Setting up the Internet and Wi-Fi network Garant. Features of equipment connection. Enabling and setting up Wi-Fi on a computer How to set up Wi-Fi on a laptop
Not so long ago, a computer, and especially a laptop, was a luxury. Today, almost every family has a computer or laptop, and in many families almost every family member has these devices. Each such device must have access to the Internet, since a computer without the Internet is a “box”. With the development of technology, in order to divide Internet traffic into several devices, it is no longer necessary to connect a separate cable to each device; everything can be done over the air - using Wi-Fi technology.
The content of the article:
Benefits of Wi-Fi
Before we talk about setting up a Wi-Fi network at home, we’ll talk about the tasks and advantages of this technology. So, if you need to divide your existing Internet channel into several devices, then you need a router. If you want to share the Internet channel by connecting devices without using wires, then a Wi-Fi router will help you with this. We have already told you about this and therefore, before purchasing it, we recommend that you read this article again. A Wi-Fi router is a great option if you have devices that support Wi-Fi networks. Thus, by installing a Wi-Fi router at the most central point, you can provide Wi-Fi coverage throughout the entire apartment, which is very convenient, because you will not need to run unnecessary wires. If your computer does not have a Wi-Fi adapter, then this issue can be solved in two ways: install a Wi-Fi router in the room where the computer is located, or purchase a Wi-Fi adapter. A Wi-Fi adapter is a small device in the form of a flash drive or in the form of a card inserted into a PCI slot.Considering that almost every family needs to install a Wi-Fi router, we will tell you how to set it up yourself, without calling a technician.
Setting up a Wi-Fi router
To configure the router, it must be connected via a cable to a computer or laptop. The connection diagram must be shown in the instructions. We unpack the router, screw the antennas to it, then connect one part of the network cable (which comes with the kit) to the router, and the other to the computer (laptop). Then we connect the router’s power and after that we connect the Internet provider’s network cable to it.How to enter the router menu
Absolutely all Wi-Fi routers are configured using a WEB interface, this is a kind of website with settings. That is, in order to configure the router, you need to open the page with its settings in your browser. To do this, enter “192.168.1.1” in the address bar of your browser and press the “Enter” key. After this, a window will appear on the screen in which you will need to enter your login and password to access the router settings. Standard (by default) login and password from the router settings menu: “admin” - in small letters. After entering, click “OK” and get to the menu.

Reflashing a Wi-Fi router
So, in order to set up a Wi-Fi router, you first need to reflash it. If you are a fairly experienced person and know what and how, then now we will tell you what you need to do for this. If you don’t particularly like to understand all the intricacies of computer technology, then you can do without flashing the router. Firmware is a kind of operating system of the router on which its operation is based.
Why is flashing needed? Reflashing the router is necessary to ensure normal and high-quality operation of the device. As a rule, every Wi-Fi router has the same firmware version from the moment it is released until it is discontinued. This firmware only passes internal tests, but when the device goes on mass sale, users find all sorts of problems in the operation of the device in various situations. Therefore, the “native” firmware is not perfect and you may have problems with the device: low speed, freezes, problems with Wi-Fi, etc. That is why it is better to install a new firmware version.
In order to reflash the Wi-Fi router, you need to download the firmware file. Of course, you can download it from the manufacturer’s official website. To do this, on the website of the device manufacturer, find the model of your Wi-Fi router, and click on the “Downloads” tab; this is where the list of available firmware should be located. Some manufacturers may send you to an FTP server where the firmware is stored. But do not rush to download the latest version of the firmware, first read the forums where users who installed this firmware wrote a review about its work and made a conclusion: is it worth installing or not.
After downloading the archive with the firmware, unzip it and copy the firmware file to the downloads folder. In the router menu, go to the Firmware section and in the available field, indicate to the router the path to the new firmware. You can find more detailed instructions on how to reflash the router in the instructions for the device.
After flashing, go to the Network / IPConfig / Network menu (depending on the model of your router) and first enter the provider settings.

WAN connection type
- Dynamic IP / DHCP / Dynamic IP – select if the provider provides dynamic IP;
- Static ip / Statistical IP address - select if the provider is built on a local network, where to access the Internet you need to enter the IP address, subnet mask and Gateway.
- PPPoE – select if you need to enter a login and password to access the Internet.
DNS 1 and DNS 2 - it is advisable to leave them installed automatically, but if the provider requires their manual installation (which is very rare), then enter the primary and secondary DNS. It is not always necessary to enter the provider's DNS in the network settings; sometimes external DNS work better than the provider's.
Then go to the Wireless tab, which contains Wi-Fi settings.
How to set up a Wi-Fi network
Network name (SSID)
Network name is the name of your Wi-Fi router, which will be displayed when the device searches for a network to connect to Wi-Fi. We recommend that you set the name as original as possible to avoid coincidences. If you have 2 devices on the network with the same names, the Wi-Fi connection may not work correctly.
Channel
This is the frequency channel over which data transmission will occur. Pay special attention to this parameter, as this may result in low Wi-Fi speeds. Why? Each channel has its own, so to speak, data transfer volumes. The more of your devices are connected via Wi-Fi, the lower the Internet speed for each device - the same goes for the channel, the more devices use the same channel, the lower its bandwidth. Therefore, even if you have a high Internet connection speed, and the Wi-Fi channel is overloaded, the Wi-Fi connection speed will be very low.
If you have not so advanced neighbors, then this parameter can be left at “Auto”. It’s very easy to check the Wi-Fi activity of your neighbors - call up the Wi-Fi connections menu list and look at the number of Wi-Fi routers that are available in your apartment: if there are few of them, then the channel is enough, if there are many, then it’s better to install it manually.
Since “Auto” selects the 6th or 7th channels, when manually selecting it is necessary to select the channels located at the beginning. That is, if in the future the Wi-Fi connection speed drops, but the cable connection speed is as stated, then it is possible that the whole problem lies in the Wi-Fi channel.

Wireless Mode
This setting sets the wireless network standard. Two factors depend on the wireless network standard: the ability to operate old-type devices in it and Wi-Fi speed. That is, Wi-Fi has its own standards of operation, and to make it more clear to you, let’s look at an example. In cellular communications, first the Internet was transmitted via WAP, then via GPRS, then via EDGE, etc., with each new type the data transfer speed also increased - in our situation everything is the same. The further a letter in the alphabet represents a communication standard, the higher the data transfer rate it supports. But here it is necessary to take into account one more point: not all devices released quite a long time ago and supporting work in Wi-Fi networks support the latest type of connection - and this must be taken into account.
When choosing a wireless connection type, set the type that will be supported by all your Wi-Fi devices. Newer types of devices can work with older types, but not vice versa. But don’t be upset, most modern Wi-Fi routers can work with several standards - which is very convenient; for this, set the value to “b/g/n” (if available).
Channel width
The channel width is indicated in megahertz. We recommend leaving this parameter at “Auto”, or setting it to its maximum value.
Maximum data transfer rate
This parameter sets the maximum data transfer rate - speed limit. Of course, it is best to set this parameter to the maximum value. If you are the main Internet user, and you need high speed data transfer via a network cable on your computer, then you can reduce the speed via Wi-Fi in this way.
Encryption type
Another important parameter when setting up a Wi-Fi router is the type of encryption of the transmitted data. The stronger the encryption type, the more securely your data will be transmitted. Today, the best type of encryption is WPA-PSK/WPA2-PSK. But here you should also pay attention to the fact that not all devices support this type of encryption and therefore it is possible that when choosing it you will need to find a “golden mean” for all devices.

How to set up Wi-Fi on a computer and laptop
Let's briefly tell you how to set up Wi-Fi on Windows 7 and Windows 8. In order to set up Wi-Fi on a laptop or computer, you need to select your Wi-Fi router in the list of Wi-Fi devices, to which you gave the original name. Then we click on its name 2 times with the mouse, and we are prompted to enter a password - enter the password, it is checked, and if you entered everything correctly, the device connects to Wi-Fi. After this, we recommend checking both over the network and over Wi-Fi. Please note that Wi-Fi speed may be limited by your router's bandwidth. Therefore, it may differ from the one available over the LAN.Sometimes, to connect a laptop via Wi-Fi, you need to separately enable the Wi-Fi module. As a rule, on laptops the corresponding button is responsible for this; it can be either separate or combined with the F7 key.
You can find out more detailed information about setting up a Wi-Fi connection from the video below.
With the development of the level and prevalence of the Internet, the number of devices that use the World Wide Web has also increased. Smartphones, tablets, laptops and even TVs all require an Internet connection for comfortable work. When there are more than two such devices at home, the question arises of how to connect them simultaneously. In this case, a useful device will come to the rescue - a router, the purpose of which is to distribute the Internet connection between various devices. There are several types of routers, so before purchasing, you need to determine which one is right for you.
By type of connection
The most common type is a router with an Ethernet connection. This refers to a standard network cable (called "twisted pair") that can be connected directly to a computer. But if you want to connect several gadgets, then you must immediately connect a router (more on this below). The connection speed can reach 1 Gbit/s, it depends on the capabilities of your network card and provider.
The second type of connection is called ADSL. It is used to obtain an Internet connection through telephone networks and is more common in the private sector where it is not possible to connect via Ethernet. If you have a telephone at home, then there is no need to run additional wires. True, you won’t see speeds of more than 24 Mbit/s (this is the maximum speed, provided there is a high-quality modern telephone line).
LTE connection is the third type of router. With this connection, you get wireless Internet via 3G or 4G networks. This is currently the most expensive and least common connection method.
If you have decided on the type of router, then you can proceed directly to the question of how to install the router. And you should start by choosing a location.
Choosing a place
Routers come in both wired and wireless varieties. If you need to connect both your phone and tablet to the network at the same time, then you should ask how to install a WiFi router at home. Moreover, a wireless router does not exclude connections using wires.
Before connecting, it is advisable to choose the optimal location of the router. Avoid placing on concrete lintels or in remote corners of the apartment, as this will reduce the usable coverage area. The ideal place is in the center of the room. Most often, the connection location is limited by the location of the incoming Internet cable. It makes sense to immediately connect and configure the router. And only if the signal level does not suit you, then start worrying about the location.
Let's start connecting

The cable must be connected to de-energized devices. For an Ethernet connection, simply plug the incoming network cable into the special jack on the back of the router (labeled WAN). If you have an ADSL connection, then you should use a so-called splitter (included) to separate the telephone and Internet signals.
For initial setup, you will also need to connect a network cable (also included) to your laptop or desktop computer. This is necessary to log into the administrative panel of the router. We will consider the connection process using the example of a router manufactured by TP-Link. If you know how to install a TP-Link router, then there will be no problems connecting devices from other manufacturers, since the principle is the same everywhere.
We go to the administrative part
In order to log into the device interface, you need to have the following data: IP address, login and password. This information is printed on a label at the bottom of the router. For most models, universal login information will work. Address: 192.168.1.1, which must be entered into the address bar of the browser. After entering the address and pressing the Enter key, a window for entering your login and password will appear (by default, the login is admin and the password is admin). But there may be options, as in the photo below, where the settings page address is different. Therefore, check the label or instructions for the device.

After entering your login and password, you will be taken to the administrative part, where you first need to open the DHCP Server tab. There you need to activate this server, that is, check Enable or “Enable” (depending on the interface language), and click the “Save” button.

The next step in the process of how to install a Wi-Fi router is to determine the type of connection.
Connection type
If you do not have information about the type of connection, you should check with your Internet provider. Without the correct settings, the Internet will not work. The simplest option is a type called "dynamic IP address." All you need to do is select this option and click the save button. In rare cases, you will also have to fill in the “Hostname” field.
A rarer type - with a static IP address - requires additional filling in the fields with IP address, default gateway, subnet mask and DNS server (provided by the provider). And when connecting PPPoE (from the English Point-to-point protocol over Ethernet), you must fill in the fields with the user name, password and password confirmation.
After setting up the Internet connection, you can move on to the question of how to set the TP-Link router to wireless transmission mode?
Wi-Fi setup
To do this, you need to find a tab called “Wireless Mode” (options are possible). Then you need to enter the SSID name of the network and select mode. If you are not sure that all your devices support the latest n-mode, then it is better to choose a mixed bgn option.

Next, you should save the settings and reboot the router. Then we’ll move on to the question of how to set the WiFi router to protected mode. For these purposes, the settings provide a “Network Security” section. Here you should select the WPA-PSK/WPA2-PSK encryption mode and enter a 12-digit password. In the future, this password will need to be entered one-time on each new device that you want to connect to the network.

After this step, the question of how to install a Wi-Fi router can be considered closed.
Possible problems
If you can’t log into the administrative panel, try changing your browser. Some devices from different manufacturers have poor compatibility with the Google Chrome browser.
Be careful when entering the router's IP address. If the firmware was updated, it may become 192.168.0.1 instead of 192.168.1.1 (or vice versa).
If after setting up the router you have a weak wireless network signal, then consider installing the WiFi router in another, more open location. Sometimes in administrative settings you can select the signal strength level. Some router models have detachable antennas. If you change them to more powerful ones, you will be able to significantly expand the coverage area without changing the router (which is much cheaper).
Conclusion
The instructions described above are universal. It will help you decide how to install a D Link, ASUS, Netgear, Linksys, etc. router. Differences may only be in the administrative panel interface or minor nuances. Provided that you did everything correctly, all that remains is to connect your gadgets and enjoy the convenience of using the Internet wirelessly.
Nowadays there are a huge number of different Wi-Fi routers from different manufacturers on sale. And that’s good, there’s plenty to choose from. But immediately after purchasing a router, we need to install, connect and configure it. And if the connection process is practically the same depending on the model, then the setup process itself and the page with the router settings can be different even from the same manufacturer.
It is very difficult to give detailed and step-by-step instructions on setting up different models in one article. But I'll try. In this article I will describe in detail and show how to install and configure a Wi-Fi router. Regardless of what manufacturer and model you have. This universal instruction is suitable for both setting up a new router and re-configuring it. You can do everything yourself. And you don’t have to pay specialists for setup.
Login to the router settings. How to log into the web interface?
Each router has its own web interface (website with settings, control panel), which can be accessed through a browser by going to the appropriate address.
Important! To go into the router settings and configure it, your device (PC, laptop, smartphone, tablet) must be connected to the router via cable or Wi-Fi network. At the same time, there may be no access to the Internet on the computer. You don't need internet to log into the control panel!
If you have a high-speed connection on your computer (maybe with your provider's name), then after connecting through the router there is no need to start it!
To enter the settings we need find out the address our router and factory username and password for authorization. This information is located on the body of the device itself. It looks something like this:

On a computer or mobile device that is connected to the router, open a browser (Opera, Chrome, Yandex.Browser, etc.) and go to the address indicated on the case. Or try 192.168.1.1 and 192.168.0.1.
Important! We enter the address in the address bar, and not in the search bar. Many people get confused and instead of a page with settings they end up on a page with the search results of some search engine.

On the login page you need to specify a username and password. The factory settings are indicated on the device body. Most often these are admin and admin. On some models, the default settings are not protected, and immediately after logging into the control panel, you need to set a login and password.
Articles that may be useful to you at this stage:
If the settings page has opened, we can continue. If not, then see the article with solutions to this problem at the link above.
How to set up a Wi-Fi router?
In order to use the Internet through a router, you need at least:
- Set up an Internet connection.
- Set up a Wi-Fi network.
In most cases this is enough. I also recommend changing the password that protects the router’s web interface. There are also settings for IPTV, USB drives, parental controls, etc., but not everyone needs them.
In the control panel of almost every router there is a so-called “Quick Setup Wizard”, also known as “Quick Setup”. On some devices, it opens immediately after logging into the control panel. With its help, you can configure your Wi-Fi router step by step. Internet connection, wireless network, etc. For example, what it looks like at TP-Link:

You can try it, it's very convenient.
Internet setup. The most important step
The main thing is correctly configure the router to connect to the provider. If he cannot connect to the Internet, then all devices will have a “No Internet access” connection. Many users who try to configure everything themselves most often encounter problems at this stage.
Each Internet provider uses a specific type of connection. Dynamic IP (DHCP), Static IP, PPPoE, L2TP, PPTP. This type of connection must be specified in the control panel of the router, and certain parameters provided by the Internet provider must be specified.
Important! You must know exactly what type of connection your provider has. Also all the necessary data for connection (Username: Password), if they are necessary. As a rule, this information is specified in the contract that you received when connecting to the Internet.
Some providers bind by MAC address. It would also be desirable to clarify this.
If your provider uses a “Dynamic IP” (DHCP) connection, then the Internet should work immediately after connecting, since this type of connection is set by default on routers.
If the Internet through the router is already working (and you haven't run any connections on the computer), then you can skip this section and go straight to setting up Wi-Fi.
When the connection type is PPPoE, L2TP, PPTP, or Static IP (which is very rare), then you need to set the necessary parameters. Usually, this is the login and password that your provider gave you. In the control panel, the section with these settings is most often called: “WAN”, “Internet”, “Internet”.
For example, what the PPPoE connection setup looks like on an ASUS router:

Other examples:
Target: so that the Internet through the router works on all devices. Via cable and Wi-Fi. If this does not happen, then there is no point in continuing the setup.
You can always call the provider and clarify what parameters should be specified and where. They help many people over the phone.
Articles that may be useful to you:
I hope everything worked out for you.
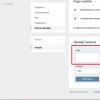
Changing Wi-Fi network settings
I highly recommend changing your Wi-Fi network name and password. It is also advisable to set your region. Everything is simple there. This can be done in the wireless network settings section. It can be called differently: “Wi-Fi”, “Wireless network”, “Wireless”, “Wireless mode”. If you have a dual-band router, then the settings must be set separately for the network at 2.4 GHz and 5 GHz.
- In the "Network name" (SSID) field you need to enter a new name. In English letters.
- In the "Password" field (wireless network key) create and write down a password. Minimum 8 characters. Security type - WPA2 - Personal.
- Well, there should be a “Region” field there. Change it to your own. IPTV on ASUS routers.
If something doesn’t work out for you during the setup process, you can always reset the settings to factory defaults and try setting everything up again. Find the “Reset” or “Reset” button on the case, press it and hold for about 10 seconds. The indicators will tell you when the reset occurred.
You can leave questions in the comments. I just have a small request, describe the problem in detail. Write the router model. Otherwise, it’s very difficult to understand and advise something when you don’t understand the question itself. Best wishes!
Almost every laptop has the ability to connect to wireless Wi-Fi.
Using this technology, computers exchange data between themselves and network devices (printers, access points, etc.), and also access the World Wide Web.
There are many laptop models, but they all work according to the same communication standards. Can you imagine what it would be like for their owners if Wi-Fi setup on each laptop was done differently?
Many laptops - one Wi-Fi
The procedure for setting up a wireless network depends only on the operating system.
Some manufacturers equip their laptops with network utilities, but this does not provide anything new, except that it makes the setup process more convenient. Of course, you can use them, but it is more useful to know how to work with OS tools.
If you figure out how to set up WIFI on Windows 7, 8 and XP using the system, you can do this on any laptop, regardless of the model.
Three conditions for turning on Wi-Fi for the first time
Before you connect your laptop to the Wi-Fi network for the first time, you need to do three things:
- turn on the wireless adapter (also called a WLAN or wireless network card);
- install the wireless adapter driver;
- start the WLAN autoconfiguration service.
Step 1. Enabling the Wi-Fi adapter
To turn on the Wi-Fi adapter on the laptop, there may be a button or key combination: Fn+ [one of the F1-F12 keys, where the Wi-Fi icon is shown]. You can tell that the adapter is turned on by the glow of the indicator on the laptop case:
Step 2. Driver installation
To install the wireless driver, connect the laptop to the Internet using cable access or a USB modem, go to the manufacturer's website and download the wireless driver for your operating system.
Run the downloaded file, wait for the installation to complete and reboot the machine.
To automatically start the WLAN AutoConfig service (if it is not running), open a Command Prompt with administrator rights and run two commands in it:
- sc config Wlansvc start=auto
- net start Wlansvc
After this, the Wi-Fi adapter will “see” access points located in the signal reception area.
Step 3. Setting up and connecting Wi-Fi on Windows 7 and 8
Quick connection
To connect your laptop to an existing Wi-Fi, click on the “Network” icon in the system tray and select the desired access point from the list.
Click the "Connect" button.
Enter your security key (password) and click OK. The connection will be established.
In addition to this method, you can connect to the selected wireless point by pressing the Wi-Fi button on the modem (router).
Important! Networks marked with a shield icon with an exclamation point do not require a password. They are not protected in any way, and data is transmitted through them in clear text.
Step 4. Connect to a hidden network and change the communication profile
To connect to an invisible network whose name is hidden, as well as to create a new wireless access profile, right-click on the “Network” icon in the tray and enter “Network Center...”.
In the “Change network settings” list in Windows 7, click “Set up a new connection or network”, and in Windows 8 (8.1) click “Create and configure a new connection or network”.
Select "Connect to a wireless network manually." This window, like the following ones, looks the same in Windows 8 and 7, so let’s look at the settings using Windows 8 as an example.
Enter the access point name (SSID), security type, encryption and password. If you are going to use this network constantly, check the “Start connection automatically” checkbox.
The “Connect if the network is not broadcasting” option should be checked when the access point is not visible in the list.
In the next window, you can change the connection parameters by clicking the button of the same name.
Basic parameters - name (SSID), grid type and availability cannot be changed. Security settings can be changed, but they must be the same as those assigned to the access point.
Step 5. Connecting and setting up Wi-Fi on Windows XP
Connect to available wireless networks. To connect your laptop to existing Wi-Fi networks, right-click on the “Network” icon in the tray and open “View available wireless networks.”
Select the desired access point from the list and click “Connect”.
Enter the password (security key) and its confirmation. After clicking on the “Connect” button, the connection will be established.
There are several ways to connect to Wi-Fi from a mobile phone (Android and iOS) or from a computer. In the instructions, we will also look at what problems you may encounter and how to solve them. We will also consider in detail the issue of setting up a network connection through the interfaces of the router itself and Windows.
How to connect Wi-Fi on your phone
Every modern smartphone has a Wi-Fi module in its hardware. Typically, you can connect your device to Wi-Fi in just a few steps. Use the quick access menu or connect through your phone settings. These steps for devices running iOS and Android will be described in more detail below.
On iPhones
Modern versions of the iOS operating system have a quick access menu, which is called up by swiping up. If your phone automatically connects to your home network, then you can safely turn on Wi-Fi through the lower toolbar. Press the wireless connection indicator until it lights up and becomes active. Afterwards, you will automatically connect to a known network.
If this is your first time connecting to a home or public network, you must complete the following steps:

Now you know how to connect Wi-Fi on any iOS device.
Possible problems and solutions
There are situations when a phone or tablet does not connect to Wi-Fi. The first and most common problem is a password-protected access point. You need to enter it in the appropriate field when connecting.

If the point does not have a password, but you cannot connect, take the following steps:
- check your Internet connection to see if the network is accessible from a computer or other device;
- make sure you are close enough to the router;
- make sure that automatic IP address distribution is enabled (DHCP function);
- reboot the router;
- reboot your mobile gadget;
- reset your router.
If other devices connect to your wireless network without problems, this means that the problem is with a specific mobile phone. We recommend taking it to a service center for diagnostics.
On Android devices
Despite the differences between Android and iOS, fundamentally connecting to Wi-Fi follows the same principle. To access the quick menu, swipe down on the unlocked screen, and then tap the corresponding Wi-fi icon.

Users can activate Wi-Fi through settings:
- Go to your phone settings.
- In the wireless networks section, click on WLAN (or Wi-Fi).
- Move the slider to the activated state, and among the available networks, click on the desired one.
- Enter your password if the system prompts you for one.
If you encounter problems, follow the same steps as described in the troubleshooting section for iOS.
If the connection to the router is hidden
When devices are connected to Wi-Fi, a corresponding icon appears at the top. However, in some situations, you cannot connect to a wireless network because it is hidden. The user will not find it in the search list. To connect to a hidden wireless access point, follow the instructions:

If all parameters are entered correctly, the phone will automatically connect to the hidden network. Make sure you are within its coverage area.
When DHCP is disabled
When trying to connect to the router, the user may see a persistent “Obtaining an IP address” message. Each device connected to the router receives its own IP address. DHCP (Dynamic Host Configuration Protocol) is responsible for distributing addresses. It may be disabled on some routers, so you must enable this protocol manually.

To activate DHCP, you need to go to the router settings. How to do this is described in detail in the subsequent paragraph “Access via the web interface”. Once you are in the settings, find the DHCP (or equivalent) section, and then select the Settings sub-item. Enable should be checked in it. Click "Save" and reboot your device.

DHCP may be disabled due to a problem in the router. Try a hard reboot. Press the button on the back of the router that says reset, and then hold it down for more than 5 seconds. Your password settings will be lost, but this will allow you to restore DHCP functionality.

Connecting Wi-Fi on a laptop
If you are connecting to a wireless network via a laptop, follow these steps:
WPS technology allows you to connect to the router quickly and easily. Using it, you do not have to enter a password on your computer or laptop. To do this, go to point 3 of the previous instructions. As soon as the password entry window appears, find the button on the router that says WPS, and then click on it. The laptop will automatically connect to the network.

WPS is often disabled by software. You can activate it in the router’s web settings. Go to the WPS section, and then click the “Enable WPS” button. If necessary, you can add a new device through the web interface by clicking the “Add device” button.

Now you know how to connect to Wi-Fi with a password.
Enabling on the case or using a keyboard shortcut
On some laptops, Wi-Fi is disabled by hardware. It must be turned on before connecting to a wireless network. The first way is to press a special button. Some manufacturers place a similar key on the keyboard or on the side of their devices.

You can also connect your laptop to Wi-Fi using key combinations. On many models, there is a button among the functional ones (F1-F12) to activate Wi-Fi. It must display the appropriate icon. To activate Wi-Fi, you need to press it together with the Fn key.

These are current ways to connect your laptop to Wi-Fi using buttons.