Can a hard drive be used as a flash drive? The computer does not see the flash drive - there is a solution Why does the hard drive see as a flash drive
An external hard drive is a portable storage device containing a storage device (HDD or SSD) and a controller for interacting with a computer via USB. When connecting such devices to a PC, sometimes some problems are observed, in particular, the absence of a disk in the “Computer” folder. We will talk about this problem in this article.
There are several reasons causing this problem. If a new drive is connected, then perhaps Windows “forgot” to report this and offer to install drivers and format the media. In the case of old drives, this may be the creation of partitions on another computer using programs, the presence of a blocking virus, as well as the usual malfunction of the controller, the disk itself, cable or port on the PC.
Another reason is lack of nutrition. Let's start with it.
Reason 1: Nutrition
Quite often, due to the shortage of USB ports, users connect several devices to one socket via a hub (splitter). If connected devices require power from the USB connector, a power shortage may occur. This leads to a problem: the hard drive may not start and, accordingly, may not appear in the system. The same situation can arise when ports are overloaded with energy-intensive devices.
In this situation, you can do the following: try to free up one of the ports for an external drive or, as a last resort, purchase a hub with additional power. Some portable drives may also require additional power supply, as evidenced by the presence of not only a USB cord included, but also a power cable. Such a cable may have two connectors for connecting to USB or a completely separate power supply.

Reason 2: Unformatted disk
When you connect a new blank disk to your PC, the system usually reports that the media is not formatted and prompts you to do so. In some cases this does not happen and it may be necessary to perform this procedure manually.
- Let's go to "Control Panel". You can do this from the menu "Start" or press the keyboard shortcut Win+R and enter the command:

- Next we go to "Administration".

- Find the label with the name "Computer Management".

- Go to the section "Disk Management".

- We are looking for our disk in the list. You can distinguish it from others by its size, as well as by the RAW file system.

- Click on the disk RMB and select the context menu item "Format".

- Next, select the label (name) and file system. Place a checkmark opposite "Quick format" and press OK. All that remains is to wait for the process to complete.

- A new disk has appeared in the folder "Computer".

Reason 3: Drive letter
This problem can arise when performing disk operations - formatting, partitioning - on another computer using special software.
In such cases, you must set the letter manually in the snap-in "Disk Management".
Reason 4: Drivers
The operating system is very complex software and that is why various failures often occur in it. In normal mode, Windows itself installs standard drivers for new devices, but this does not always happen. If the system does not start driver installation when you connect an external drive, you can try restarting the computer. In most cases this is enough. If the situation does not change, you will have to “work with your hands.”

If the software for the disk cannot be installed, you need to check the branch "Disk devices". If there is a drive with a yellow icon, this means that the OS does not have such a driver or it is damaged.

A forced installation will help solve the problem. You can find software for the device manually on the manufacturer’s website (perhaps it came with a driver disk) or try to download it automatically from the network.

Reason 5: Viruses
Virus programs, among other nasty things, can prevent the initialization of external drives in the system. Most often they are located on the removable drive itself, but they may also be present on your PC. First, check your system drive and, if you have one, your second hard drive for viruses.
You won’t be able to check the external drive using the tools given in the article above, since it cannot be initialized. Only a bootable USB flash drive with an antivirus scanner, for example, Kaspersky Rescue Disk, will help here. With its help, you can scan the media for viruses without loading system files and services, and therefore the subject of attack.

Reason 6: Physical problems
Physical malfunctions include failure of the disk or controller itself, failure of ports on the computer, as well as a banal “breaking” of the USB or power cable.
To determine the problem, you can do the following:
- Replace cables with known good ones.
- Connect the drive to other USB ports; if it works, then the connector is faulty.
- Remove the device and connect the drive directly to the motherboard (don't forget to turn off the computer before doing this). If the media is detected, then there is a controller malfunction; if not, then the disk. You can try to restore a non-working HDD at a service center, otherwise it will end up in the trash.
What should I do if, when connecting a flash drive, a message appears: “Insert the disk into the device”?
This situation is one of the most common when working with USB drives. The flash drive is connected, but the Windows operating system refuses to see it point blank. Or another common option, the system offers to format the device, and then reports that it is impossible to complete the formatting.
In this article we will try to analyze in detail why this happens and how best to correct such an error.
Partition structure errors or file system problems
You have probably heard more than once that a flash drive cannot be disconnected without first disabling it through “Safely Remove Hardware and Disks.”
The fact is that a connected flash drive can actively rewrite information to its file system, and a sudden power outage can lead to recording errors and malfunction of the flash drive. Accordingly, such problems may arise not at all through your fault, but as a result of a power failure.
In this case, the operating system does not see the partitions on the USB drive suitable for operation, so it displays an error.
The USB drive is missing important information.
If the information on the flash drive is not of any importance, the easiest way is to subject it to the formatting process. To do this, right-click on the flash drive itself in Explorer and select the “format” item of the same name.
Please note that the drive capacity may be unknown, you should ignore this message and leave the settings unchanged.
Did this method help you? Great, congratulations! You can stop wasting your time and read this article, from which you will learn how to make a Windows installation flash drive
What should you do if Windows cannot complete the formatting?
In this case, deleting all partitions through a standard Windows operating system utility called DISKPART can help.
To do this, type start menu in the search cmd or " Command line”, find the program of the same name and right-click on the item “ Run as administrator”.

And voila, our flash drive is ready for use again!
How to recover important files from a flash drive?
First of all, we will again use the DISKPART utility.
Having launched the command line as administrator, enter diskpart, and then the command chkdsk e: /f, where e: is your drive letter and may vary.
In the case where a failure has caused the flash drive to be unreadable, after checking with a higher probability, you will see your disk intact and with the necessary data.
But if the message “CHKDSK is not valid for RAW disks” appears on the command line, then everything is much more serious.
To correct this situation, you should contact the service, or, for example, use special paid or free utilities.
Let's hope that you were able to restore the usb drive using standard operating system programs.
Admin 06/15/2014 - 10:13 Tips
Today, the cost of USB flash drives is still quite high. And a drive with a capacity of 128 gigabytes will cost the user approximately 5,000 rubles. In comparison, a 500 GB hard drive (2.5" form factor) will cost in the range of 1500 - 2500 rubles! Naturally, the preferred purchase would be to purchase an external hard drive, or to complete it yourself...
How to assemble an external hard drive?
The benefits of self-configuring the device are obvious. This is not only an individual selection of external and technical characteristics, but also an opportunity to save money by using an existing hard drive.
So in the situation described below, we managed to get by with “little loss.” There is a 320 gigabyte hard drive, which was removed from the laptop due to replacement with a larger device. We buy an additional “box for hard drives” (case, pocket, etc.), which costs very little, from two hundred rubles and more. Next comes the assembly process, which takes 5 to 10 minutes.
If you are unsure of the success of completing the equipment yourself, then you should contact specialists. For example, inquire about the possibility of assembly at the place of purchase, or trust the service center.
Steps to assemble an external hard drive:
Connecting the drive to the computer:
We connect the resulting drive to the computer using the USB cable supplied with the box. We insert one end (micro-USB) into the corresponding connector on the box panel, and one (or two) into the free USB ports of your PC;
If the hard drive used in the drive was previously installed in a laptop, as in our case, then the installation will not require any additional actions. Windows operating systems older than XP automatically recognize controllers of this type. If you equipped the drive with a new hard drive, then at a minimum you will need to format it (often, no additional actions are required, since the factory hard drive is ready for use after connection).
Most models of boxes for external hard drives are equipped with an indication marked as “LED” (it can display the connection - constant light, or intermittent - reading and writing information). In addition, the box panel may have additional functionality. In our case, this is the “Backup” button, designed to start a backup of the specified directories or files (with the software installed).
P.S.
That's all, it took no more than 15 minutes to start copying data to the assembled disk. I hope you were able to assemble your external hard drive, spending a minimum of time and effort.
updated: 06/25/2016
leave a comment
wd-x.ru
Do-it-yourself external storage. USB drive from laptop hard drive.
Introduction. Most laptop owners sooner or later face the problem of running out of hard drive space. As a rule, laptops with screen sizes up to 15 inches inclusive do not have a free second slot for a 2.5-inch device. Therefore, owners are forced to think about either replacing the laptop itself or replacing its hard drive. After replacing the hard drive, there is always an old drive left, which can easily be turned into an external USB drive for transferring data. Naturally, you can purchase a mobile 2.5-inch hard drive and turn it into an external drive. Fortunately, the cost of external drives allows this. For example, at the time of writing, for a 250 GB mobile hard drive they are asking $40, and for a 500 GB device from WD they are asking only $45.We decide on the type of hard drive.
To be fair, it should be noted that an ordinary desktop 3.5-inch hard drive can also be turned into an external drive - you just can’t call it mobile. If you have an unused 2.5 or 3.5 inch hard drive, then first of all you need to decide on the type of its interface.
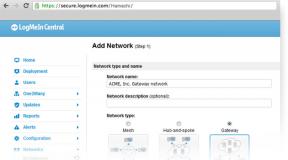
Today on the market there are the following types of interface: IDE (ATA) and various SATA options. As a rule, all SATA interfaces are backward compatible with each other, and we will not dwell on their variations. The situation is completely different between IDE and SATA interfaces, which are absolutely incompatible with each other and have different connectors.

The picture is clickable --
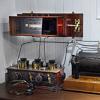
The figure shows two hard drives with different interfaces. Hard drives have a mobile format of 2.5 inches. On the left is a hard drive with a SATA interface, on the right is a hard drive with an IDE interface.

The picture is clickable --
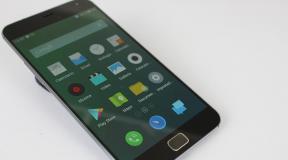
In our hands was a 250 GB hard drive from Western Digital Scorpio Blue series with a SATA interface. This drive was used in an Acer laptop for a long time, but its capacity became insufficient, and it was replaced with a more capacious 500 GB solution.

The picture is clickable --
Despite long-term use, the performance of the hard drive did not cause any complaints, so it was decided to use it as an external mobile drive. To do this, we had to find an external case for it, which is what we did. External case AGESTAR for 2.5 inch mobile hard drive. Computer hardware stores offer a wide variety of external cases for 2.5-inch hard drives. Their key difference is the following: - the material used to make the case, - the type of external port (interface), - the cost. As a rule, stores offer various cases with a USB 2.0 interface, a much smaller number of cases with an eSATA interface, and even fewer cases with a combination of USB 2.0&eSATA. Several cases with a modern USB 3.0 interface were found on sale, but their cost exceeded the cost of the hard drive itself, so we did not consider them. The key difference between USB 2.0 and eSATA interfaces is data transfer speed. Using the USB 2.0 interface allows for maximum compatibility, since these ports are available on all computers. A significant disadvantage of the USB 2.0 interface is its low data transfer speed, which will not allow you to unlock the full speed potential of your hard drive. The eSATA port is more promising, but it is not widespread and is found only in expensive versions of motherboards, cases and laptops. The eSATA interface allows you to fully unleash the potential of SATA devices. The material used can also be very different. In a simple case, it is plastic. In more expensive variations, an aluminum case with a leather cover is included. The cost of external cases also varies. The cheapest option will cost the user $3, expensive versions will cost more than $100.
Buying a $100 case for a hard drive that costs less than $40 when new and is half the price once it's in use is, to say the least, wasteful. Therefore, for testing we were provided with a case costing a symbolic 3 dollars - AgeStar SUB2P1.
Equipment and external inspection of AgeStar SUB2P1.

The picture is clickable --
We didn't expect any miracles from a device that costs three dollars, both in terms of equipment and in terms of performance. The device comes modestly packaged in a package. The front wall of the device is covered with a cardboard listing the key characteristics of the device. This includes support for 2.5-inch mobile hard drives or solid-state drives with a SATA interface, the presence of a USB 2.0 data transfer interface and various color options.
To be fair, it should be noted that our suppliers confirmed that they had not seen any other color for this case other than black.

The picture is clickable --
After opening the package, we were pleasantly surprised by the fact that the kit included an instruction manual entirely in Russian.

The picture is clickable --
The case is completely made of plastic. There are paper stickers on the front wall indicating the model, which will be erased in any case, so we recommend immediately removing them from the surface of the device.

The picture is clickable --
The material used to make the case is soft black plastic, which does not smell of anything and is uniform throughout its structure.

The picture is clickable --
The covers of the device come off in two different directions, which ensures easy removal and installation of the hard drive in an external case.

The picture is clickable --
The two sides of the outer case are secured using a plastic latch made from the material of the case. Thanks to the recesses on the walls, the lids are securely fixed and spilling any glass of liquid, or leaving the device in the rain, is unlikely to lead to any problems.

The picture is clickable --
The device is designed for SATA hard drives, which we have repeatedly emphasized. Inside there are controllers with SATA ports for power and data transfer.

The picture is clickable --
On the side wall there is a mini USB port for data transfer and power supply to the hard drive. There is no additional port to provide power to the drive, which may cause some problems for users. With a weak power supply that underestimates the voltage along the 5 volt line, you often have to deal with problems starting the hard drive. As a rule, connecting the drive directly to a port on the motherboard, and not on the system unit case, and using a high-quality USB cable allows you to forget about this problem.

The picture is clickable --
Sellers of computer components often, as an advantage of this or that external case, talk about the presence of a USB data cable in the kit or offer to purchase it separately if it is not there. We advise our users not to pay attention to this, since a mini-USB-USB cable, as a rule, is available in almost every family and is often supplied with mobile phones. In our case, we successfully used a stale data cable from a Nokia mobile phone.

The picture is clickable --
The next step was to install the hard drive into the case. This is done quite simply - by lightly pressing. The most important thing is to first correctly rotate the hard drive according to the power and SATA data ports located in the case.

The picture is clickable --
The absence of any protruding elements on the hard drive controller circuit allows you not to worry about its rear surface when transporting and using the device.

The picture is clickable --
Some users may argue that the plastic case does not provide adequate heat dissipation from the hard drive. Naturally, external cases made of aluminum cope with this task much more effectively. At the same time, we should not forget that mobile hard drives do not have such high power consumption that they suffer from overheating, and in laptops, as a rule, they are not additionally cooled with anything.

The picture is clickable --
After completing the assembly of the device, the stage of its testing and use begins. The supply of voltage to the device is accompanied by the glow of a blue LED, which also symbolizes the user about the process of data transfer. It should be noted that not everyone will have a smooth start when starting to work with the created external drive. If the hard drive has already been used, has been formatted and partitions have been created on it, you will not have any problems getting started. It works like a regular flash drive using the Plug&Play method. But those users who purchased a new hard drive without formatting and with no partitions will have a problem that will be associated with the absence of a drive letter in the “My Computer” tab.
To do this, you need to create partitions on the hard drive and format it. This can be done through various boot disks, but it’s better not to bother and do it in the Windows operating system itself.

The picture is clickable --
To do this, you need to go to the "Control Panel" through the "Start" section, then visit the "Administration" section. In this section, select “Computer Management”, where in the “Disk Management” tab you can partition and format the newly connected external drive. After creating partitions and formatting them, you will have access to them through the “My Computer” tab and you will be able to exchange with the drive as with a regular hard drive. Test configuration. The assembled external drive was tested both on a desktop computer based on a modern Core i7 processor and an equally modern motherboard, and on an Acer Aspire 7730 laptop based on a Core 2 Duo processor. It should be noted that the level of performance on two different systems turned out to be comparable.
1. Data reading speed was tested in the HD Tach 3.0.4.0 program

The picture is clickable --
It is pleasant to note that the external drive we assembled shows a much higher level of performance than the WD My Passport Essential external hard drive we previously tested. The maximum data transfer speed was 34.3 Mb/s, and the average latency was about 17.9 ms.
2. Data reading speed in HD Tune 4.5.

The picture is clickable --
In the second synthetic test, we received data similar to the previous ones, which also turned out to be slightly better than that of the official external hard drive WD My Passport Essential.
3. Write speed of 64 MB files in HD Tune 4.5.

The picture is clickable --
Testing that is closer to practice is somewhat more valuable, by recording files of 64 MB in size. In this test, we received quite expected results, which were also limited only by the capabilities of the USB 2.0 interface. Separately, I would like to note that throughout the entire testing, the temperature of the hard drive did not exceed 35 degrees Celsius, while a similar hard drive installed in the laptop had a temperature of about 43 degrees. Therefore, worrying about the operating conditions of the hard drive in this case on the part of users will be unnecessary.
4. Boot speed of the Windows 7 operating system.

During practical testing of the loading speed of the Windows 7 operating system image, we received results similar to other external drives with a USB 2.0 interface.
5. Assessing drive performance in Windows 7 environment.

We tested the performance of the external drive we assembled using the Windows 7 operating system. To do this, in the command line you need to call the command: “winsat disk -drive g -ran -write -count 10”, where “g” is the letter of the tested drive in the system.
From the test results it is clear that the drive we assembled received a much higher rating than the factory solution WD My Passport Essential.
Conclusion. Based on the materials in this article, it is clear that any mobile hard drive can be turned into a good external drive without any hassle. Especially for testing, we asked for the cheapest external case, costing $3. Three dollars allows you to get an excellent external drive from a mobile hard drive, at least for data storage. Not to mention the fact that the same external case makes it easier to recover data from the hard drive of “dead” laptops.
Despite the fact that many people criticize AgeStar's products for their low quality, after many years of using them I have only a positive impression of them. First of all, it is at an affordable price. Defects occur in all manufacturers, although AgeStar has a slightly higher rate than Thermaltake. But the latter has no analogue to the presented external case for three dollars and with a 6-month warranty. We award AgeStar products with a gold medal of honor for their optimal performance/price ratio.
megaobzor.com
Converting a USB flash drive into a hard drive
From a Windows point of view, any flash drive can be easily turned into a natural hard drive. That is, for the operating system, the USB flash drive will be perceived as a regular, fixed disk, and not as an external portable device. Why might this be needed?
This technique is described primarily for those who want to prepare a flash drive for installing Windows 7 from Windows XP using the DISKPART utility. The whole problem is that in Windows XP the DISKPART utility does not see the flash drive at all. Entering the list disk command for DISKPART at least a hundred times is useless: as a result, we will only be shown the available hard drives and nothing more.
Therefore, it is generally impossible to make a bootable USB flash drive with Windows 7 from Windows XP using DISKPART.
However, what a blessing - this problem can be solved in a clever way. Namely: we will turn the flash drive into a regular fixed disk. In other words, for Windows XP the flash drive will become another hard drive. And then DISKPART will show the disk we need as cute. Cool? Still would!
This conversion of a flash drive will be useful to you for other purposes, wherever you decide to use a flash drive instead of a removable hard drive.
By the way, are you wondering why the hell DISKPART doesn’t display the flash drive at all? It's all about the RMB (removable media bit) descriptor recorded on each flash drive. It is because of this that Windows XP (and other versions of Windows) perceive a flash drive as a plug-in device (i.e., a removable device). It is enough to delete this descriptor and the flash drive will mutate into a hard drive and will be displayed as a disk in the My Computer window, all file managers and generally everywhere.
A wonderful driver from Hitachi will allow us to do such a trick with our ears. Therefore, first of all, we need to download it, and then modify it.
Download Hitachi driver for USB flash drive
Unpack the driver archive and find the cfadisk.inf file. Let's open it. There's a lot of stuff in the file, but we need one section, it's called .
And it has the main line with which we do street magic. In the file it looks like this:

Now all we need to do is replace the selected part of the recording with the identification data of the flash drive, which we will turn into a hard drive. And then we will change its name.
How to do it? First of all, connect the flash drive to the USB port. Now open Device Manager (for example, select Start > Run, type devmgmt.msc and press the key).
Expand the Disk devices section, right-click on the name of the flash drive and select Properties.

Go to the Details tab. The Device Instance Code menu will immediately open there; this is the code we need. Highlight the code with one left click and press the key combination to save it to the clipboard.

Well, then everything is simple. Open the cfadisk.inf file, find the section, it contains a line that starts with %Microdrive_devdesc% and change the specified value after %Microdrive_devdesc% = cfadisk_install to the one copied earlier.
In other words, you need to change the line in bold below to the one you copied. Then save the cfadisk.inf file.
%Microdrive_devdesc% = cfadisk_install,USBSTOR\DISK&VEN_JETFLASH&PROD_TS1GJF168&REV_0.00\A7B03577C3F1B5&0
Now we change the name of the flash drive. At the very end of the cfadisk.inf file, find the line Microdrive_devdesc = in the section and change the value in brackets to any other. Initially, the value “UsbToFix” is indicated there, you can leave it.

The most important thing remains: install the updated cfadisk.inf driver for our USB flash drive. To do this, click again on the name of the flash drive in the Device Manager window and select Update Driver.

The Hardware Update Wizard window will open. Now step by step.
- In the first window, select the No, not this time radio button and click the Next button.
- Select the Install from a specified location radio button and click Next.
- Select the Don't search radio button. I'll select the driver I need and click Next.

- Click the Have Disk button.
- In the Install from Disk window, click the Browse button and select the driver folder where the cfadisk.inf file is located.
- Windows will ask if you really want to install the driver, click the Continue installation button and then click Finish.
Now it's done and the flash drive has turned into a hard drive, hooray. Disconnect it, connect it again and format it. And now look: instead of a portable device icon, the flash drive will be displayed as a hard drive.
Well, that’s all, the flash drive has successfully turned into a hard drive, and now it will become available to the DISKPART utility, and maybe you will find other uses for it.
windata.ru
How to connect a hard drive to USB
Let's say you upgraded your laptop and replaced some parts with more powerful, capacious and faster ones. Everything is great, but you still have old parts that are still quite functional and it’s a shame to throw them away. Of course, you can sell them online or give them away for free. But among them there is a little thing that may still be useful, and this is a hard drive.
Apr 11 2013
The computer does not see the flash drive - there is a solution
Hello. Your The computer does not see the flash drive, memory card or hard drive and you are wondering what to do? Surely every computer user has experienced a similar situation, or even more than one.
Today I will help you with solving issues if your computers do not see flash drives and other similar devices. I’ll tell you what problems there are with displaying usb devices and how to solve them.
Display problems
By the way, the last article was about data recovery from a flash drive. If you are interested in this, then replenish your knowledge.
Your computer does not see or detect the flash drive, hard drive and memory card. Let's look at the possible reasons for this situation. At the end of the article, don’t forget to watch a visual video lesson on how to make a flash drive or hard drive work.
A short outline of the article
- Device Definition
- Power indicator
- Front USB ports
- Not enough food
- USB disabled in BIOS
- USB device not recognized
- Outdated drivers
- Viruses
- Different file systems
- Conclusion
Determining the device
The first step is to determine exactly how the computer does not see your USB drive. From this answer it will be clear whether it is possible or not.
To do this, you need to go to Windows Device Manager.

In order to enter it, you need to right-click on the my computer shortcut on the desktop or in the start menu, go to properties, click on device manager.

After that, select disk devices.

We got to the device manager and the disk devices tab. If your flash drive or memory card appears in this list, then it is highly likely that you can recover data on it. If there is no flash drive there, then the memory card controller is most likely burned out. I recommend trying to connect your USB device to other computers.
If nothing changes and the flash drive is still not visible, then the problem is probably a faulty controller. It’s unlikely that you will extract data from such a USB device; you can, of course, contact special institutions that do this (they are not in all cities), but they will charge you a tidy sum for the work. So think about whether you need it or not.
Your flash drive is visible as a device, but it does not appear in my computer or Explorer, or asks to be formatted. To do this you need to go to disk management. To get into it you need to perform the following steps. Here are screenshots for clarity:
Right-click on my computer and go to management.

Go to disk management.

The device is displayed, writes its volume and file system - it is ready for use and functions normally.
The device is displayed, shows its capacity, but does not display the file system and writes “not defined”. In order to use it, you need to right-click in the Not Defined window and select Format.
You can check the quick formatting box and click OK. After the device is formatted, it should work in normal operating mode.

Displayed as a removable device, says no media and does not show the file system. All these parameters indicate that this device is not working properly, there is internal or external damage to the controller. You can hardly read information from such a flash drive without special expensive equipment.
Power indicator
When you connect the flash drive to the computer, a small indicator on the USB device should light up. If it lights up and starts blinking, then everything is fine with the flash drive, but not with the operating system, you need to look for the reason in it. If the flash drive indicator does not light up, then the problem may be in the device itself or the connected port of the computer.
Front USB ports
There have been cases when a flash drive is connected to a computer via the front USB ports, but the flash drive does not work. Perhaps these front usbs are turned off or they forgot to connect them to the motherboard.
Not enough power
Power shortages mainly occur when connecting hard drives through the front USB ports of the computer, hubs and hubs. It is best to connect such devices directly to the USB connectors on the motherboard, that is, at the back of the computer. If you use a usb hub or hub, then disconnect unnecessary devices, this may help. The reason may also be a low-power computer power supply.
USB disabled in BIOS
This problem is rare. Mainly in computer clubs and similar entertainment establishments. What is it for? To prevent a person from introducing viruses and downloading various programs and unnecessary information onto the computer. This is more of a protective measure. If this is a home computer, then you need to go to the settings and check the box to enable the launch of usb devices in the motherboard.
USB device not recognized
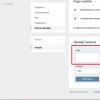
The usb device is not recognized and when you connect a flash drive, the operating system gives it an already used letter (volume label in use). This does not always happen; there are other cases. In order to fix this you need to go to the computer control panel.

I showed how to enter it above, or you can open the Run window - keyboard shortcut Win + R (checkbox between Ctrl and Alt plus the letter R) and type the command diskmgmt.msc. Go to disk management, find the desired device - a flash drive, right-click on it and select Change drive letter or drive path. In the window that appears, you can add or change this letter.
Outdated drivers
It is possible that your drivers are outdated - update them. To do this, you need to find out what manufacturer and model of your motherboard is. Usually written on the packaging box, if you saved them, of course. If not, then use the Everest or Aida program.
Using them, you can find out the model of your motherboard and a lot of other useful information about your computer. After you have found out everything, you need to go to the manufacturer’s official website, find the required motherboard and download drivers for the chipset and usb device, if any.
Viruses
There have been cases where the computer does not recognize the flash drive due to viruses that have appeared in your operating system. To do this, I recommend using good anti-virus programs and doing a full virus scan at least once a month. If you don't have it, you can use a free antivirus, or purchase a paid product.
Different file systems
This happens, but very rarely. Your computer does not see the flash drive due to a conflict between the computer’s file systems and USB devices. Most flash drives work in two file systems: FAT and FAT32, and hard drives work in NTFS.

You can try formatting your flash drive in a different format such as FAT32 or NTFS. Maybe after this everything will work fine.
Helpful information. On a flash drive in FAT and FAT32 format, you can upload information in one file of no more than 4 Gigabytes, and on a hard drive much more. Therefore, if you encounter such a problem, be prepared for it and keep it in mind.
And for dessert, watch a short video tutorial on how to make your computer see a flash drive and hard drive. For convenient and enjoyable viewing, I recommend watching this video in full screen, that is, in full screen mode.
The computer does not recognize the flash drive and hard drive
Conclusion
And I also have some news. Yesterday my email account was hacked. I tried to restore it, but to no avail. I filled out the form to the support service, the answer should be sent within 3 working days, I will wait for news. If everything goes well and I can restore my mail, I will definitely write a separate article about it. After all, this problem happens to many Internet users.
Perhaps you have any questions or questions - your computer does not see the flash drive. You can ask them below in the comments to this article, and also use the form with me.
Thank you for reading me on