How to properly connect two sata hard drives. How to install a second hard drive. Initializing the disk in the OS
Sooner or later, any user is faced with the fact that his data no longer fits on his existing hard drive. A second hard drive can be a solution to this problem. In this article we will tell you how to install a second hard drive on your computer.
Step #1: Prepare your computer for installing a second hard drive.
First, you need to prepare your computer. First, you need to turn off the power and disconnect all cables from it. Simply turning off using the button on the power supply is not enough; the computer must be completely disconnected from the power supply.
Secondly, you need to open access to the internals of the system unit. To do this, you need to remove both side covers. Typically, the side covers are fixed to the back of the system unit with four screws. Remove these screws and carefully remove both side covers.
Step No. 2. Installing the second hard drive and securing it.
Once the computer is completely unplugged and the side covers are removed, you can begin installing the second hard drive. Hard drives are installed in a special compartment of the system unit. Identifying this compartment is quite simple. It is located on the lower right side of the system unit, and its width is exactly suitable for 3.5-inch hard drives.
In inexpensive computer cases, this compartment is usually turned with the hole towards the motherboard (as in the photo below). In more expensive models of computer cases, the hard drive compartment is turned towards the side cover.

When installing the hard drive, it is better to keep the system unit in a vertical position. Insert the hard drive into the hard drive bay (as shown in the photo below). In some cases, in order for the hard drive to fit into the bay without problems, you will need to remove the video card or RAM. You can read about how this is done in our articles: and. If your system unit has a lot of space for hard drives, then try to install the second hard drive away from the first. This way they will cool better.
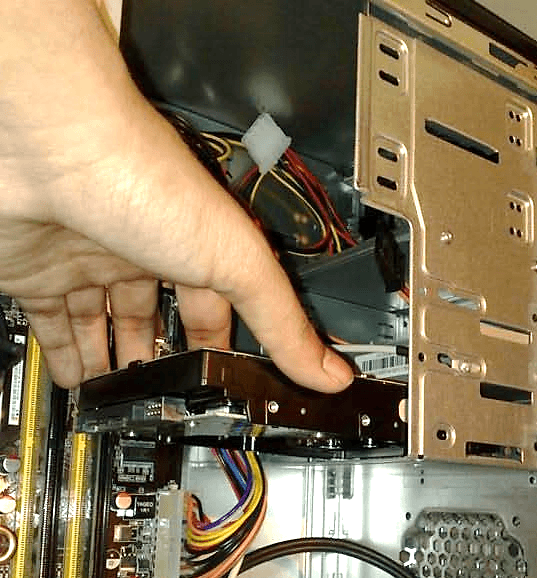
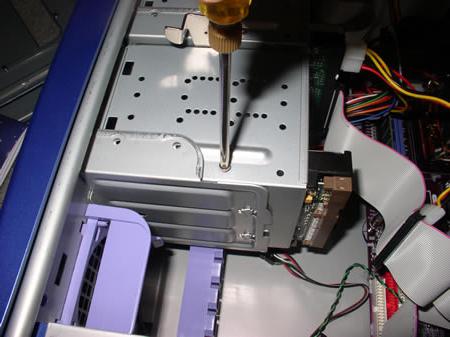
Once the second hard drive is installed in the hard drive bay, it must be secured using four screws, two on each side of the hard drive (see photo below). You should not save screws and fix the hard drive with only two or three. In this case, it will vibrate and create a lot of noise.

Step No. 3. Connecting a second hard drive to the computer.
Once the second hard drive is installed in the computer and securely secured, you can begin to install it. Hard drives are connected using two cables: one cable goes to the motherboard (data is transferred through this cable), and the other to the power supply (it is used for power supply).
A cable is used to connect the hard drive to the motherboard (see photo below). This cable usually comes with the motherboard. If you do not have such a cable, you can purchase it separately.
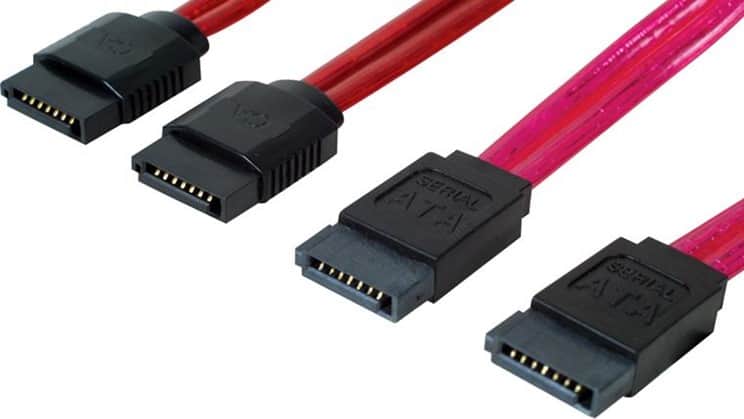
To connect the hard drive to power, use a cable with a similar connector. (photo below).

If there are difficulties connecting the second hard drive to the computer, then look at how the first hard drive was connected and proceed in the same way.
Step No. 4. Assembling the system unit.
After the hard drive has been installed, securely fixed and connected, the system unit can be closed. Replace the side covers and secure them with screws. After installing the side covers, the computer can be connected to power and started. If everything was done correctly, then after the computer starts, a second hard drive will appear in the system.
When assembling a PC, upgrading it and repairing it, sometimes it is necessary to install a hard drive on the computer. Let's consider the basic rules and requirements that must be taken into account in order to get an excellent result, spending a minimum of time.
Basic steps for installing a hard drive
The most common reason for installing a new hard drive is the failure of the previous one. In this case, the replacement process is surprisingly simple. To begin with, of course, you need to open the cover of the system unit, for which you first unscrew 2 fixing screws on each wall of the back side of the case (it is better to put the screws in plain sight so as not to lose them). Next, you need to disconnect the burnt hard drive from the power cable and data bus, free it from the mounting screws and remove it.
Having it as a sample, go to the store. And having purchased a new analogue, remove the hard drive from the packaging and inspect it to ensure there are no serious external damages or scratches. If you haven’t found one, then proceed to install it. Everything needs to be connected in reverse order. After completing this procedure once, you will already know how to install a hard drive on your computer
It is important to note that all work is performed with the power turned off; also, for convenience, disconnect all cables connected to the PC case and place it on the table.
Features of installing hard drives of different formats
Let's look at how to install a new hard drive if this is your first time doing this. Attaching a hard drive will not be much more difficult, but for those who do not have the relevant experience and are faced with this task for the first time, the information presented will be useful.

First of all, you need to remember that different generations of hard drives have different connection standards, and, accordingly, different connectors.
Installation Rules
If we rely on the opinion of most experts on how to properly install a hard drive, then first we advise you to make sure that the motherboard supports the installed hard drive, and also confirm their compatibility. Some motherboards may have two types at once: SATA and IDE, but usually in such motherboards DVD drives are connected to IDE cables. Although they are also suitable for hard drives.
Previously, in computers, the emphasis was placed on the practice-tested IDE format, which has confirmed its reliability and compatibility with many well-known models. But since technologies are constantly developing, outdated ones are gradually being abandoned, and new, more modern ones are replacing them. With the introduction of the new SATA format, IDE is becoming a thing of the past, and although drives with it are no longer sold, it is still widely used.

Features of formats
The electronic and mechanical basis of both formats is identical, the differences are in the type of interface used. has a maximum of 133 MB/sec. Existing standards SATA1, SATA2 and SATA3 provide up to 150, 300 and 600 MB/sec, respectively.
The advantages of IDE include the ability to connect two devices to one cable (the common one is divided between them), and each SATA device is connected with a separate interface cable.
Another disadvantage of the IDE is the need to manually select and use jumpers to set the modes - Master/Slave, and also to enter into the settings in the BIOS which hard drive should be considered the main one if a second one is connected.
Features of installing a new disk in the system unit
Let's consider the question of how to install a new hard drive. First, you need to insert our hard drive into a specially designated place for it; usually you should look for it closer to the front of the case.
Select its location in the bay to install it where it can best be cooled by PC coolers. Its optimal position is in the center. Install the new hard drive horizontally and securely fix it. Attach the screws well so that they are located on both sides.
Reliable fastening will prevent vibrations of the hard drive itself during operation. Vibrations for a hard drive that has moving mechanical elements are destructive. In addition, with tight contact between the disk and the case, the walls, like a radiator, remove the heat generated by the hard drive. Next, connect the power and data cables.
How to install a new SATA drive
Unlike an outdated IDE, a more advanced one is much easier to connect to. As we already know, with this standard, each hard drive is connected using a separate cable.

The SATA hard drive interface also has two connectors: narrow and wide. But here the question of how to install a new hard drive lies in the presence of a different connector through which data is transferred from the motherboard, and voltage is supplied through the wide one.
The SATA cable connects to the data connector. They come in different types: straight and angular, without latches and with them. But it is impossible to mix up and plug the cable in the wrong direction, so there is nothing to be afraid of.
The hard drive can be connected to the SATA connector arbitrarily. Although there are variants of the SATA-1, 2 and 3 standards, they differ only in the speed of information transfer and are absolutely compatible both at the level of physical connection and logically.
The second end of the cable is connected to the connector on the motherboard. They can also be angular or straight, and are usually brightly colored and easily recognizable.
Connecting power to the drive
After the most labor-intensive operations have been completed, and we have figured out how to install a new hard drive, now all that remains is to connect it to power.

It is supplied to both IDE and SATA hard drives directly from the PC power supply. It is supplied to IDE drives through Molex connectors, while the SATA standard has its own connector - a wider one.
Keep in mind that SATA power is not always natively present in the set of connectors on the computer's power supply itself. It may turn out that you have a PC with an old model block, and this connector is not there. How to install a hard drive on a computer in this case?
It all depends on the specific model of power supply. In this case, an IDE-SATA adapter will help you. They come in different designs, and sometimes some examples act as splitters for several devices. Basically, that's all you need to know how to install a hard drive on your computer. What if you have one hard drive, but want to add a second one?
How to install a second hard drive

Sometimes a situation arises when, when downloading new files, you suddenly discover that your hard drive does not have the free space necessary for this. Of course, there is a way out - deleting old unnecessary documents and defragmenting, but all these attempts to free up a few hundred megabytes (or at best gigabytes) are only temporary success. After some time, you discover that the disk is again full to capacity, and you have no room for new films or music.
What to do in this case? There are several ways to solve the problem. You can replace your old hard drive with a new one, which has much more memory. How to install a new hard drive has already been described above. But you need to understand that this entails a lot of additional problems. It is necessary to reinstall the OS, and, accordingly, all previously downloaded drivers, applications and programs. You will also have to transfer all important information from the old disk to the new one. A lot of time will be spent on this operation.
But there is another way to solve the problem - purchase a second, additional hard drive. We'll look at how to install a second hard drive below.
Installing an additional SATA hard drive has proven in practice to increase system speed. By interacting with heavy software systems, you can qualitatively feel the superiority of the new format. Applications and programs do not slow down at all, and loading occurs instantly. In addition, the energy consumption and power of SATA drives are minimal, which practically does not lead to possible overheating of the hard drives.
How to connect a second hard drive?
The procedure for connecting a second, additional hard drive is no different from how to install a hard drive on a computer for the first time, and corresponds to the previously described process.
When connecting a second IDE hard drive, there is a small nuance - a jumper. You need to set its status using a special jumper. For the main hard drive it must be set to the Master position, and for the additional one - to the Slave position. With new SATA format drives this is no longer necessary.
Each hard drive in the system unit has its own compartment. You only need to make sure that the distance between the installed devices is sufficient to ensure good ventilation. Do not place them close to each other; it is better to leave a free span. If it is not possible to distribute two disks on different shelves, you can install an additional fan to prevent overheating of the media, which negatively affects the durability of the elements and the safety of your information.
After this, carefully secure each hard drive to the case to avoid vibration. If they still appear after turning on the second hard drive, this indicates an obvious problem. Vibrations threaten you with hard drive errors and the possibility of losing information. Therefore, do not neglect the fasteners. This will help reduce the possibility of vibration as much as possible.
What to pay attention to after installation
Recently, appropriate instructions have begun to be supplied with the hard drive, which tells how to install a hard drive on a computer, so if you look there additionally, there should be no difficulties in the process. After the work has been done, take care not only to connect the cables correctly, but to lay them carefully so that they do not stick out. If possible, move them further inside and, if necessary, secure them with electrical tape or plastic ties.
With a desktop computer the situation is much easier than with a laptop, so let's start with it. So, you already know what characteristics to rely on when purchasing, so we’ll leave this topic outside the scope of today’s article.
- First of all, even before purchasing, you should have figured out what free connectors for connecting drives are available on your motherboard - the old IDE or one of the varieties of SATA (I, II or III).
- And secondly, what free power connectors are available on the .
Modern hard drives, motherboards and power supplies work with SATA connectors. However, if they are all already occupied on the power supply, then also take care of purchasing a Molex-SATA adapter to connect your second drive to Molex-type power.
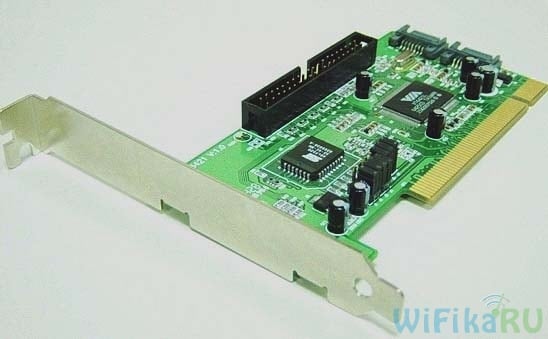
If you want to use a second old hard drive with a connection to an “IDE” type motherboard, and your latter is new and no longer has such an input, then we buy an adapter from IDE to SATA.
Another option to connect a hard drive to a computer that does not have a corresponding connector for it is to use a special IDE-SATA PCI controller. Its advantage is that with it you can either connect an old IDE drive to a new board, or a new SATA drive to an old motherboard. It looks like an expansion card that is inserted into a PCI slot on the motherboard and adds support for working with IDE devices. Let me remind you that you can connect two disks or drives to a standard cable at once.
Let's say you have already figured out all your nuances, purchased a second hard drive and, if necessary, adapters, and now you need to install it in the case and connect it to the motherboard and power supply. First, we secure the hard drive in a special basket in the case, or insert it along the guides and secure it with special fasteners or ordinary screws, depending on the type.

After that, we connect the “small” SATA to the corresponding connectors on the back of the drive and on the motherboard, and into the larger SATA socket (for power) we insert either an adapter connected to the cable from the power supply, or directly the power supply cable with a SATA plug. We do this carefully so as not to break the socket on the hard drive, since there is no limiter at the bottom and you can easily break off a piece of the board with the contacts of this connector.
In the screenshot below, green arrows indicate wide SATA arrows that connect the second hard drive to the power supply, and red arrows indicate narrow ones that go to the motherboard.

Yes, do not forget that all connections must be made with the power supply disconnected from the outlet, or with the power switch turned off, if there is one on it. As you can see, there is nothing complicated.
How to install a second hard drive in a laptop?
Is this really possible? Yes, today you can also increase the amount of space not only on a desktop PC, but also on a laptop. And to do this, it is not at all necessary to replace the standard hard drive that is already in the laptop, and therefore you will not have to face all the associated problems, such as transferring files and reinstalling Windows and all programs on a new hard drive.
The second hard drive in the laptop (let me remind you, 2.5 inches in size) is connected using a special adapter, which is installed instead of a laptop DVD drive - you must admit, almost no one uses this device now. And if you need to view discs, you can always use an external one connected via USB.
This is what this adapter, invented (or copied?) by the Chinese, looks like:

In online stores it can be found under the name “2nd SSD HDD HD Hard Disk Driver Caddy SATA for 12.7mm CD / DVD-ROM Optical Bay”. Inside and outside this adapter there is a connector for connecting a disk and for connecting the adapter itself to the laptop board.
So, we insert the hard drive into the adapter. You may also have to screw the mount yourself to the back of the adapter, through which it will be screwed to the laptop body.


And in its place we insert the adapter and secure it with the same screw. After this, a new hard drive will appear in the “Computer” menu, which after formatting can be fully used.
How to install a small hard drive in a computer?
Speaking about connecting a hard drive, one cannot help but touch upon the problem that users sometimes encounter when they need to install a hard drive or 2.5″ SSD into a computer whose case only has mounts for standard 3.5″ drives. For this case, there are also special adapters in which such a hard drive can be secured and inserted into a regular place under disks of larger diameter.

BIOS does not recognize the second hard drive
Another common problem that you may encounter when you have 2 hard drives installed is that the computer simply does not see one of them. First of all, if you are using an adapter, then this may be the problem. Use known-good adapters.
If you haven’t used it or your adapter is working, then the whole point is in the BIOS settings, namely, the operating mode of the hard drive controller is incorrectly set.
We reboot the computer, go into the BIOS and look for the “SATA Controller” item (or SATA ATA/IDE/Raid Config, Mass Storage Controll or something else like that to set the HDD operating mode). If you connected a drive to the motherboard via a SATA cable and a modern operating system is installed on the computer (Windows Vista, 7, 8 and higher), then the AHCI, IDE, Native or Enchansed position can be activated in this item. Wherein
Only in AHCI mode will the maximum data transfer speed from the disk be achieved.
If there is an older Windows, or if the hard drive was connected, then only IDE, Native or Enchansed.
The disk controllers themselves must also be enabled. Here are a couple of screenshots from different BIOSes with these settings:

If your computer has 2 hard drives (or a disk + DVD drive) and both of them are connected via IDE cables, then the problem may be that they are not configured correctly with each other. If you have just such a connection and in the BIOS you see the following picture:

then this is your case. In this configuration (when both are connected via IDE), one disk should be Master, that is, the main one, the one on which Windows is located, and the other Slave, that is, secondary.
This priority is adjusted using a special jumper installed on the contacts on the back of the case.

All possible positions of this jumper and their modes are usually described on a sticker on the disk body. They may differ from one manufacturer to another.

From our table we see that if Windows is installed on the disk and it will be the main one (Master), or if it is used alone, then we put a jumper on the first 2 vertical contacts. If it is secondary (Slave), then remove the jumper altogether.
We do this with our hard drives and go into the BIOS again. Now they will be automatically detected by the motherboard and the following picture should be drawn:

Friends, I can explain to you in a nutshell why this happens, for example, you installed Windows 8 on one hard drive, and then Windows 7 on another, so Windows 8 commands the loading of both operating systems and all the files responsible for loading are in it, if If you delete it or dismantle the disk on which it is installed from the system unit, you will no longer be able to boot Windows 7. Why? Because...
1. The partition from which the operating system is loaded is not active.
2. Or the partition from which the operating system is loaded is active, but there are no operating system boot files on it. For Windows 7, 8, the bootmgr file and the Boot folder with boot configuration files (BCD).
4. If you have permanently disconnected one hard drive, you can restore booting of Windows 7, 8.1, 10 remaining on the second drive using our article.
5. You can also produce .
Note: EasyBCD 2.0.2 boot manager is best used if you have two or three operating systems installed on one hard drive.
- If you want to install several operating systems with bootloaders independent of each other on different hard drives, then everything needs to be done so that each installed Windows does not know anything about its neighbor located on another hard drive installed in the same system unit. That's all. Another question, how to do this and how to then control the computer boot? The answer is yes, very simple.
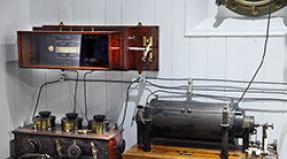
Look at my working system unit, it contains four hard drives and operating systems are installed on all hard drives, they all start and work in the system unit together or one at a time. None of the systems have special boot managers installed: EasyBCD 2.0.2 or MultiBoot.
SiliconPower SSD (120GB) - Windows 8 installed
SSD ADATA SSD S510 (60GB) - Windows XP installed
Kingston HyperX 3K SSD (120GB) - Windows 7 installed
Simple Western Digital Caviar Blue hard drive (250 GB) - Ubuntu Linux installed


The secret is simple, install any operating system on your computer, then simply disconnect the hard drive with this Windows from the system unit and connect another hard drive, and install another operating system on it, if you have a third hard drive, do the same with it. But now the most important thing, when you install everything and connect all the hard drives to the system unit, how to manage the loading of operating systems?
If there are several hard drives in the system, the parameter appears in the BIOS (AMI) Hard Disk Drives,
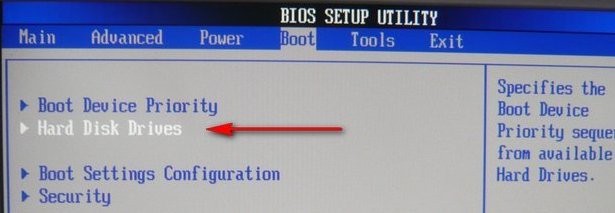
And in the BIOS (Award) the parameter Hard Disk Boot Priority,

In BIOS UEFI parameter Hard Drive BBS Priorities, all of them are responsible for the primacy or priority of hard drives in the system.

If in any of the above parameters a certain hard drive is listed first, then the computer will boot from it first by default, since it is the main one. But to quickly change the priority of the hard drive, it is not at all necessary to go into the BIOS every time and look for these parameters; you can make everything simpler.
When loading, press the Delete or F8 key and enter the boot menu, then use the arrows on the keyboard to select the hard drive with the operating system you need and press Enter, the Windows you have chosen will load.
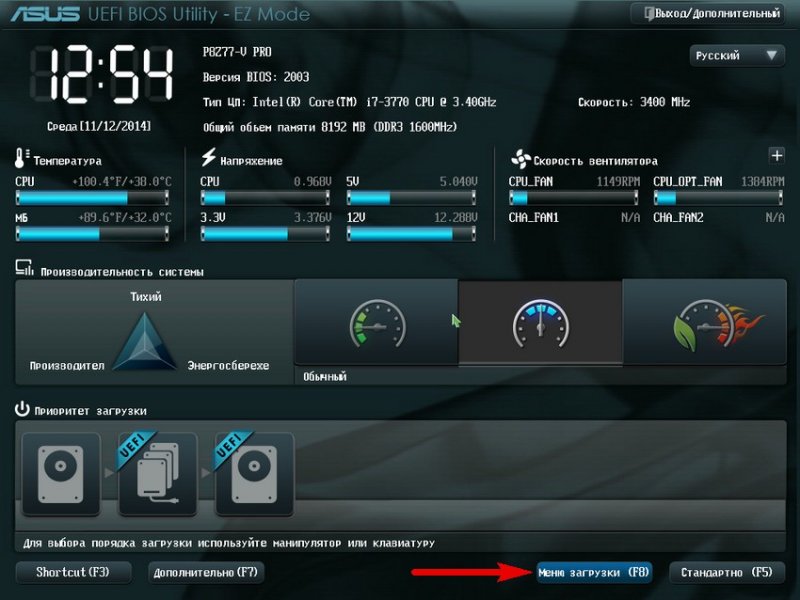
If you most often use a particular operating system, then you need to make it bootable by default.
Boot parameter No. 1 is the hard drive on which the operating system boots by default first. Click on the parameter with the left mouse

And in the menu that appears, select the hard drive with the Windows we need. For example, I will choose a SiliconPower SSD with Windows 8 installed, since this is my main operating system.


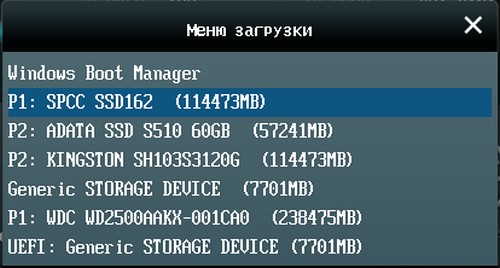
And Yes, the computer reboots and loads Windows 8 on the SiliconPower SSD hard drive I selected.

If during the day I suddenly need Windows XP, then I reboot, press Delete, enter the boot menu and select the hard drive with Windows XP installed and that’s it.
Hello.
Almost all new laptops (and computers) come with one partition (local disk) on which Windows is installed. In my opinion, this is not the best option, because... It’s still more convenient to split the disk into 2 local disks (two partitions): install Windows on one, and store documents and files on the other. In this case, if there are problems with the OS, you can easily reinstall it without fear of losing data on another disk partition.
If earlier this would have required formatting the disk and partitioning it again, now the operation is done quite simply and easily in Windows itself (note: I’ll show you using Windows 7 as an example). At the same time, the files and data on the disk will remain safe and sound (at least if you do everything correctly; if you are not confident in your abilities, make a backup copy of the data).
1) Open the disk management window
The first action is to open the window disk management. This can be done in different ways: for example, through Windows control panel, or you can use the “Run” line.
To do this, press the button combination Win and R- a small window with one line should appear, where you need to enter commands (see screenshots below).

Win-R buttons
Enter the command diskmgmt.msc and press Enter (as in the screenshot below).

2) Volume compression: i.e. from one section - make two!
The next step is to decide which disk (more precisely, partition on the disk) you want to take free space from for the new partition.
Free space is emphasized for a reason! The fact is that you can create an additional partition only from free space: let’s say you have a 120 GB disk, and there is 50 GB free on it - which means you can create a second local disk of 50 GB. It is logical that you will have 0 GB of free space on the first partition.
To find out how much free space you have, go to “My Computer”/”This Computer”. Another example below: there is 38.9 GB free on the disk - which means the maximum partition that we can create is 38.9 GB.
Local drive "C:"

In the Disk Management window, select the disk partition from which you want to create another partition. I chose the system drive “C:” with Windows (Note: if you “split off” space from the system drive, be sure to leave 10-20 GB of free space on it for system operation and for further installation of programs).
On the selected partition: right-click and select the “” option in the pop-up context menu (screen below).


Request space for compression.
In the next window you will see:
- Space available for compression (this is usually equal to the free space on the hard drive);
- The size of the compressed space is the size of the future second (third...) partition on the HDD.
After entering the partition size (by the way, the size is entered in MB), click the “Shrink” button.

If everything was done correctly, then after a few seconds you will see that another partition has appeared on your disk (which, by the way, will not be distributed, it looks like in the screenshot below).

In fact, this is a section, but you won’t see it in “My Computer" and Explorer, because... it is not formatted. By the way, such an unallocated area on the disk can only be seen in specialized programs and utilities (“Disk Management” is one of them, built into Windows 7) .
3) Formatting the resulting partition
To format this section - select it in the disk management window (see screenshot below), right-click on it and select the ““ option.

In the next step, you can simply click “Next” immediately (since the partition size was already decided at the stage of creating an additional partition, a couple of steps above).

The next window will ask you to assign a drive letter. Typically, the second drive is the local drive "D:". If the letter “D:” is busy, you can select any free one at this stage, and subsequently change the drive and drive letters in a way that is more convenient for you.

The next step: selecting a file system and setting a volume label. In most cases, I recommend choosing:
- file system- NTFS. Firstly, it supports files larger than 4 GB, and secondly, it is not subject to fragmentation, like FAT 32 (more about this here:);
- cluster size: default;
- Volume label: enter the name of the disk that you want to see in Explorer, which will allow you to quickly find out what is on this disk (especially if you have 3-5 or more disks in the system);
- Quick formatting: It is recommended to check the box.

The final touch: confirming the changes that will be made to the disk partition. Just click the “Done” button.

Actually, you can now use the second disk partition as usual. The screenshot below shows the local drive (F:) that we created a few steps earlier.

The second disk is the local disk (F:)
PS
By the way, if “Disk Management” does not solve your aspirations for disk space, I recommend using these programs: (using them you can: merge, split, compress, clone hard drives. In general, everything you might need in everyday work with HDD). That's all for me. Good luck to everyone and fast disk partitioning!