Where to find the camera in an Asus laptop. How to enable the built-in camera on a laptop with the Windows operating system using programs or key combinations. Drivers to enable Bluetooth
A person who has purchased a laptop, turned on and configured the operating system, launched all the drivers and done everything else in accordance with the installation instructions will definitely want to familiarize themselves with all the capabilities of the laptop. He has a lot of them and one of the most valuable is a webcam. But for it to start working, it must be turned on.
How to turn on the camera on an Asus laptop?
The tips described below are valid for any Asus model. So, you need to start the activation process by installing the drivers, even if the activation is planned using keys, you cannot do without drivers. In addition to them, you will also need a special program.
If you installed Windows 8 or 7, XP or Vista OS yourself, then there are no auxiliary tools for connecting the camera for the simple reason that Microsoft ignores downloading the drivers and utilities required in this case during startup. You need to take care of their presence in the gadget yourself. Those who purchased the system at the pre-installation stage can immediately proceed to the stage of turning on the camera on the Asus laptop.
The drivers that will be used to enable it must be standard ones exclusively for Asus, and the program for the webcam can be anything. On the keyboard you need to find the fn key and a picture of a camera or camera. Both of these buttons, pressed together, perform a quick turn on.

How to set up the camera in an asus laptop?
After the issue of turning on the webcam is resolved, it’s time to think about how to set up the camera in an Asus laptop. To do this, you need to do the following:
- open the Life Frame utility. This can be done using the mouse. As a standard, the program for a webcam on an Asus laptop has its own shortcut and is located on the desktop;
- You need to double-click on the shortcut with the mouse, and the utility will launch. The camera is ready to use.
You can clarify the settings through the Asus Camera Screen Saver program. In order not to worry about how to set up a webcam on an Asus laptop, you need to double-click on this shortcut, which is located on the desktop by default.
You should consider this program as an assistant in the question of how to take a photo from a web camera on an Asus laptop. It was created not only to demonstrate the capabilities of the webcam, the parameters of which can be set.

How to take a photo with a webcam on an Asus laptop?
Since the main purpose of the camera is to photograph and film, you need to know how to take a photo with a webcam on an Asus laptop. This does not cause any particular difficulties. In the section of the Asus Camera Screen Saver program, which the manufacturer must install on the desktop, there is a special subsection, opening which you need to find how to take a photo with a web camera on an Asus laptop. By following the instructions, you will be able to do this without the slightest problem.
Another option is an external program, which you can also run and simply select the appropriate line for your actions.
Its further operation depends on how to set up the webcam on an Asus laptop. Therefore, special attention should be paid to this aspect. The person who finds and turns it on will definitely be able to take pictures and record videos. The main thing is to familiarize yourself with the programs that are standard for this device model.

In the age of modern technology, it is no longer something frightening and fascinating for anyone when a loved one or an old friend, located far away, waves, smiles and speaks from the screen of some incomprehensible device. Video communication through specialized computer programs, devices for transmitting video signals and, of course, the presence of a high-speed connection to the global Internet has become an integral part of the lives of people around the world and is an integral part of their daily lives. Particular attention should be paid to how convenient it has become to communicate with friends and business partners from anywhere, because now you can find an Internet connection almost everywhere, and devices such as laptops, tablets and smartphones already have a built-in video camera. Such a camera is usually called a web camera, since it is intended specifically for “web communication” (from the English web - web). Day after day, people spend long hours in such communication, but suddenly a problem arises - the camera on the laptop does not work. Panic. What to do? Without understanding the cause of the malfunction, it is difficult to do something, so the article will reveal the causes of malfunctions and ways to solve them using the example of laptops from popular manufacturers.
Causes of malfunctions in the built-in cameras of laptops
A number of factors and reasons can affect the performance of a laptop's built-in webcam. A malfunction can occur either due to the fault of the manufacturer or due to improper handling of the device by the user. It happens that the laptop does not see the webcam, but now it is very necessary for communication. Here the reasons may be:
- factory defects during production or final inspection of products;
- damage from falling, impact or foreign objects and liquids entering the laptop case;
- software error in drivers, operating system or specialized programs for the camera.
Read more about all types of malfunctions and how to connect the laptop camera back to the device below.

Factory negligence
The production process of built-in webcams for laptops involves a semi-automatic assembly line on a printed circuit board, so not every camera that comes out of the assembly will meet all quality standards. The assembly robot could miss soldering or make it unevenly, shop employees could attach the part incorrectly, etc. For such cases, there is special product quality control, which involves conducting cyclic tests of the performance of devices. However, given the production volumes and very short contractual delivery times, it is possible that controls may be relaxed in favor of compliance with contractual relations. How do you know if the camera on your laptop still doesn’t work due to a factory error? Very simple. If when you bought a laptop the camera worked perfectly and served its warranty period, then the reason is different. Otherwise, you must take the purchased computer device to the manufacturer’s service center and carry out free warranty repairs.

Physical damage by the user
A common reason that the camera on a laptop does not work is physical damage to the device in the event of an “accident” in which it fell, was knocked, was subjected to strong pressure, a change in temperature or high humidity. It is very important to understand that the most ordinary laptops are not suitable for such handling and operation in extreme conditions, so any event from the above can affect the performance of the webcam. She can:
- work incorrectly;
- trigger every other time;
- switch off spontaneously;
- respond to pressing the laptop case near her.
The listed symptoms that appear after these events indicate a malfunction of the camera hardware or the laptop itself. Therefore, in the case when this state of affairs no longer suits the user, it is necessary to take the device to the service center and carry out paid repairs, since the warranty does not apply to damage caused by the user.

Software glitch
The most likely event leading to the camera not working on a laptop is a software failure. Here are some of the most common reasons:
- The laptop cannot see the webcam because it is disabled. This happens when the user involuntarily presses a key combination that turns off the device. You can solve the problem by doing the opposite (usually Fn + F1-F10 - depending on the laptop model).
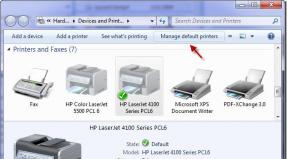
- The driver for the webcam is not installed. This can be checked by going to the section: "Control Panel" / "Administration" / "Device Manager". An unknown device with a yellow question mark will be visible here. This designation indicates that the laptop has a device with an uninstalled driver (perhaps it is a webcam). To install the driver, you will need the driver disk that came with the laptop. You can also go to the computer manufacturer's website and download the necessary driver installation file. Here, in the “Device Manager”, by right-clicking on an already installed camera, you can enable or disable it.
- The utility responsible for turning on the camera does not work on it when the special curtain is opened. In this case, you will need to reinstall the program from the disk or from the manufacturer’s website.
- The camera driver or programs ended up in the antivirus isolated storage as malware due to high activity and suspicious actions. In this case, you will need to create an exception rule in the antivirus program settings, specifying the path to the camera files.
- Damage to operating system files after installing various programs containing malicious code. It’s difficult to say how to connect a camera on a laptop in this case. The situation is complicated by the fact that it is impossible to predict how the damaged system will behave after certain manipulations. You can determine an OS failure by noticing spontaneous reboots, the “blue screen of death”, sluggish operation, constant pop-up error windows and other things that are not inherent in the normal operation of a laptop. This problem is treated by reinstalling the operating system at service centers or the place where the device was purchased.

The camera on an Asus laptop does not want to work
The Asus laptop has always been distinguished by its beautiful design and the latest technologies. The camera doesn't work for him either, for all the reasons listed above. However, it is worth noting that the manufacturer can place a special switch on the device body that closes the electrical circuit for turning on the “eye.” This is what it is - an Asus laptop. Camera does not work? You should check all the reasons and look for the “miracle” switch.

HP laptop camera not working
Next up is an HP laptop. The camera does not work on it in the same cases as with Asus and other manufacturers. You also need to check the entire package of pre-installed proprietary software - maybe some program is malfunctioning.

Lenovo: laptop with a faulty camera
The successor to the American IBM is the Lenovo laptop. The camera does not work on it in all the specified cases or in the presence of special built-in technologies such as a “miracle” switch, touch activation or turning off the camera when the battery is low. Therefore, it is necessary to familiarize yourself with the full functionality of the laptop by reading the User Manual.
Verdict - she died
If it becomes clear that the laptop’s built-in camera has “died,” you can always replace it at a service center or attach a new external one to the screen. External cameras have better video signal transmission quality, but create certain inconveniences due to their bulkiness. How to connect a camera on a laptop? Very simple! You just need to insert the plug into the USB connector of the device and install the drivers.
Before you try to find out how to turn on the camera on your laptop, you need to make sure that it is available.
Most laptop models are equipped with built-in. But its presence is more an option than a design requirement.
If there is no built-in camera, you can always connect it via the USB connector.
If there is a need for a video call, then usually no special steps need to be taken to turn on the webcam.
Just press the video call button on Skype and during the conversation you will be able to see what the camera is transmitting in a small window at the edge of the screen.
The same goes for online services that provide
This is just how the camera works - it does not show signs of life until it is accessed by a program that can work with it.
Ways to use the camera functionality
Many laptops come with a set of programs, including programs for working with the camera.
Typically, these programs can be launched via a shortcut on the desktop, in the Start menu, or via keyboard shortcuts, a keyboard shortcut that instantly launches the program.
The sequence of actions to enable video communication on a Windows 8 or Windows 7 laptop is not fundamentally different.
Let's look at the shortcut keys and programs that serve the camera for some common brands of laptops.
To turn on the device on an ACER laptop, you must press the key combination FN+V.
The standard software package accompanying the new Aser includes the laconic Acer CrystalEye utility, designed for working with the camera. It can be found in the Start menu.

To turn on the video device on an Asus laptop, you will need to use the Fn + V command.
The package of programs and drivers for Asus laptops usually contains three programs related to the operation of the built-in camera: Virtual Camera Utility, Life Frame Utility, ECap Camera.
With their help, you can adjust the parameters of the transmitted image, record a video, and even apply simple effects.

To turn on the device on an HP laptop, hold down the Fn button and look for the button with the camera icon.
If it is not marked, then most likely the combination FN+V works. By default, your HP laptop should have HP Camera or HP MediaSmart installed.

To turn on the video device on a Lenovo laptop, in most cases you need to press Fn+ESC, but there are exceptions.
To manipulate the camera on laptops of this brand, you can use the EasyCapture program.
It is unknown whether it is included in the standard package, but you can download it from the Lenovo technical support website.

If the camera still doesn't work
If you were unable to turn on the device using the above method, you need to find out the following:
- Is the video camera detected by the system?
- Are the necessary drivers installed?
- Is the camera enabled in the current system configuration?
All three questions are answered in the Device Manager utility.

The fastest way to open this program window is:
- click the Start button;
- in the “Search programs and files” field, enter “Device Manager”;
- press Enter.
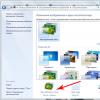
In the window that opens, look for the Image processing devices item and expand it by clicking the triangle at the beginning of the line.
Important! If the list under this item is empty, the camera has not been detected, and you need to look to see if there are any lines in this window marked with an exclamation mark on a yellow background.
If there are exclamation marks, this means that the system has detected a device for which there is no suitable driver.
Go to the “Searching and installing a driver” section.

If the list contains a line with a set of letters, numbers and words, then the camera is detected by the system and drivers are available.
If at the beginning of the line there is an icon in the form of a white circle with a black arrow pointing down, then the use of the camera is disabled.
To enable the use of the camera, right-click on the stock and select “Enable” from the context menu. The device should work.
We check again using special programs or.
Finding and installing a driver
Typically, in such cases, technology serves as an “intermediary” between the service and the camera.

In order for her to gain access to control the camera, she needs formal confirmation from the owner of the computer.
You will be prompted for confirmation when you try to use the webcam, such as joining a video chat.
At the same time, a small window appears with the name “Adob Flash Player Settings”. Click the “Allow” button and enjoy the fruits of technological progress.
How to turn on the camera on a laptop
Simple and clear instructions on the topic - how to turn on the camera on a laptop
The presence of a built-in webcam is one of the significant advantages of laptops over desktop computers. You do not need to buy a separate camera in order to communicate with relatives, friends or acquaintances. However, such communication will not be possible if your laptop does not have drivers for the device mentioned above. Today we will tell you in detail how to install webcam software on any ASUS laptop.
Looking ahead a little, I would like to note that not all ASUS laptop webcams require driver installation. The fact is that some devices have cameras in the format "USB video class" or "UVC". As a rule, the name of such devices contains the indicated abbreviation, so you can easily identify such equipment in "Device Manager".
Necessary information before installing the software
Before you start searching and installing the software, you will need to find out the identifier value for your video card. To do this you need to do the following.

In addition, you will definitely need to know the model of your laptop. As a rule, this information is indicated on the laptop itself on the front and back sides. But if your stickers have worn off, here's what you can do.

Now let's get down to the methods themselves.
Method 1: Official website of the laptop manufacturer
Once you have a window open with the webcam ID values and you know the laptop model, you need to do the following steps.
- Let's go to the official one.
- At the top of the page that opens, you will find the search field shown in the screenshot below. In this field you must enter the model of your ASUS laptop. Don’t forget to press the button after entering the model "Enter" on keyboard.
- As a result, a page with search results for your request will open. You need to select your laptop from the list and click on the link in the form of its name.
- By clicking on the link, you will be taken to a page with a description of your product. At this stage you need to open the section .
- The next step is to select the operating system installed on your laptop and its bitness. This can be done in the corresponding drop-down menu on the page that opens.
- As a result, you will see a list of all drivers, which are divided into groups for convenience. We are looking for a section in the list "Camera" and open it. As a result, you will see a list of all software available for your laptop. Please note that the description of each driver contains a list of webcam IDs that are supported by the selected software. This is where you need the identifier value that you learned at the beginning of the article. You just need to find the driver whose description includes your device ID. When such software is found, click the line "Global" at the very bottom of the driver window.
- After this, you will start downloading the archive with the files that are necessary for installation. After downloading, extract the contents of the archive into a separate folder. In it we look for a file called "PNPINST" and launch it.
- You will see a window on the screen in which you need to confirm the launch of the installation program. Click "Yes".
- The entire further process will take place almost automatically. You will only need to follow further simple instructions. At the end of the process, you will see a message indicating successful installation of the software. Now you can fully use your webcam. This will complete this method.


Method 2: ASUS Special Program
To use this method, we need the ASUS Live Update utility. You can download it on the page with driver groups, which we mentioned in the first method.

Method 3: General solutions for updating software
To install ASUS laptop webcam drivers, you can also use any program that specializes in automatically searching and installing software, like ASUS Live Update. The only difference is that such products are suitable for absolutely any laptop and computer, and not just for ASUS brand devices. You can get acquainted with the list of the best utilities of this kind by reading our special lesson.
Of all the representatives of such programs, it is worth highlighting Driver Genius And DriverPack Solution. These utilities have a significantly larger base of drivers and supported hardware compared to other similar software. If you decide to opt for these programs, then our educational article may be useful to you.
Method 4: Hardware ID
At the beginning of our lesson, we told you how to find out the ID of your webcam. You will need this information when using this method. All you need to do is enter your device ID on one of the special sites, which will find the corresponding software using this identifier. Please note that it will not be possible to detect drivers for UVC cameras this way. Online services will simply write to you that the software you need was not found. We described in more detail the entire process of searching and loading a driver using this method in a separate lesson.
Method 5: Device Manager
This method is mainly suitable for UVC webcams, which we mentioned at the beginning of the article. If you encounter problems with such devices, you need to do the following.

Laptop webcams are among those devices with which problems arise relatively rarely. However, if you are faced with a malfunction of such equipment, this article will definitely help you solve it. If the problem cannot be fixed using the described methods, be sure to write in the comments. Let's look at the current situation together and try to find a way out.
Read also...